Roasted Artichoke Salad (the easy way)

During our time in California, artichokes were a family favorite. We usually got them at roadside stands on Highway 1. Our favorite was an old man named Dutch who sold them out of the back of his station wagon. We’d bring them home and steam them whole with lemon and garlic. We all became expert at eating them leaf by leaf scraping the tender flesh with our teeth until we reached the heart. That best part, was relished last. Here is a link to another Artichoke post that features pictures, memories, and a tasty soup recipe.

https://mamadskitchen.net/2014/03/14/memories-of-highway-one-and-artichokes/ 

Artichokes are available here most of the year and we often get them. The problem is that they have to travel from California and sometimes arrive past their prime. Still we try to enjoy a perfectly steamed edible thistle whenever we can.

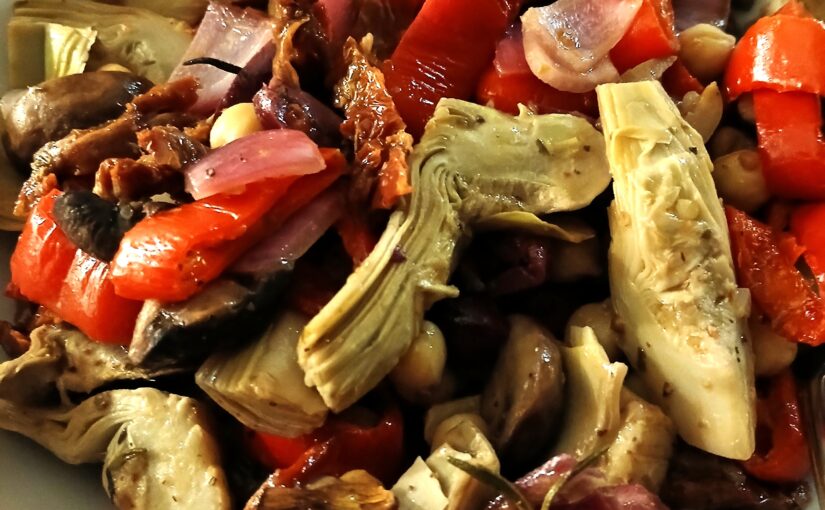
There are other ways to experience artichokes. They have come in cans and jars forever. These are convenient and versatile, but they lack the texture and frankly, some of the flavor of fresh. Then there are frozen artichoke hearts. They retain more taste and texture than their canned cousins. Unfortunately, they are not always available. For years, I relied on Trader Joe’s, but haven’t found them there recently. To my surprise, I have found them at Walmart (of all places). They are sold in 12 ounce bags for under $3.00 at certain stores. They are firm, large, and tasty, and they are the cornerstone for today’s recipe.

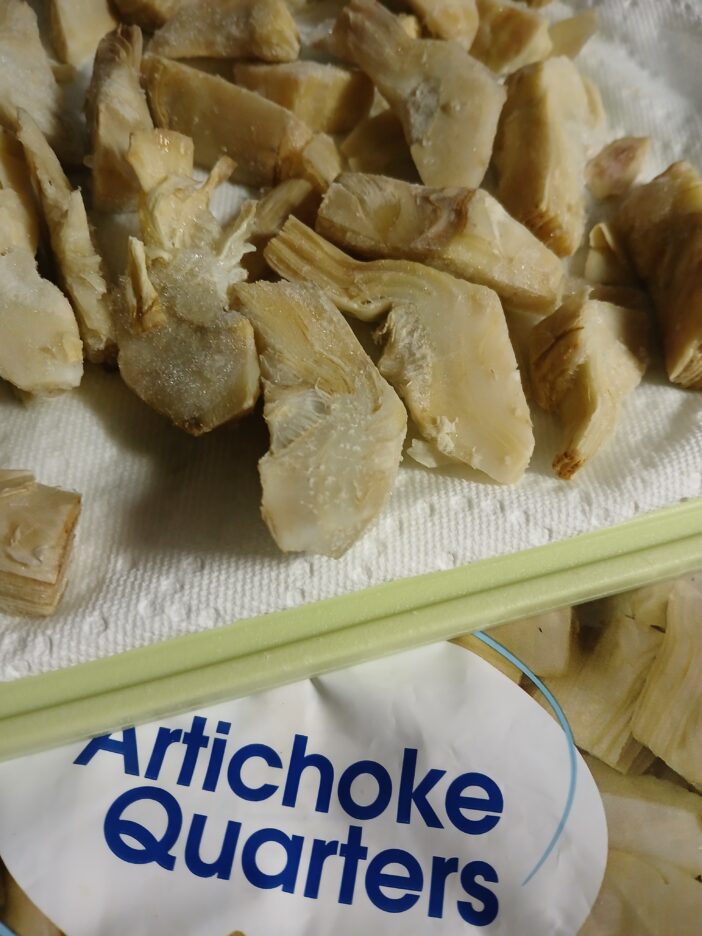
I think that this qualifies to be called a salad as it is filled with vegetables and is tossed with a dressing. While many salads are served cold, this one can be served warm or at room temperature as well as chilled, but I think that the flavors are best warm. It is a wonderful accompaniment to grilled proteins and could be a nice addition to a potluck table.  Another benefit with this salad is that it can be a meatless main dish thanks to the chickpeas (use the whole can if you are going meatless) and if you want a little more protein, add some crumbled feta cheese.

I used the little bell peppers (Lollipeppers are my current favorite) that can be found in every grocery store along with some crimini mushrooms and red onion. 
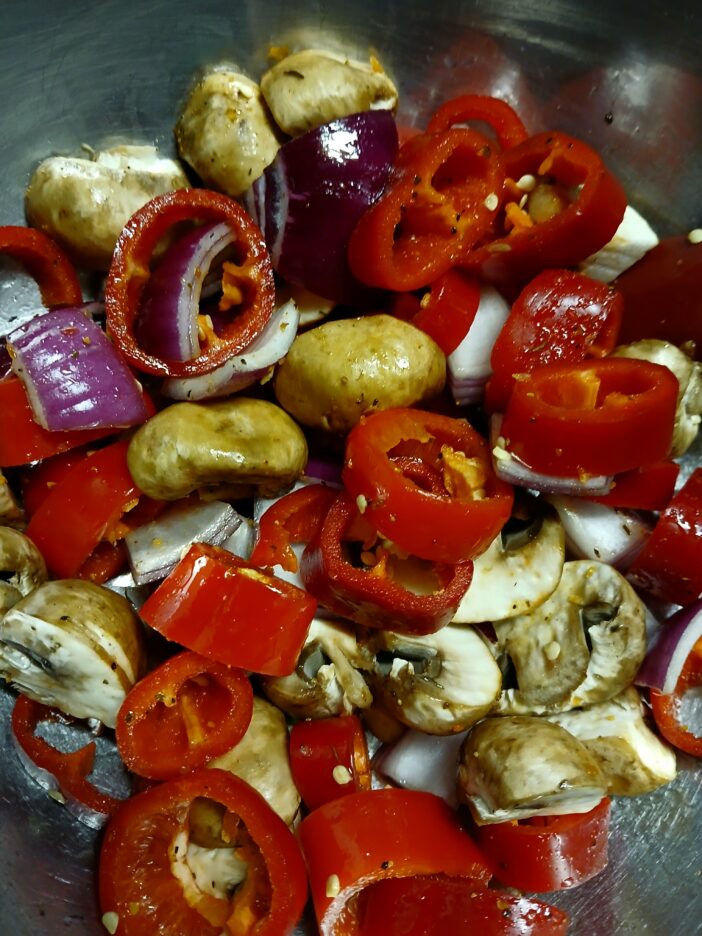
These along with the artichoke hearts were seasoned with salt and pepper and tossed with a little olive oil. Within 20 minutes in the oven they were lightly caramelized and tender.

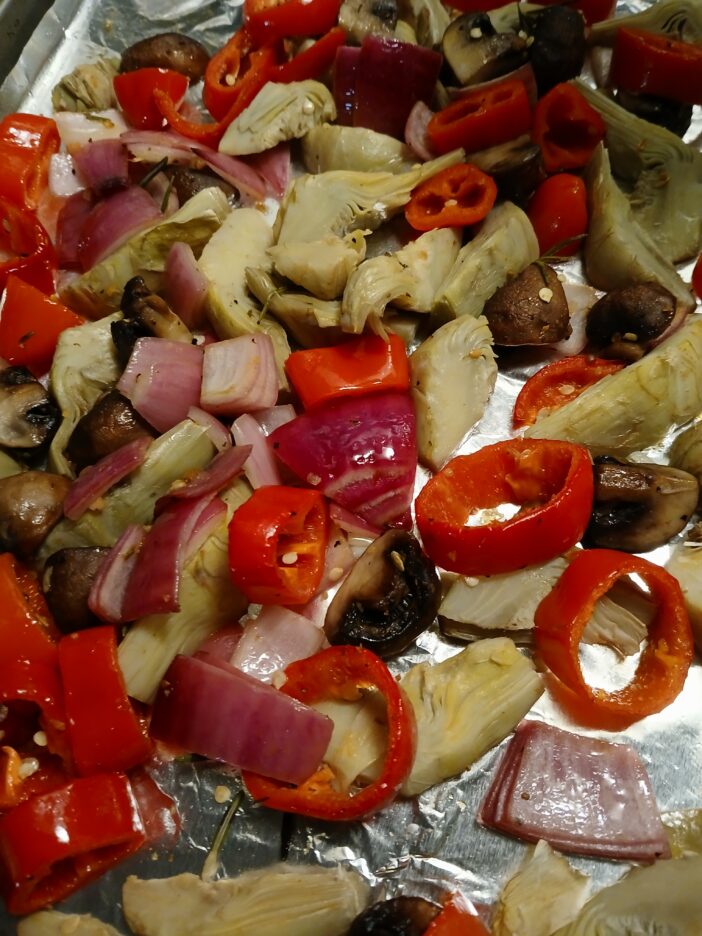
As I said, this is salad done the easy way so, canned chickpeas, sun dried tomatoes, and olives joined the mix. If you have a Mediterranean olive blend available use that, but kalamata or even green or black olives would work.

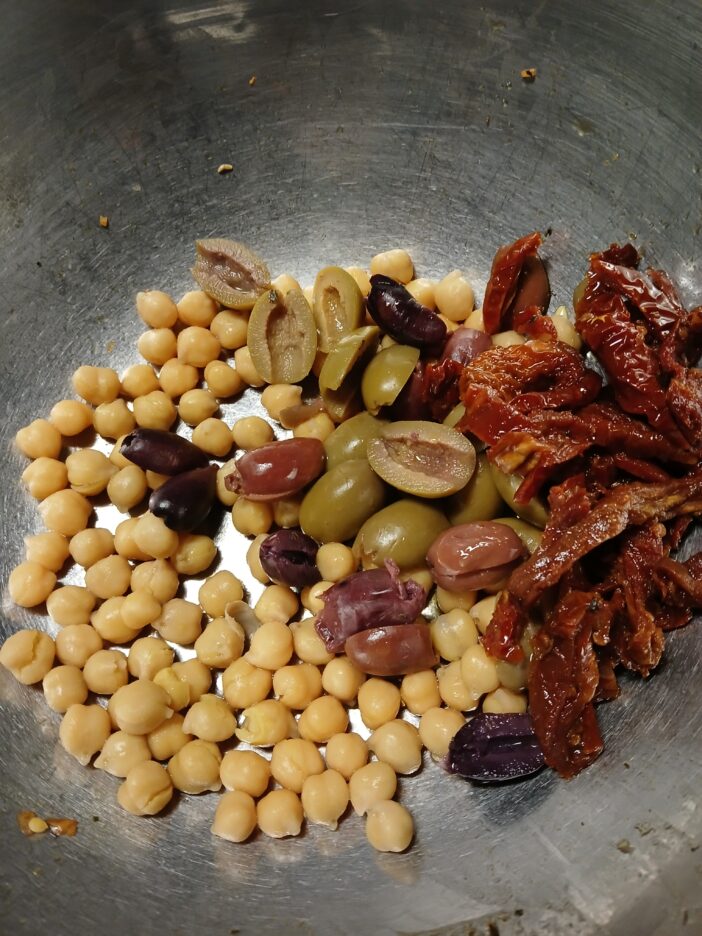
When it comes to a dressing, use your favorite vinaigrette recipe or make it easy on yourself and use a bottled dressing that you love. I used a Mediterranean Dressing and Marinade from Aldi. 
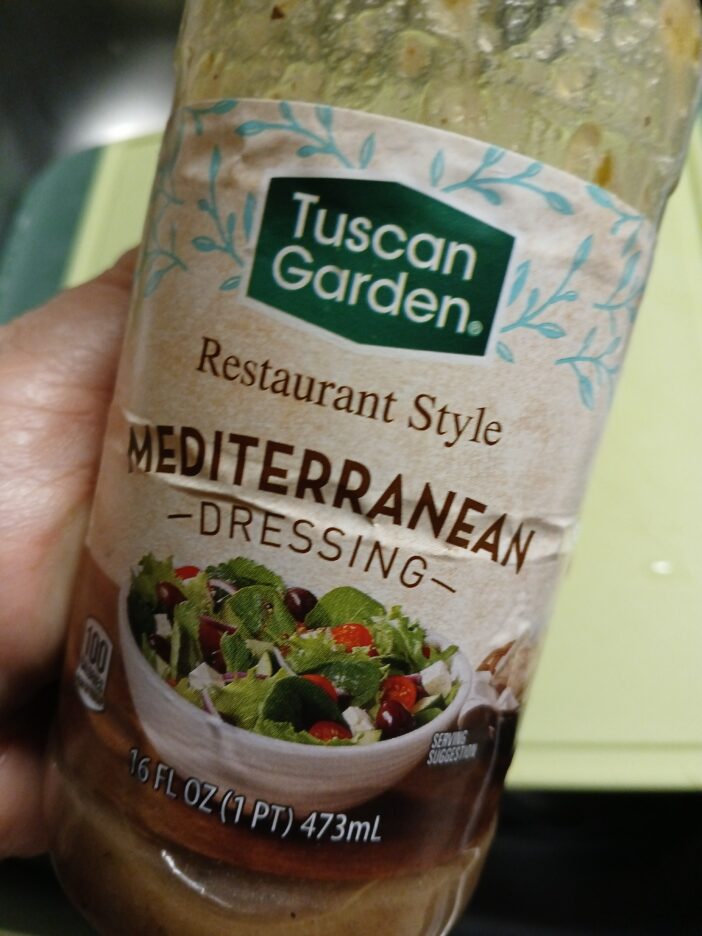
I think it has a nice balance of flavor and have used it as a dressing as well as a marinade in various dishes.

All that is left to do is toss the roasted vegetables with the canned/jarred additions. To assure that the vegetables really absorb the dressing, add it while the roasted vegetables are warm. Then serve it, let it stand until dinner is ready, or chill it. This does get more flavorful with time so it can be made ahead and I think it tastes even better the second day

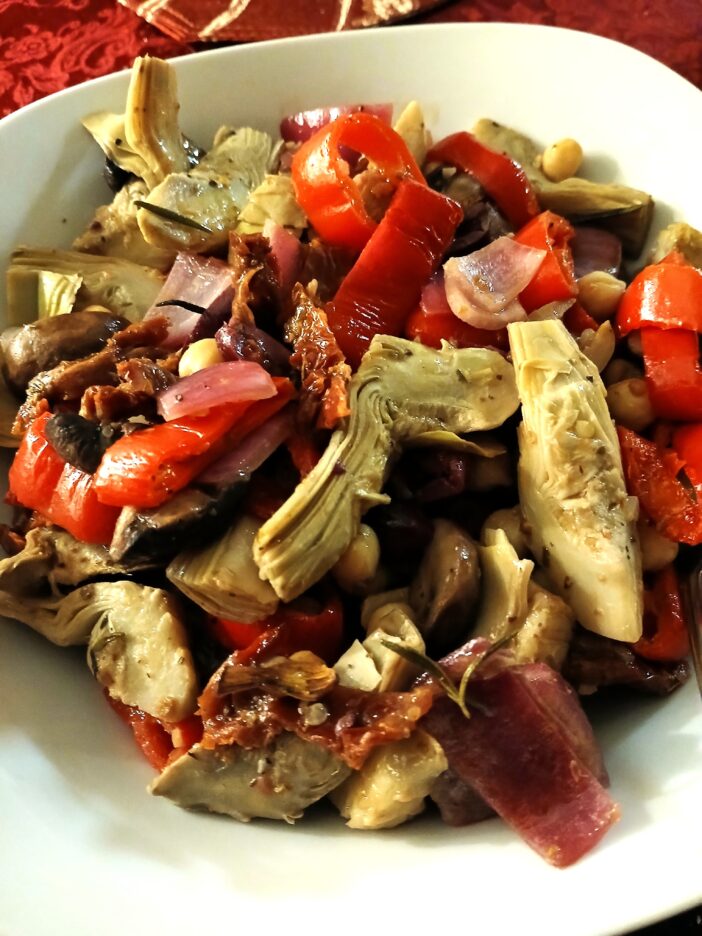
Here is the recipe as I have been making it and as always you are welcome to play with it however you choose.

Roasted Artichoke Salad

Hearty and healthy, the perfect salad to accompany grilled proteins.

Course: Salad
Cuisine: Mediterranean
Servings: 6
Author: binner216@comcast.net
Ingredients
  • 1 Pkg. Frozen Artichoke Hearts 12 oz. package
  • 1 Cup Baby Red Bell Pepper Rings About 4-6 peppers, sliced
  • 4-6 Ounces Crimini Mushrooms Halved or quartered
  • 1 Cup Chopped Red Onion Cut in about 1 inch pieces
  • 1 Tbsp. Olive Oil
  • 1/2 Cup Sun Dried Tomatoes Oil packed, drained
  • 1/3 Cup Kalamata or Mediterranean Olives Halved
  • 1 Cup Chickpeas Drained and rinsed
  • !/2 Cup Mediterranean Salad Dressing (more as needed) Store bought or homemade
  • Salt and Pepper To taste
  • 1/2 Cup Feta Cheese, crumbled Optional for garnish.
Instructions
  1. Preheat oven to 375 degrees. Line a large baking sheet with foil for easy cleanup and lightly coat with cooking spray. Combine the artichokes (no need to thaw), peppers, mushrooms, and onion in a large bowl. Add the oil to the bowl. Season lightly with salt and pepper and toss to coat. Spread out on the prepared baking sheet. Reserve the bowl and do not wipe it out.

  2. Roast in oven for 20 minutes or until everything is slightly caramelized and tender.

  3. While the veggies roast, Combine the chickpeas, sun-dried tomatoes, and olives in the bowl.

  4. When the vegetables are roasted, add them (and any pan drippings) to the bowl and gently toss to mix. Add the dressing and toss to coat evenly. If needed add more dressing to make it the consistency and flavor that you want.

  5. Transfer to a serving bowl and add some crumbled Feta Cheese if you desire. Serve warm, chilled, or at room temperature.

Have fun making this recipe to your own liking and I hope you enjoy these edible thistles as much as I do.

A Monday Kind of Pasta Frittata

As Summer finally (maybe) comes to an end, leaving a checkerboard path of meatless meals in its wake, I am again moving into “Meatless Mondays.” I am also once again cleaning out the refrigerator, putting ingredients to use before they are useless. That being said this recipe would be wonderful even if it was planned in advance.

I have just returned from a wonderful visit with California friends. While I was living it up in a penthouse suite overlooking the Chicago River and Lake Michigan, 
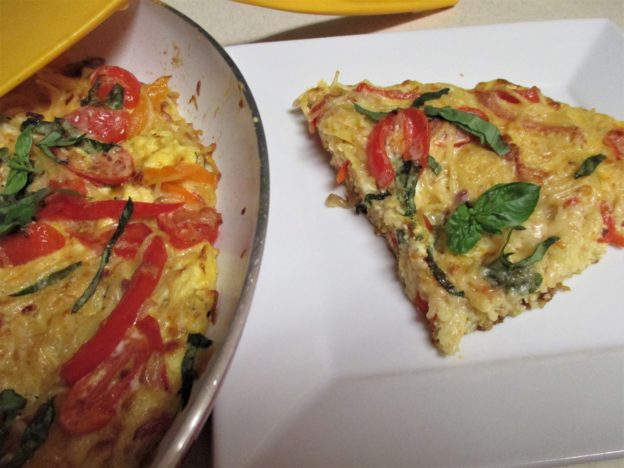
Papa D was left to his own devices as far as meals were concerned. One evening he cooked a pound of pasta to go with the container of Sunday Gravy that I had left in the refrigerator. Wisely, he decided to save some of the pasta  to scramble with eggs (his idea).

Liking the idea when I got home, I ran with it. There were a few other leftovers that needed rescuing. Peppers, tomatoes and some cheese all were nearing the end of the road so they gathered together to become a pasta frittata.This dish, and the use of pasta, is popular in many areas of Italy. It can be labeled Neapolitan or Sicilian and is probably claimed by many other regions, but it always seems to use leftover pasta as its base. Techniques can vary, but I like cooking the vegetables first.
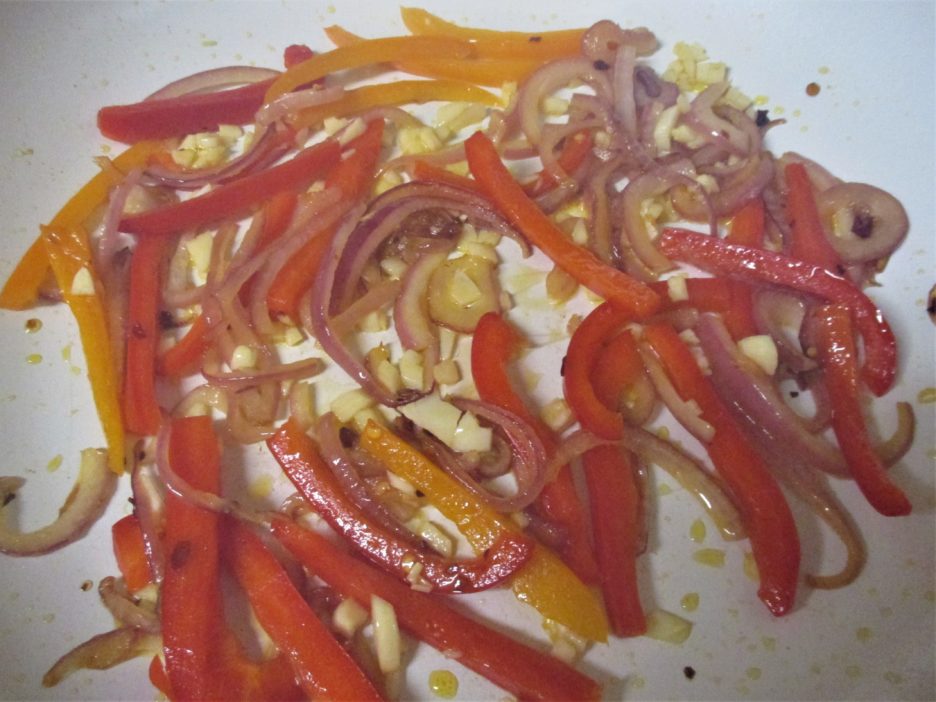
and adding the pasta second. 
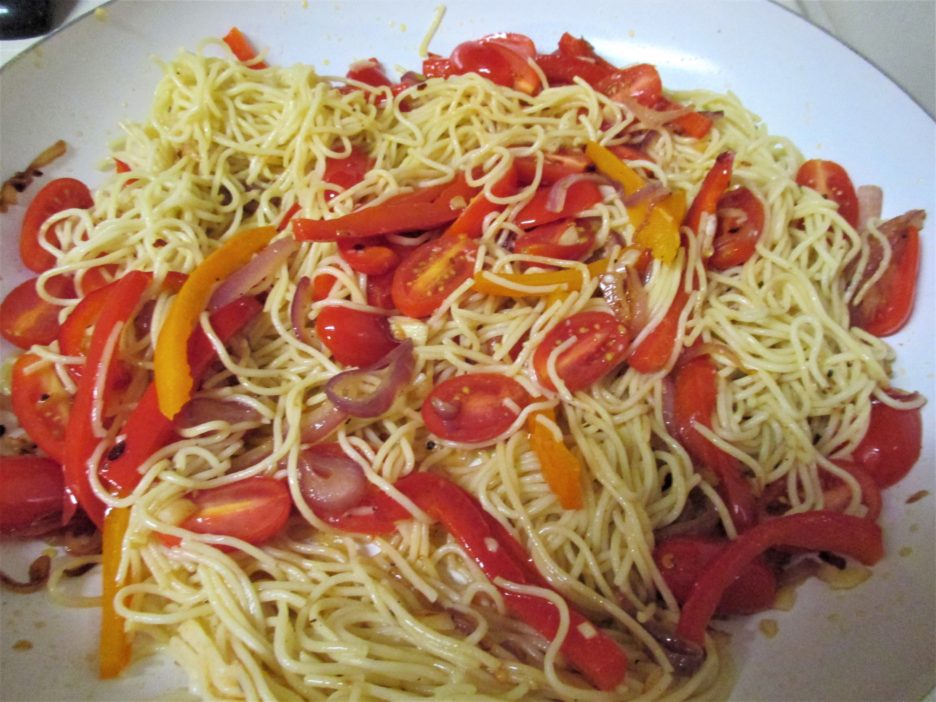
Olive oil is a driving force in this process as is initial high heat. Once the eggs are added along with some cheese, things need to get low and slow. This is a dense dish that takes time to set. This also allows time to enjoy the fragrance that the garlic and other vegetables create.When the frittata is almost set, it gets crowned with a little more cheese (a hard grating cheese is best. Asiago, Romano or Parmesan are good choices) and heads for the broiler. Lightly golden and ever so slightly crusty it is ready for its close up. A sprinkling of basil or any other available herb gives it a little more color.
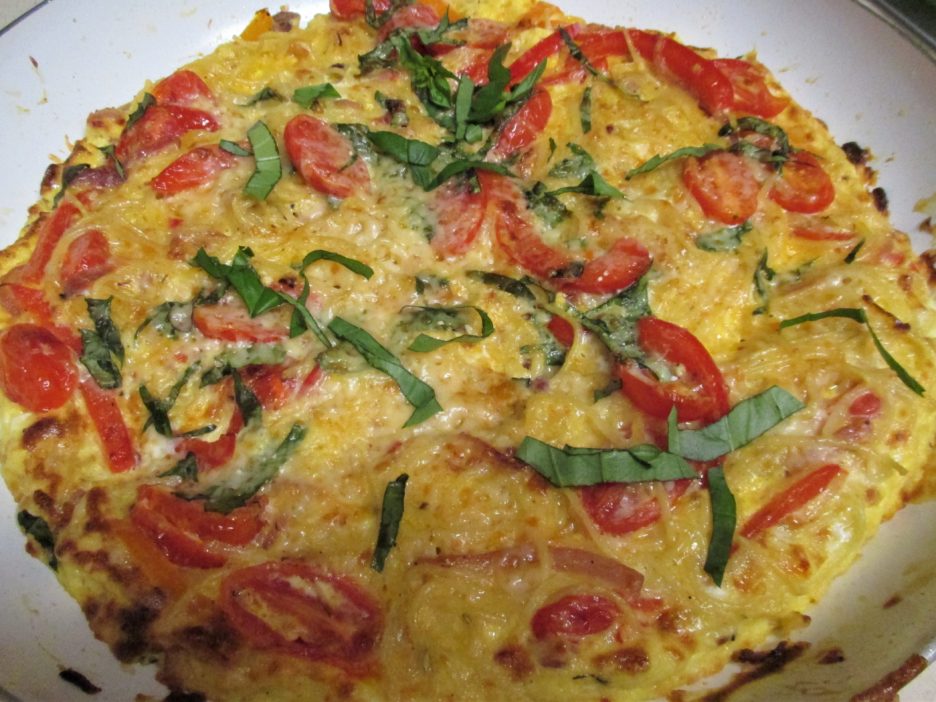
This makes a lovely weeknight supper, but it is just as at home for a weekend brunch. The format is easy and lends itself to whatever embellishment you want to add. This served two lavishly and could easily serve more with a salad and some crusty bread added.  

Pasta Frittata
Servings: 2
Ingredients
  • 1 Tbsp. Olive Oil
  • 3/4 Cup Thinly sliced Onions
  • 3/4 Cup Thinly sliced Sweet Peppers
  • 2 cloves Garlic Chopped
  • 1 Cup Grape Tomatoes Halved
  • 2 Cups Cooked Pasta
  • 4 Eggs Beaten
  • 2 Tbsp. Milk
  • 1 Tsp. Italian Hebs
  • 1/2 Cup Grated Italian Cheese Divided
  • 1/4 Cup Thinly sliced Basil
Instructions
  1. Heat the olive oil over medium high heat in an oven proof skillet. Add the onions and peppers and cook stirring occasionally until softened and beginning to brown. 5-7 minutes.

  2. Add the garlic and tomatoes to the pan and cook another 3 - 4 minutes. The garlic should be fragrant and the tomatoes should begin to soften.

  3. Add the pasta and toss to combine the ingredients. Continue to cook, tossing occasionally until the pasta begins to take on some color, another  5 minutes or so.

  4. Heat the oven to broil. Beat the eggs, milk and half of the cheese together until well blended. Stir in the Italian herbs. Carefully pour the egg mixture into the pan so that it is even.

  5. Lower the heat to medium and cook lifting the edges of the egg to allow the mixture to cook through. Once the eggs are almost set, sprinkle with the remaining cheese and transfer to the oven.

  6. Broil until the top is golden and the cheese has melted. Remove from the oven and allow to rest for 5 minutes. Sprinkle with the basil and serve.

I don’t want to cut anyone’s weekend short, but Monday is just around the corner. If you make pasta over the weekend, make a little extra…a frittata might be just the way to begin the “Meatless Monday” tradition.


Bring on Fall…Spinach Alfredo Casserole

There are signs of Fall all around us. The trees (those that can) are beginning to show their autumn paletes of red and gold. The vibrant petunias and impatiens of Summer are being replaced by more subtly colored and hardier mums. Squirrels are hunting and burying with gusto. Kitchens are beginning to fire up the ovens as often as firing up the grill.

In case you haven’t guessed, I love Fall. It is my favorite time of year. Those of you who only know it is Fall by the month on the calendar or the inexplicable appearance of pumpkin spice everything, are missing quite an experience. Whatever the weather is where you are, it is time to think about making those comfort filled one dish wonders, casseroles.

Here is one to get your autumnal juices flowing. This starts quite simply with penne pasta as a base, but any cut pasta would do. Baby spinach and crimini mushrooms team up with onion and garlic to give some plant presence to the dish.

The sauce is Alfredo. You can make this sauce, and it is really quite easy, or you could buy pre-made sauce which is even easier. I am not a proponent of prepared foods in general, but once in a while it doesn’t compromise my integrity too much to reach for a jar or carton. Find one with an ingredient list that has things you can easily identify and not too many non-food additives. They are out there.

The vegetables were sautéed in a little olive oil, taking turns based on cooking time. Once everything was as it should be, the sauce was added. 
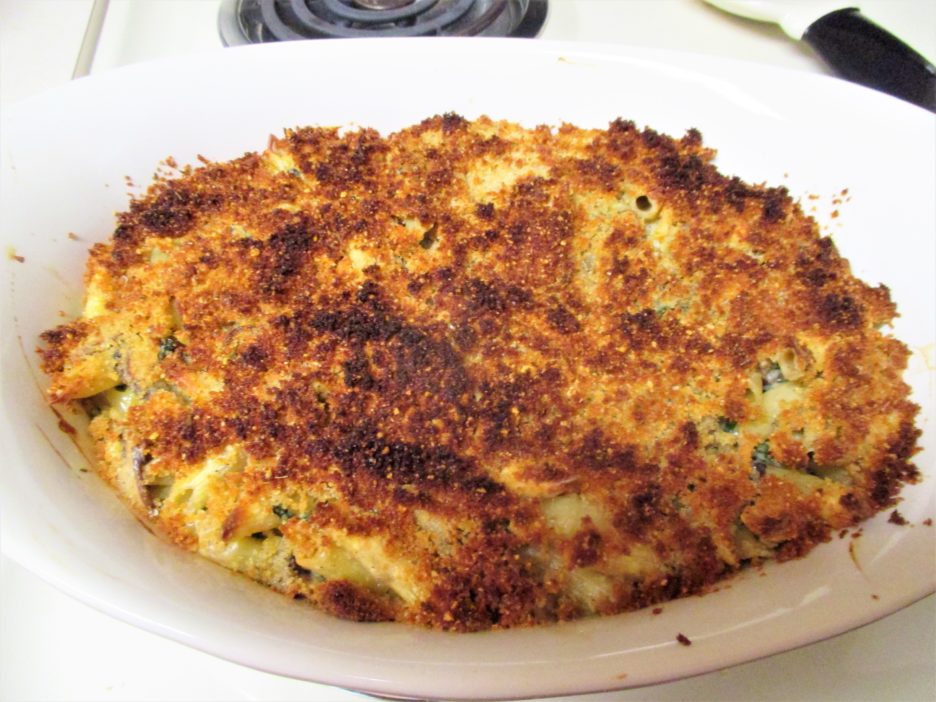
Once it was at a bubble some asiago cheese went in. Th penne was added and everything went into a good-sized casserole.

I gave it a blanket of cheesy breadcrumbs and let it bake until it displayed all of the requisite casserole characteristics; bubbly edges and golden brown crust. It was delicious, it made the house smell wonderful, and it was the perfect comfort food for the first chilly night of the season.

Spinach Alfredo Casserole


Servings: 4
Ingredients
  • 8 Ounces Penne Pasta Any cut pasta will work
  • 1 Tbsp. Olive Oil
  • 1 Mediium Onion Chopped
  • 8 Ounces Crimini Mushrooms sliced
  • 4 Cloves Garlic Chopped
  • 6 Ounces Baby Spinach Chopped
  • 1-1/2 Cups Alfredo Sauce Home made or prepeared
  • 1/3 Cup Milk More or less as needed
  • Salt and Pepper To Taste
  • 4 Ounces Grated Asiago Cheese
  • 3/4 Cup Bread Crumbs
  • 1 Tbsp. Parmesan Cheese
  • 1 Tbsp. Butter
Instructions
  1. Cook the pasta in boiling salted water 2 minutes less than the box directs. Drain and put in a 2 quart casserole dish that has been generously sprayed with olive oil cooking spray. Prepare the sauce while the past cooks

  2. Heat a large skillet over medium high heat. Add the olive oil swirling to coat the bottom of the skillet. Add the onions and cook for 5 minutes, stirring occasionally.

  3. Add the mushrooms and garlic to the skillet and cook another 5 minutes or so, stirring occasionally.

  4. Add the spinach and toss well to combine. Cook 3 - 4 minutes until the spinach begins to wilt. Stir in the Alfredo sauce and continue to cook until it comes to a bubble, stirring often. If the sauce seems thick, add the milk a little at a time until you have a medium thick sauce.

  5. Turn the heat to low and add the Asiago cheese. Stir until it is completely melted. Taste and add salt and pepper as you need. Pour the sauce over the pasta and stir to completely combine.

  6. Melt the butter and stir in the bread crumbs and Parmesan cheese . Toss until the crumbs are well coated. Sprinkle on the top of the casserole.

  7. Bake at 350 degrees for 20 - 25 minutes. The crumbs should be brown and the sauce should be bubbly. Allow to rest a few minutes before serving.

Fall likes to take its time around here. Right now it feels far more summer like. We all know that this is only a fleeting event and soon the weather will demand something from the oven. This casserole is a good place to start.

Pantry Raid! Tortellini and Chick Pea Salad

They say that knowledge is power. This applies to many things that help one live a full life. The phrase can also apply to the more mundane matters of life like making dinner. Having recently learned a great deal about what is in the pantry, Mama D has used this knowledge to create some pretty interesting things (and a few mundane things as well). Since “Meatless Monday” is on the horizon, I thought I’d share a recent solution to the question: “What can I make for dinner without having to run to the store?”

Tortellini salad sounded good. Having discovered that I had one of those little bags of dry cheese tortellini in the pantry, and knowing that they really only work in soup or a salad, the choice was easy. It honestly could have gone either way, but another “Midwestern Warm Spell” made the salad idea more appealing.

Further investigation of the larder revealed several cans of chick peas, the refrigerator yielded some zucchini and grape tomatoes, and the freezer revealed several bags of pesto (remnants of a distant summer). Not bad for starters, I thought. The zucchini was roasted, the tortellini cooked al dente, and the pesto was blended with some buttermilk to create a light and creamy dressing. Now what?
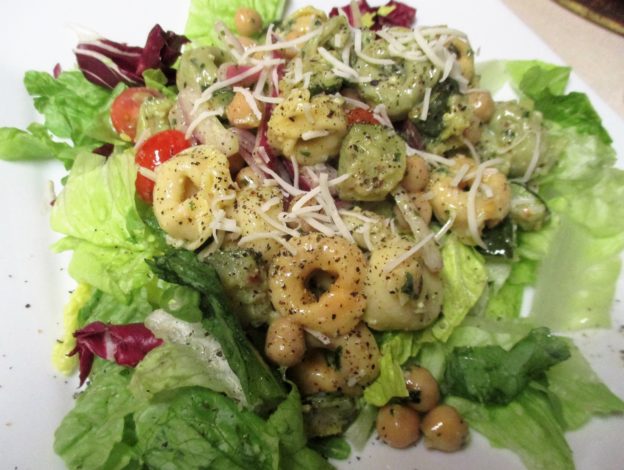
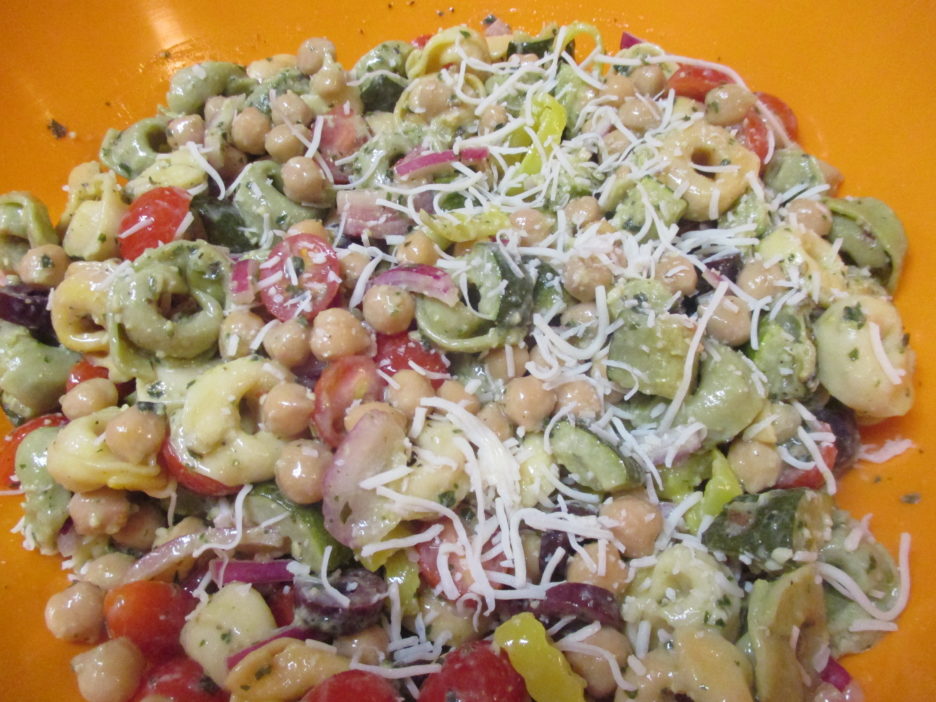
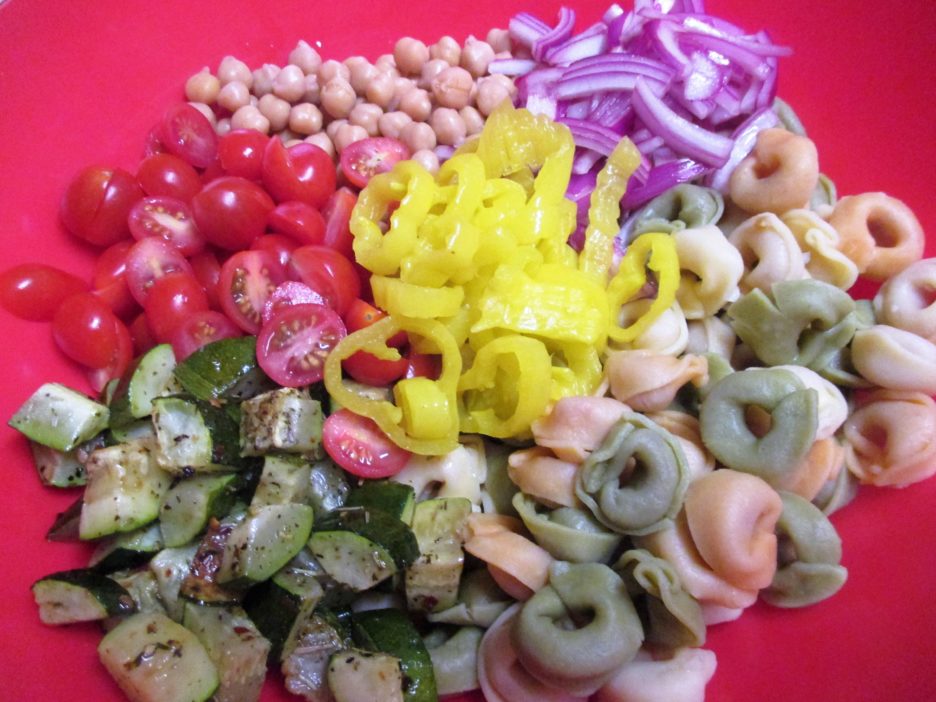
Nothing like some sliced red onion and sweet pepper rings to add some crunch and color. The pepper rings were discovered in the back of the bottom shelf of the refrigerator. I do not remember why I got them in the first place, but it had to be for something because the jar was half empty; or was it half full?  It seems that no part of Mama D’s Kitchen is immune from hoarding or philosophical musings.

The Buttermilk Pesto Dressing was perfect. The tangy low-fat dairy gave the rich pesto a healthy balance. Two more refrigerator discoveries; some Romano Cheese (a staple actually) and Kalamata Olives (original purpose unknown) rounded out the bowl. As this salad was kind of thrown together from what was on hand, it can be adapted to anyone’s pantry and I would recommend adapting it to your own needs.


Tortellini and Chick Pea Salad
Course: Main Course, Salad
Ingredients
  • 8 Ounces Dry Tortellini
  • 1 Can Chick Peas Drained and rinsed
  • 2 Small Zucchini
  • 1/2 Medium Red Onion
  • 1-1/2 Cups Grape tomatoes Halved
  • 1/4 Cup Pickled Pepper Rings Any kind
  • 1/4 Cup Kalamata Olives Quartered
  • 1 Bag Italian Lettuce Blend
  • 2 Tblsp. Grated Romano
  • Cracked Black Pepper To taste. Optional
Creamy Pesto Dressing
  • 1/3 Cup Basil Pesto
  • 1/3 Cup Buttermilk
  • 1 Tblsp. White Balsamic Vinegar
  • 1 Tblsp. Olive oil
Instructions
  1. Cook the Tortellini according to the package directions. Drain well, rinse and drain well again. Place in a large bowl.

  2. Quarter the zucchini lengthwise and chop into 1 inch pieces. Spread out on a baking sheet and spray with non-stick cooking spray. sprinkle with Italian herb blend. Roast at 375 degrees for 15 minutes turning once to brown both sides. Add to the bowl .

  3. Slice the red onion into thin vertical slices. Toss with a little vinegar and set aside for 15 minutes. Blooming makes raw onion less strong tasting. Drain the onion and add to the bowl.

  4. Add the chick peas, olives, tomatoes, and pepper rings to the bowl and toss to combine everything.

  5. Shake the Pesto Dressing ingredients in a jar with a tight fitting lid. Pour about half of the dressing over the salad and toss to coat well. Cover the bowl and chill for several hours.

  6. About 30 minutes before serving remove the bowl from the refrigerator and add the remaining dressing. Toss again.

  7. To serve: Place a couple of handfuls of the lettuce blend on each of the plates. Top with the tortellini salad and sprinkle with the Romano. A generous sprinkle of black pepper is a nice finishing touch.

Like a perfect storm, this salad will never happen in quite the same way again. The next version will most likely be different no matter whose kitchen it comes from. 

Soup Season Has Arrived: Chipotle Cheddar Cheese Soup

It’s soup season. The calendar tells me so, but here in the Midwest we have had a very mild January…in fact it is almost one for the record books. There has been virtually no snow and the temperature has flirted with the 60’s. Still, it is soup season so soup is making many appearances in Mama D’s Kitchen.

Armed with plenty of homemade stock in the freezer I am embarking on serious soup adventures. My first stop was revisiting a pure comfort soup, Broccoli Cheddar Cheese, to be exact. What could elevate this creamy classic? Enter a block of Chipotle Cheddar Cheese. This is a white cheddar studded with bits of chipotle pepper. It is available in a few markets and while bringing a bit of heat is still a sharp cheddar that will please most tastes.

I started with onions, carrots and garlic softened in a little olive oil. My stock of choice was vegetable as “Meatless Monday” was looming. I simmered these together for half an hour or so before transforming it into creamy cheesy goodness. There was going to be a lot of cheddar cheese going into this so I dialed down the dairy fat by using a combination of evaporated skim milk and low-fat buttermilk. A flour and stock slurry insured pleasant thickness and some Worcestershire Sauce and Chipotle Tabasco Sauce added some zip. I added a little Chipotle Chile Powder. Depending on how hot you want to go, this could go as high as your palate can bear.

I blanched the broccoli to help keep its vivid green color and added a cup of frozen corn to keep things interesting.

This is actually a very quick soup to make. It would also lend itself to many variations. The addition of buttermilk was an experiment that succeeded. It added creaminess as well as a little zing to the flavor. If you can’t find chipotle cheddar use any sharp cheddar cheese.

Chipotle Cheddar Soup with Broccoli and Corn
Print Recipe
Servings
4
Servings
4
Chipotle Cheddar Soup with Broccoli and Corn
Print Recipe
Servings
4
Servings
4
Ingredients
Servings:
Instructions
  1. Heat the olive oil in a large soup pot. Add the onions, carrots, and garlic. Cook for 5 minutes or until the veggies are beginning to brown.
  2. Add 1/4 cup broth to the pot and stir scraping up any brown bits. Cook for a minute or so to reduce slightly.
  3. Add 3-1/2 cups of stock, the allspice, and chipotle powder to the pot and bring to a boil. Reduce heat to a simmer, cover and cook for 10 - 15 minutes.
  4. While the stock simmers, blanch the broccoli. Dump the broccoli into a pot of salted boiling water and cook for 2 minutes. Immediately remove the broccoli and submerge in a bowl of ice water. Drain well and set aside.
  5. Once the stock mixture starts smelling wonderful, add the evaporated milk and the buttermilk. Shake together the remaining 1/4 cup of stock and the flour. Slowly pour it into the soup stirring constantly. Continue to stir until it thickens.
  6. Add the broccoli, corn, Worcestershire Sauce and Chipotle Tabasco. Cook for several minutes.
  7. Over low heat, stir in the cheese, continuing to stir until it is melted. Give it a taste and adjust any seasoning. Serve.
Share this Recipe
Powered byWP Ultimate Recipe

The soup pot sits at the ready for its next great adventure…I wonder where we will wind up?