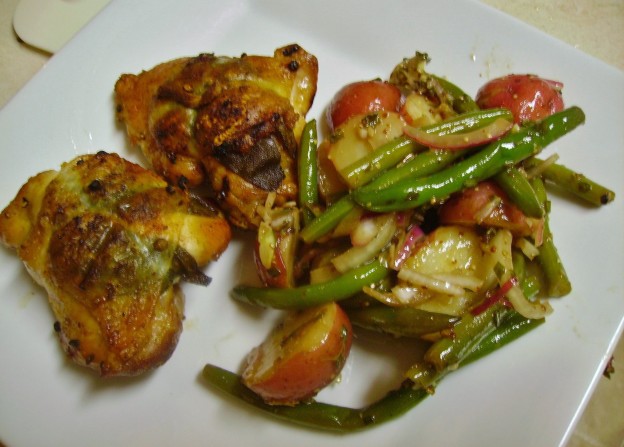
Smokey Grilled Chicken Thighs with Sage

Smokey Sage Grilled Chicken Thighs
Print Recipe
These little bundles of goodness make a wonderful dinner.
Servings
3
Servings
3
Smokey Sage Grilled Chicken Thighs
Print Recipe
These little bundles of goodness make a wonderful dinner.
Servings
3
Servings
3
Ingredients
Servings:
Instructions
  1. Mix the garlic, herb blend, and olive oil together in a small bowl. Allow to sit for an hour or so before assembling the chicken thighs. This allows the herbs to soak up the olive oil and become almost a paste.
  2. Trim the chicken thighs of extra fat and skin. They should have a nice little cap of skin when you're finished.
  3. Carefully loosen the skin and gently pull it aside. Leave one edge of skin connected to the meat.
  4. Divide the garlic herb paste evenly between the thighs. Spread it ever so gently on the flesh of the thighs.
  5. Place two sage leaves on each f the thighs and carefully pull the skin back in place.
  6. Use kitchen twine to tie up the thighs. I did this like ribbon on a package; crossing the twine on top and knotting it on the bottom.
  7. Sprinkle both sides with salt and pepper and place skin side up on a medium hot grill. Allow to cook 7 -9 minutes with the lid down until the bottom is nicely browned.
  8. Carefully turn the thighs skin side down. Close the lid and allow to cook for 5 minutes or so. Check the thighs at this point. Lifting the lid should cause a little fire. Blow it out and re-cover the grill. You've just set up your smoker.
  9. Let the chicken continue to cook/smoke for another 5 minutes or until they are cooked through (internal temperature should be 165 degrees).
  10. Remove from the grill and let rest for 5 minutes. Cut the strings and plate the chicken.
Share this Recipe
Powered byWP Ultimate Recipe

Italian Three Bean Salad

Italian Three Bean Salad
Print Recipe
Servings
4
Servings
4
Italian Three Bean Salad
Print Recipe
Servings
4
Servings
4
Ingredients
Servings:
Instructions
  1. Cook the green beans in salted boiling water for about 2 minutes. You want them quite crisp, but with a tender heart.
  2. Drain the beans and cool quickly in a bowl of ice water. Drain well again and place in a large bowl.
  3. Add the cannellini and garbanzo beans to the bowl. Let the peppers and onions join in the fun, too. Toss everything together.
  4. Combine the olive oil, vinegar, lemon juice & zest, garlic, mustard, rosemary and parsley in a jar with a tight fitting lid. Shake vigorously until the dressing is completely blended.
  5. Pour the dressing over the salad ingredients and toss to coat everything. Taste and add salt and pepper if needed. Cover and refrigerate for at least 3 hours, overnight if you have the time.
  6. Give it one more good toss before you serve it and taste again, making any adjustments. It's ready.
Share this Recipe
Powered byWP Ultimate Recipe

Pesto Pasta Salad

Pesto Pasta Salad
Print Recipe
Servings
4
Servings
4
Pesto Pasta Salad
Print Recipe
Servings
4
Servings
4
Ingredients
Servings:
Instructions
  1. Cook the pasta according to the package directions. About 3 minutes before the cooking time is over add the green beans.
  2. At the end of the cooking time drain the pasta and beans and rinse well with cold water. Pour the beans and pasta into a large bowl.
  3. Cut the tomatoes in half and add them to the bowl.
  4. Whisk the pesto, stock, and vinegar together until well blended. Pour the dressing over the ingredients and toss to coat well. Taste and add salt and/or pepper if needed.
  5. Cover and refrigerate for at least 2 hours. Overnight is better.
  6. When you are ready to serve, toss well and check for seasoning. If the salad seems dry add a little more vegetable stock or a splash of olive oil. Sprinkle the Romano cheese on top and serve.
Share this Recipe
Powered byWP Ultimate Recipe

Roasted Garlic Pesto

Roasted Garlic Pesto
Print Recipe
Servings
1-1/2 Cups
Servings
1-1/2 Cups
Roasted Garlic Pesto
Print Recipe
Servings
1-1/2 Cups
Servings
1-1/2 Cups
Ingredients
Servings: Cups
Instructions
  1. Cut the top off the head of garlic (just enough to expose the cloves a bit). Place in the center of a square of heavy duty foil. Drizzle with a little olive oil and wrap sealing completely but leaving a little breathing room. Place in a 350 degree oven and bake for 40 minutes or until the kitchen smells wonderful and the garlic feels soft. Unwrap and allow to cool.
  2. Toast the pine nuts on top of the stove. Place them in a dry non-stick pan and toast over low heat shaking frequently to prevent burning. This should take 6 or 7 minutes.
  3. Place the basil and parsley leaves in the bowl of a processor. Squeeze the cooled garlic into the bowl. Add the pine nuts. Pulse to coarsely chop the ingredients.
  4. Add the grated cheese and pulse to combine.
  5. With the motor of the processor running, stream the olive oil into the feed tube. Stop as soon as the mixture is the texture that you like. (Do not process until smooth).
  6. Scrape the pesto into a bowl. Check for seasoning Add some ground pepper and a pinch of salt if you want.
  7. It is now ready to use. It can be frozen in 1/4 cup (or whatever amount you like) packages. It will keep in the refrigerator for a week. Pour a thin layer of olive oil on the pesto before you put it in the refrigerator to help preserve color and flavor.
Share this Recipe
Powered byWP Ultimate Recipe

Artichoke and Tomato Salad

Artichoke and Tomato Salad
Print Recipe
Servings
3
Servings
3
Artichoke and Tomato Salad
Print Recipe
Servings
3
Servings
3
Ingredients
Servings:
Instructions
  1. Combine the artichokes, tomatoes, and onion in a bowl. Toss gently to mix.
  2. Combine the remaining ingredients in a jar with a tight fitting lid. Close tightly and shake until all of the ingredients are thoroughly blended.
  3. Pour the dressing over the vegetable and toss to coat. Cover and refrigerate for at least 2 hours (more is better).
  4. Serve with your favorite grilled meat, fish, or poultry.
Share this Recipe
Powered byWP Ultimate Recipe