Can You Grill It? Potato and Green Bean Salad, Revisited

Yes, the grill on Mama D’s balcony is still working its grates off. It is after all, grilling season and everything is fair game. That’s where my “Can you grill it?” test comes into play. Taking a recipe or food that is usually made in the comfort of the kitchen into the great outdoors can be an adventure. Sometimes the result is wonderful, every once in a while, not so much. This potato salad, however, was a rousing success.

I’ve made this salad before and I’ve even shared the recipe. I don’t know why it took me this long to realize that it would be awesome on the grill. Well, thankfully it did (dawn on me, that is) and I wanted to share it with you.

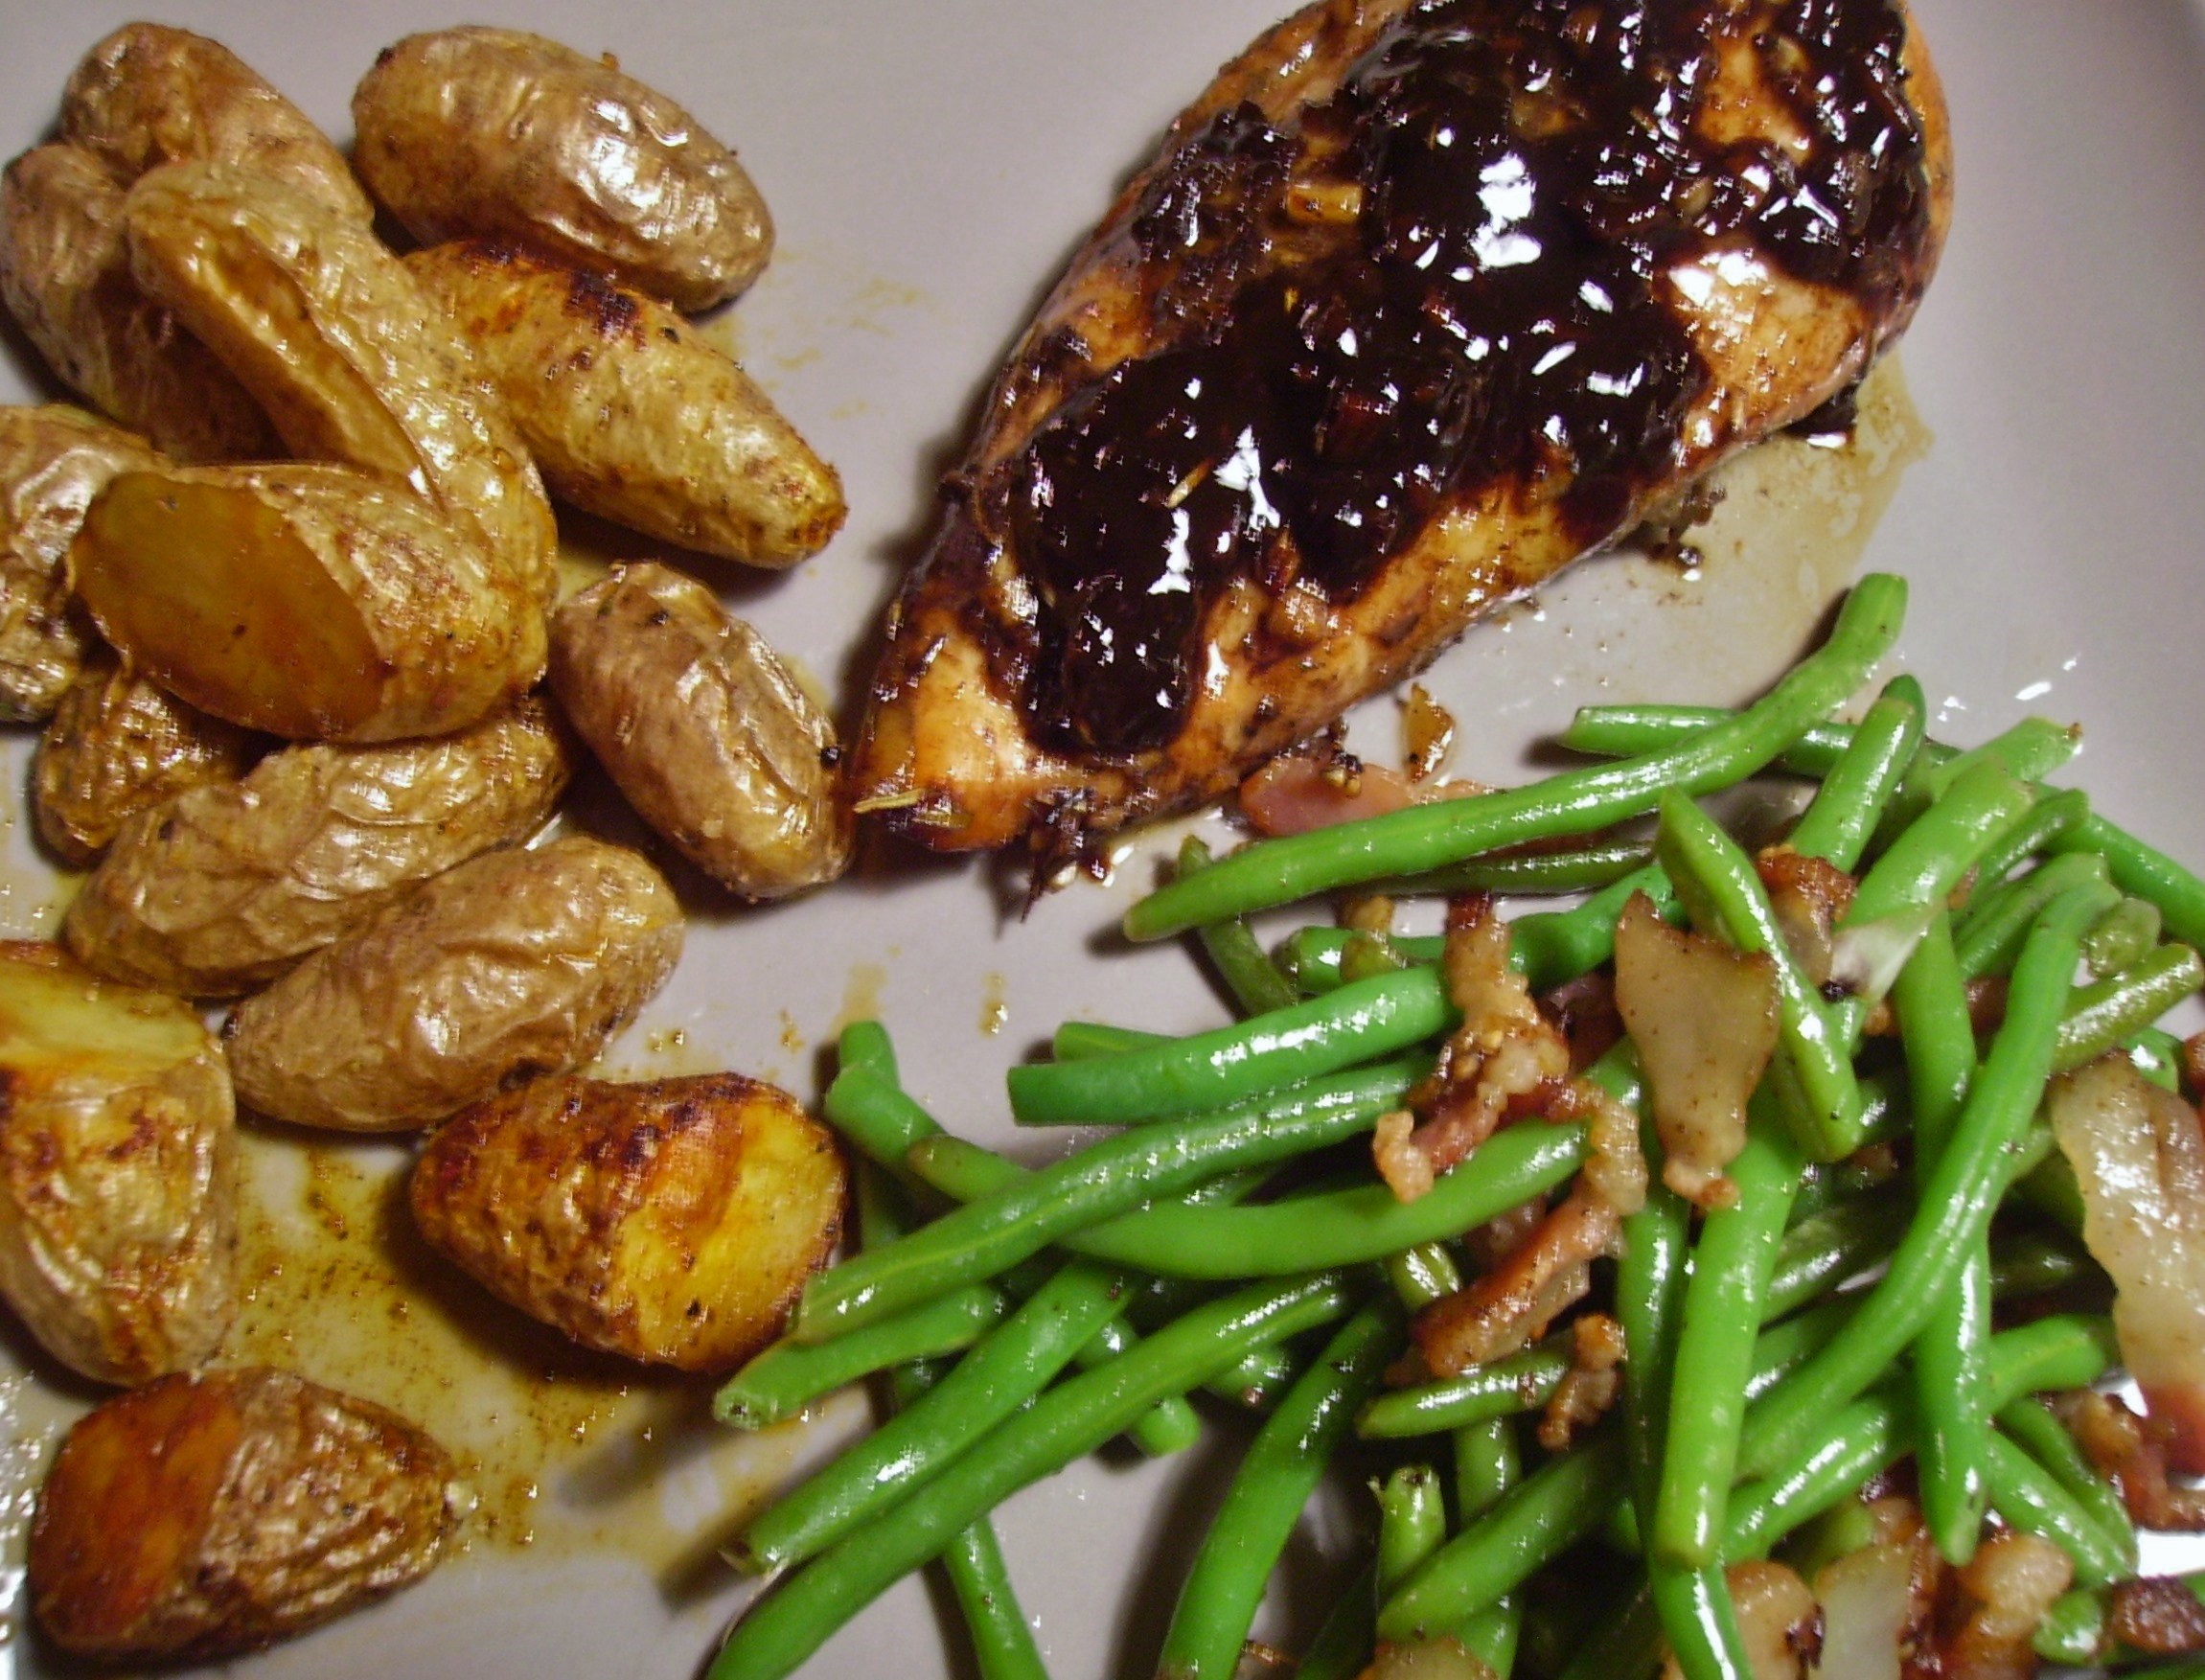
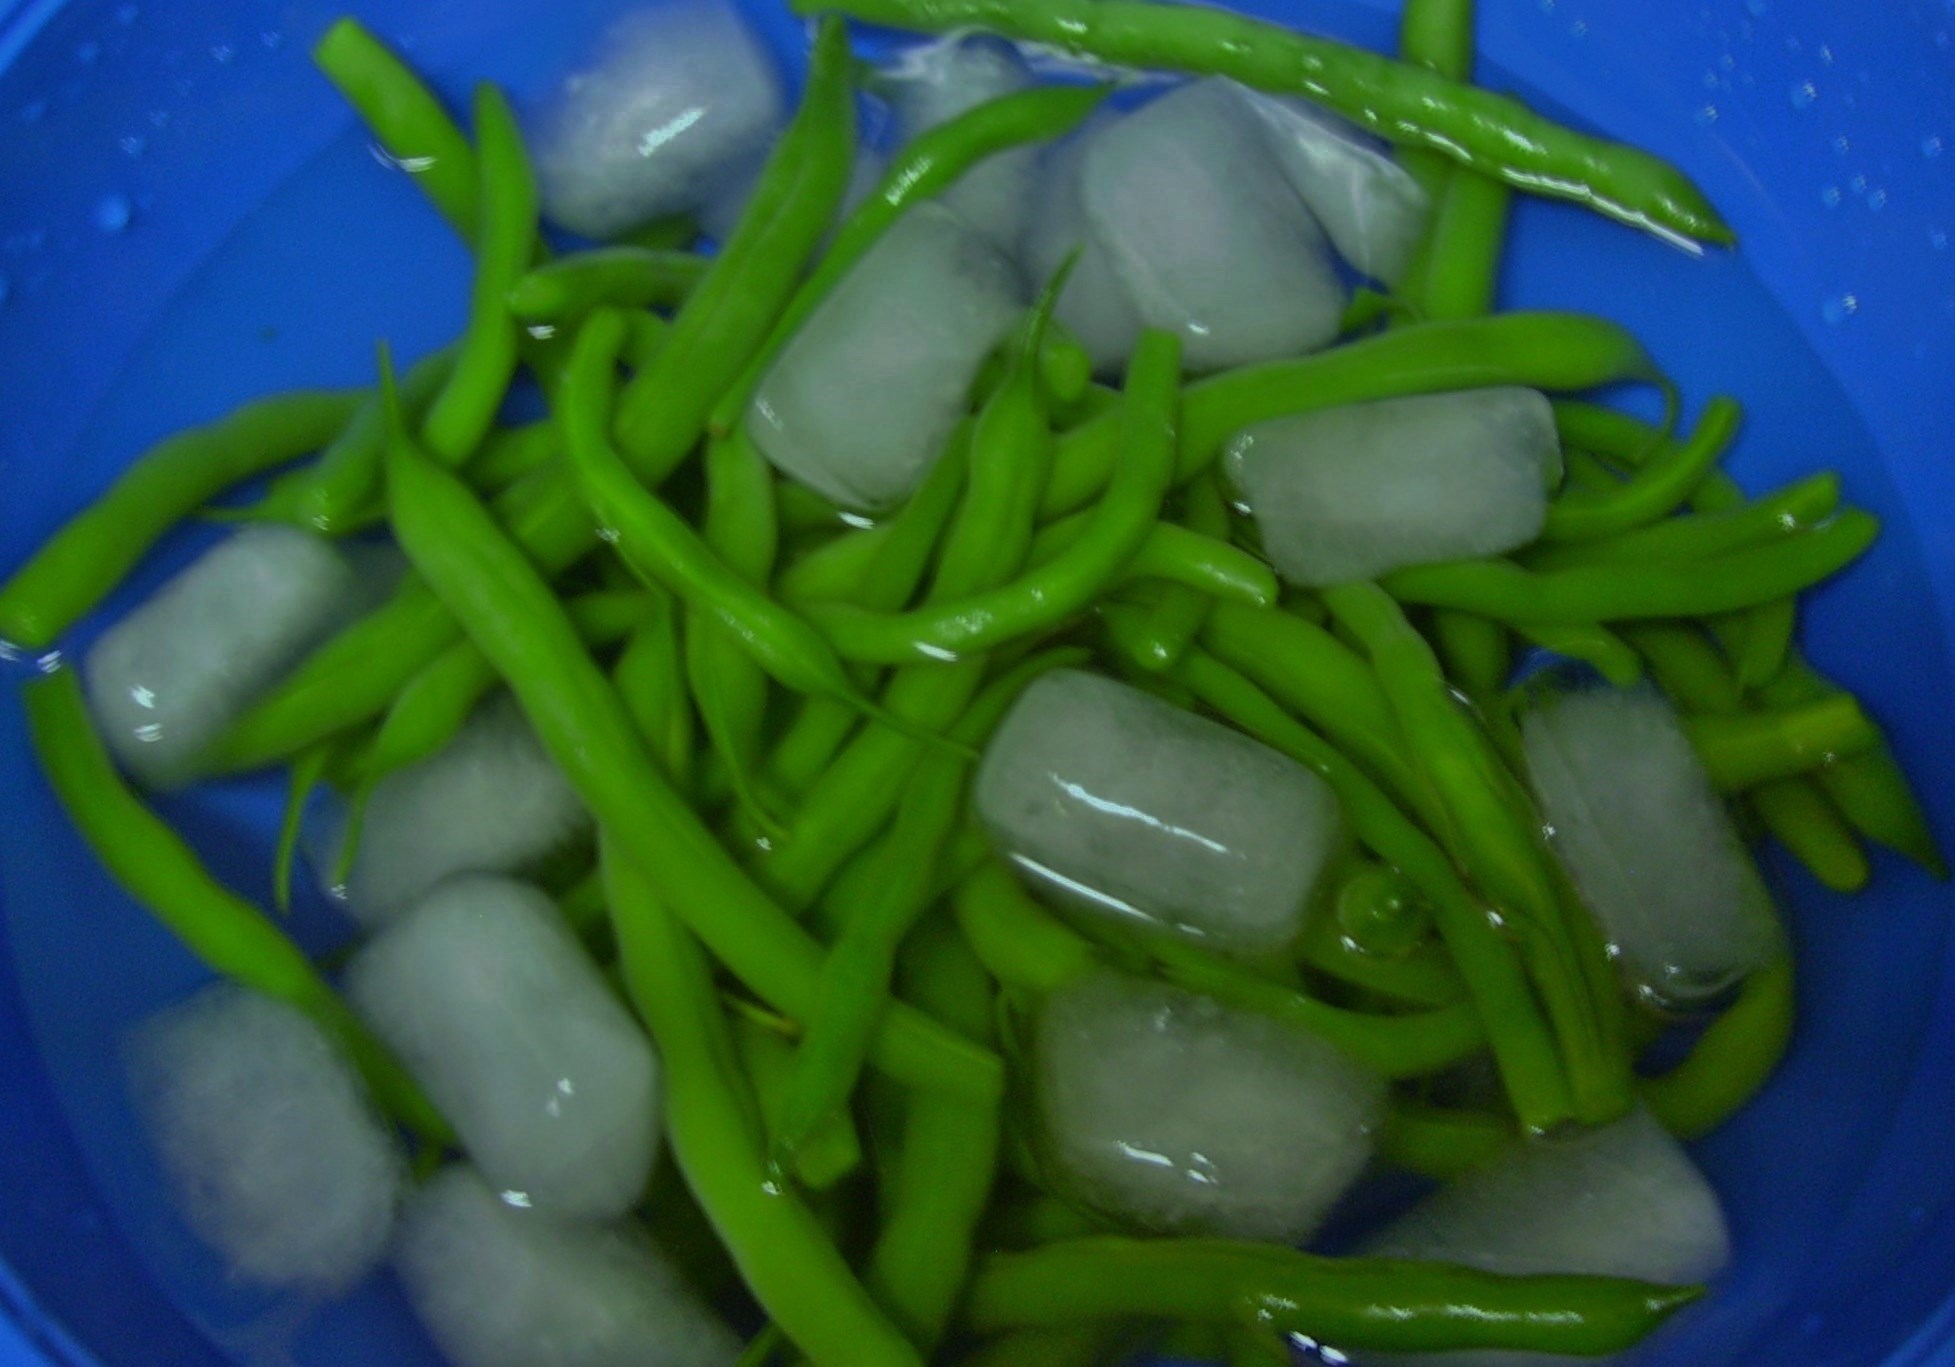
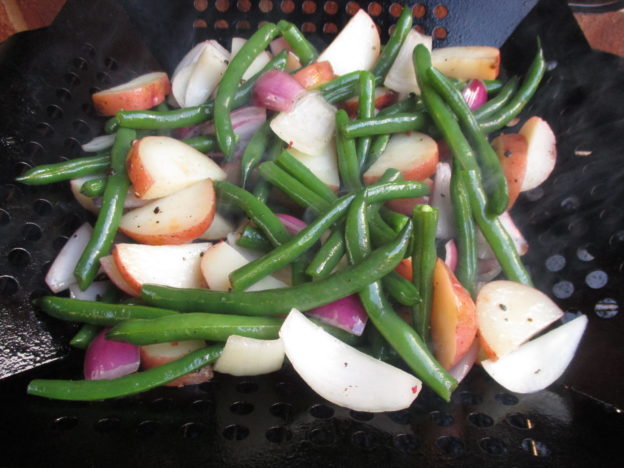
Baby red potatoes got steamed until almost tender and green beans were blanched before meeting up with some sliced onions.IMG_2057

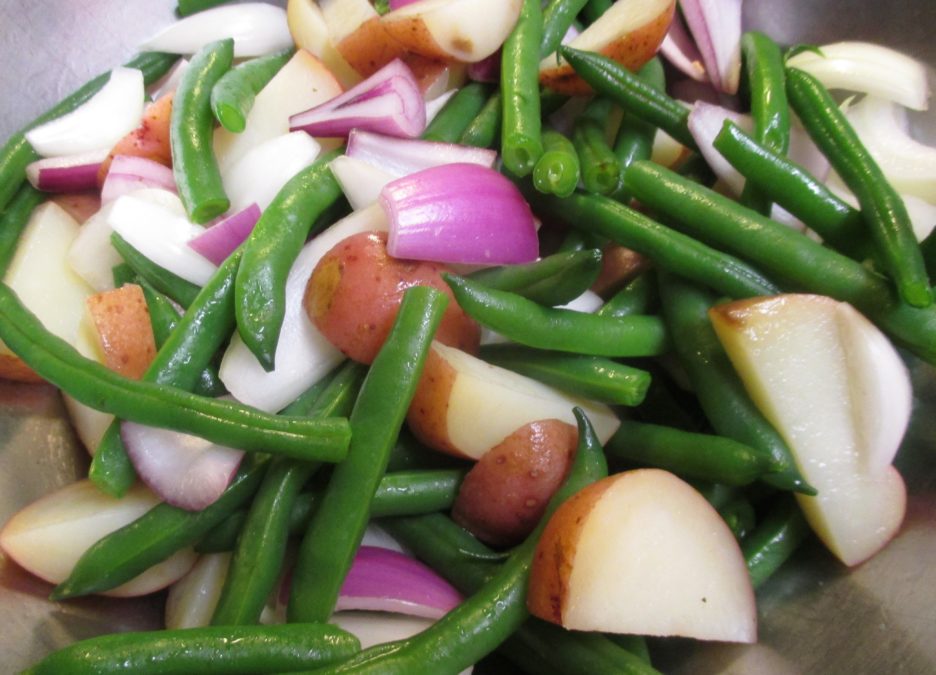
Everything got tossed with a little salt and pepper and a generous glug of olive oil before diving into the grill basket. Can this really count as a grilled dish if some time on the stove was required?  Why yes, it can. Partly because I said so, but primarily because the potatoes would burn before they cooked through and the green beans would lose their beautiful green-ness if this step wasn’t taken. So there.

My original recipe used a vinegar based dressing featuring a combination of balsamics (white and other wise) with olive oil, garlic, and grainy mustard. For the grilled version I lost the vinegars and went straight to the lemon juice. I know they are available all year, but fresh squeezed lemon juice just says summer to me. I have a condiment crush on grainy mustard right now, so it played a major role in the dressing. Some garlic, olive oil and a few snips of rosemary from the herb garden and I called it dressing.IMG_2052

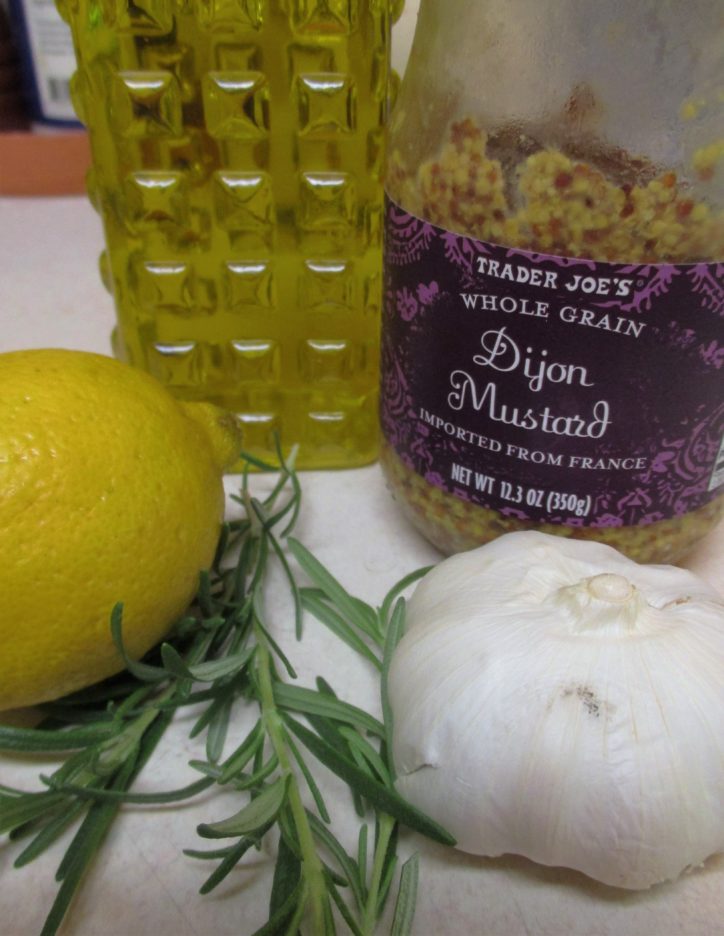
Once the veggies were suitably golden, I tossed them with the dressing and lo and behold, a perfectly delicious side dish was born. In this case, it was paired with some grilled chicken thighs, but I think that any protein would enjoy sharing a plate with this “Can you grill it?” winner.IMG_2064

Grilled Potato and Green Bean Salad
Print Recipe
Servings
4
Servings
4
Grilled Potato and Green Bean Salad
Print Recipe
Servings
4
Servings
4
Ingredients
Servings:
Instructions
  1. Steam the potatoes for 5 - 7 minutes or until they are barely tender. Set aside.
  2. Blanch the beans in boiling water for 2 -3 minutes until barely tender. Remove from pan and plunge them into an ice water bath. Drain and set aside.
  3. Combine the potatoes, beans, and onions in a large bowl. Add a bit of the olive oil and some salt and pepper and toss to coat everything evenly.
  4. Spray a grill basket with non-stick spray and set on a grill over medium/high heat. Spread the potato mixture evenly in the basket.
  5. Cook, tossing occasionally until the potatoes are golden and tender and the beans are tender with a bit of crunch. How long this will take depends on your grill. Don't go too far away.
  6. When the vegetables are cooked place them in a large bowl.
  7. Combine the remaining olive oil and the rest of the ingredients in a small bowl and whisk until blended. Pour the dressing over the veggies and toss to coat. Serve warm or at room temperature.
Share this Recipe
Powered byWP Ultimate Recipe

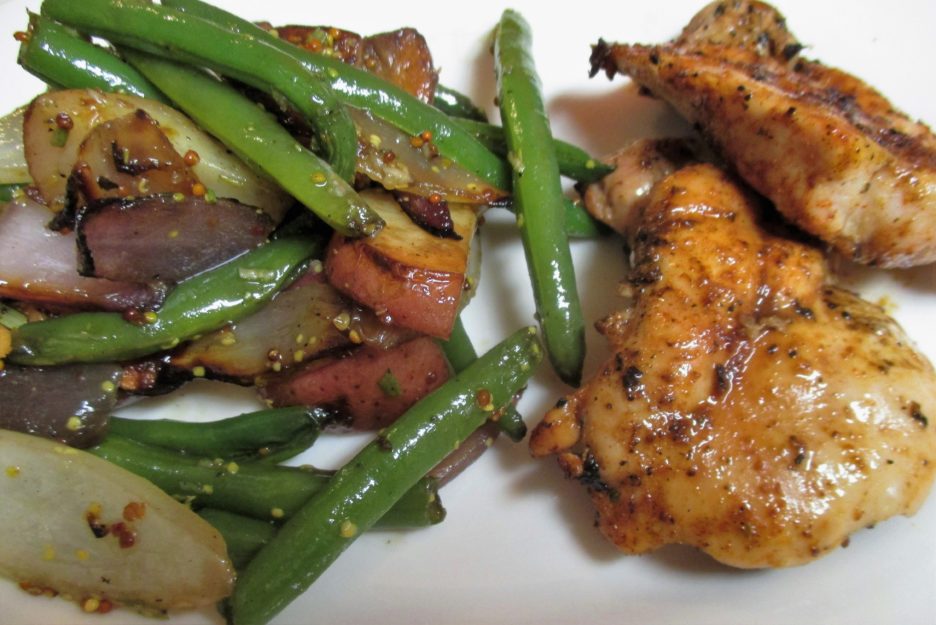
You can be sure that the grilling adventures will continue. There will be more “Can you grill it?” tests that will hopefully result in some fantastic recipes that will find their way into these posts. Until the next time, Happy Grilling!


Greenie Beanie Salad with Warm Bacon, Shallot, and Garlic Dressing

Don’t laugh at the title of this post. Greenie beanies was how we always referred to this vegetable when my kids were growing up. Maybe it helped them eat them more willingly, maybe I just made up silly words because I was that kind of mom. Whatever the reason, we still refer to those lovely green spears as greenie beanies. They are still a family favorite and if you took a poll, half the family would like them as a salad and the other half would like them as a warm side dish, though everyone would eat them both ways.

The garden has given us a veritable bounty of beans. The beans have survived being nibbled down to almost nothing by deer, shivering through cold beginnings, basking in very warm sunshine and way more than enough rain. Thanks to care by many residents especially wonderful Lois, the beans are sweet and tender and just beg to be eaten simply. Green Bean Salad in Mama D’s Kitchen consists of blanched green beans in a dressing of olive oil, garlic, fresh basil, and balsamic vinegar. This is how my mother made it except that the beans were more than blanched and  the dressing usually featured mint as the herb of choice. I think she used mint because it was very plentiful in our backyard. Anyone who has grown mint knows that it knows no boundaries, so there was always a steady supply for bean salad and the requisite summer iced tea.

When I fix green beans as a side dish I fry up some bacon and add shallots. Then I toss the blanched beans in this deletable bath and heat until everything is happy. Green beans and bacon have a natural affinity and the shallots add a subtly onion-y flavor that is perfect with almost anything.

DIGITAL CAMERA

I couldn’t decide which of my preferred preparations to make so I opted for a mash-up of the two.The beautiful beanies would be lightly cooked to the perfect tender crispness and dressed with a vinaigrette of garlic, olive oil and balsamic. The dressing would be further enhanced with shallots and bacon. While I decided to chill the beans slightly, the dressing would be warm.

Blanching green beans seems to work the best for me. Cooking them briefly in boiling water then plunging them into an ice bath, while seeming cruel and unusual punishment, results in bright green beans that crunch ever so gently when you bite into them. It sets the stage for whatever they will become.

DIGITAL CAMERA

On this occasion, they chilled briefly  while I prepared the dressing. Two slices of chopped peppered bacon crisped up in a pan. Out came the bacon and away went the drippings. The pan was left with all those beautiful brown bits. They weren’t alone for long. I added some olive oil followed by some diced shallots. Once they were soft and fragrant I added some garlic and let them cook long enough to become really good friends. Then a bit more olive oil and some balsamic vinegar and the dressing was perfect.

By this time the beans were slightly chilled and ready to welcome their rich brown dressing. The bacon crowned the dish and a new family favorite was born.

Green Bean Salad with Warm Bacon Shallot and Garlic Dressing
Print Recipe
Servings
4
Servings
4
Green Bean Salad with Warm Bacon Shallot and Garlic Dressing
Print Recipe
Servings
4
Servings
4
Ingredients
Servings:
Instructions
  1. In a large pot, bring a good amount of salted water to boil. Add the green beans and cook for 3 - 4 minutes (they should be just barely tender and quite crisp).
  2. Drain the beans and place in a bowl of ice water. Stir to cool as quickly as possible. Drain well and store in the refrigerator while you make the dressing.
  3. Chop the bacon and cook it in a small skillet until it is crisp. Remove the bacon and drain on a paper towel. Pour off all of the drippings but leave the browned bits.
  4. Add the olive oil to the pan and let it get hot. Add the shallots and cook for 3 minutes or so until they begin to turn golden.
  5. Add the garlic and cook another 2 minutes, stirring often.
  6. Add the vinegar and reduce the heat to low. Let the dressing simmer for a few minutes. Check the flavor and add salt and pepper if needed.
  7. Put the beans in a serving bowl. Add the dressing and toss to coat. Sprinkle the reserved bacon on the top and serve.
Share this Recipe
Powered byWP Ultimate Recipe

It looks as though there will be more beans to come as well as tomatoes and peppers (as long as the squirrels don’t sample too much).  In spite of everything our community garden is giving us lots of food and a different perspective on apartment living.


Summer Vacation and Italian Three Bean Salad in the Kitchen of Love

It’s hard to believe that my summer vacation will be over in a week. As the saying goes, time flies when you’re having fun. To be honest, I will still have a generous portion of each afternoon to do all the summer type things that I am remembering how much I enjoyed. While I’m not riding my bike or trying to go “over the bars” on a swing, I am taking time to enjoy the simpler things that made the Midwestern summers of my childhood so special, warm days, long evenings, and now, time in the kitchen.  I am loving the time that I can spend planning and preparing meals. Produce abounds from the garden, farm stands, and the grocery store. The colors and textures paint visions of meals that are vegetable driven, healthy and dare I say it, fabulously delicious.

I’ve gone back to dinners around a theme. Recently we had an Italian inspired dinner. Okay, lots of my dinners have an Italian vibe. What do you expect? I’m Italian and proud of it. “Italian-ness” aside, I do love pork. Tenderloins are my current favorite because they are versatile, quick cooking and the perfect size for two. I wanted to do another version of the pork wrapped in pork that is always so succulently yummy. I had a little thin sliced pancetta that I carefully uncoiled to create a delicate casing for the pork.

DIGITAL CAMERA

The seasoning for the meat had a very sausage like taste…red pepper flakes, fennel, and Italian herbs. In the summer, if you are Italian, and you think sausage, the next thing to pop into your head is peppers. Of course, peppers fried in olive oil with a bit of onion had to become the side.

DIGITAL CAMERA

Now what? In what I feel was a stroke of brilliance, a bean salad came to mind. Then the gears in my Italian brain meshed and I decided to make an Italian version of Three Bean Salad. We all remember the traditional Three Bean Salad that often appears at picnics and many salad bars. Varying combinations of green and kidney beans swim in a decidedly sweet vinegar dressing. Can this become a Paisan? I kept the green beans and added garbanzo and cannellini beans. The dressing went from sweet to tangy with the addition of lemon juice and white balsamic vinegar. Garlic and olive oil completed the transformation.DIGITAL CAMERA I opted to use rosemary and parsley as the herb component because I love how they taste with lemon. I chose red for the onion and pepper because they’re pretty and it gave a little nod to the Italian flag. As with any marinated salad, I made it early in the day so that everything had time to become as friendly as the goombahs from the old neighborhood.

Italian Three Bean Salad
Print Recipe
Servings
4
Servings
4
Italian Three Bean Salad
Print Recipe
Servings
4
Servings
4
Ingredients
Servings:
Instructions
  1. Cook the green beans in salted boiling water for about 2 minutes. You want them quite crisp, but with a tender heart.
  2. Drain the beans and cool quickly in a bowl of ice water. Drain well again and place in a large bowl.
  3. Add the cannellini and garbanzo beans to the bowl. Let the peppers and onions join in the fun, too. Toss everything together.
  4. Combine the olive oil, vinegar, lemon juice & zest, garlic, mustard, rosemary and parsley in a jar with a tight fitting lid. Shake vigorously until the dressing is completely blended.
  5. Pour the dressing over the salad ingredients and toss to coat everything. Taste and add salt and pepper if needed. Cover and refrigerate for at least 3 hours, overnight if you have the time.
  6. Give it one more good toss before you serve it and taste again, making any adjustments. It's ready.
Share this Recipe
Powered byWP Ultimate Recipe

This was a wonderful partner for the pork and peppers, but it would go well with any grilled meat and would be a hit at any party you brought it to. Another plus for this dish is that it can easily function as a one dish meal. The beans provide plenty of protein and fiber, but if you wanted to up the ante, add some cheese.

I did just that for lunch the next day. A little feta cheese, some tomatoes and a nice bed of baby greens from the garden made for a lunch that was as tasty as it was pretty.

DIGITAL CAMERA

Weeknight Wonderland – a Meatless Minestrone for Mondays and Beyond

Even though our nest is now empty, sitting down at the end of a day with good food,  good wine and good company is the best. I’ve shared my crazy split shift life before and how it impacts everything, even cooking. Just as I’ve learned to create in a small kitchen, I am learning to create dinner in stages, and weekends are my favorite secret weapon. A little time spent cooking ahead on the weekend eases the time crunch Monday through Friday.

This soup was a Meatless Monday dinner, but it got its start on Sunday. That’s when I thawed out some of my homemade vegetable stock. I heated my trusty soup pot and used  it to sweat onions and carrots in a little olive oil.DIGITAL CAMERASome Italian seasoning, red pepper flakes, lots of garlic and a couple of bay leaves livened things up.DIGITAL CAMERAI added the thawed stock along with a can of fire roasted tomatoes and let everything get happy for twenty minutes or so.DIGITAL CAMERAOnce it cooled a bit, I stored it in the refrigerator until Monday night when I got home from work, An extra bonus here, the flavors had plenty of time to get well acquainted with each other at their sleepover in the fridge.

The vegetable medley that I chose included zucchini, green beans, and artichoke hearts. I decided to give the squash and hearts a little extra color so I lightly browned them. I liked the color it added and there was a richer depth of flavor that the quick saute imparted. I actually did this during my mid-day break so that they would be ready when I got home. The other late arrivals were a can of chickpeas and a little orzo pasta.DIGITAL CAMERAThe final cooking was easy peasy. Once the stock base came back to a simmer, I added the beans and pasta, followed shortly by the green beans, then the zucchini and artichokes. The whole process took about 20 minutes or so. I toasted slices of multigrain French bread and topped them with a blend of Italian cheeses. They made a lovely topping  for the soup.DIGITAL CAMERA

The short cooking time of the veggies kept them nice and crisp. I opted to cook the pasta directly in the soup. It added just the right amount of pasta to the soup. DIGITAL CAMERAIf you are going to make this farther ahead or plan on reheating it the next day, you may want to cook the pasta al dente in water, drain it and refrigerate it to add as the soup heats.  Pasta has a strong inclination to soak up as much liquid as it can hold, which is an amazingly large amount. What was soup the first time around becomes a much more pasta-centric dish after a day or two. I’m a “cook the pasta separately” kind of gal, but once in a while, I like to eat soup with a fork, but that’s me.


Meatless Minestrone for Mondays and Beyond
Print Recipe
Servings
4
Servings
4
Meatless Minestrone for Mondays and Beyond
Print Recipe
Servings
4
Servings
4
Ingredients
Servings:
Instructions
  1. Heat a large soup pot over medium high heat. Add the tablespoon of olive oil and swirl to coat the bottom of the pan. Add the onions and carrots and a pinch of salt. Cook for several minutes until the vegetables begin to soften.
  2. Add the garlic, red pepper flakes and the bay leaves to the pot and cook another minute or two, stirring frequently.
  3. Pour in the can of tomatoes, juice and all and the vegetable stock. Bring up to a boil over high heat. Reduce the heat to a simmer and cook covered for 20 minutes or so, stirring occasionally. At this point you can cool the stock and refrigerate until the next day. You can also complete the recipe at this time if you want.
  4. Coat a non-stick pan with olive oil cooking spray and heat over medium heat. Add the artichoke hearts and cook for 5 - 6 minutes or so turning once until lightly browned on both sides. Remove from pan and set aside.
  5. Repeat the above process with the zucchini slices.
  6. When you are ready to complete cooking the soup, (re)heat the stock to a simmer. Add the chickpeas ans pasta and cook for 5 minutes, stirring it once or twice.
  7. Add the green beans and cook for 4 minutes or until they are the amount of tender crisp you like.
  8. Add the browned artichokes and zucchini and simmer everything gently until it is all heated through. This should only take a couple of minutes. Taste and add salt and pepper as needed.
  9. Ladle into four soup bowls and top each with two of the toasted bead slices (recipe follows) and a drizzle of olive oil.
Cheese Toasts
  1. Heat oven to 375 degrees. Lightly coat the bread slices on both sides with olive oil cooking spray and place them on a foil lined baking sheet. Toast for 8 minutes, turning once. Top with the cheese and return to the oven set on broil and cook until the cheese is melted and slightly brown.
Share this Recipe
Powered byWP Ultimate Recipe

By now you should know that this recipe is just a guideline. Change up the beans, the pasta, and the vegetables too, for that matter. If you have the time, the whole soup can be made in one day…just continue the cooking steps once the stock is done. Monday will be here before you know it (damn it), so give this a try. Hey, live on the edge and make it on Tuesday or Thursday.


Fully Loaded Minestrone…a Soup in Three Chapters

Once upon a time Mama D stayed home and cooked everyday. She created lots of wonderful dishes and wrote about them in great detail. She’s not a stay at home Mama anymore, but she is still in the kitchen every chance she gets and the wonderful dishes and stories continue to appear right here.

These days time management is the keyword in Mama’s kitchen. Working a split shift gives me a block of time in the middle of the day. Making something wonderful in these small windows of time is developing into an art form that I really enjoy. Many times I break a recipe down into smaller parts and complete each one before putting them together to create something delicious. That’s how this soup came to be.

Chapter One involved preparing the stock base. I began by sweating onions, garlic, and carrots in a little olive oil. DIGITAL CAMERAMy seasonings were simple, some Crushed Red Pepper Flakes and a healthy dose of McCormick Italian Herb Blend. (Love, love this)DIGITAL CAMERAA quart of my turkey Stock (featured in a previous adventure) went in and I let everything simmer for a good 30 minutes. I added a can of drained Fire Roasted Tomatoes and let it simmer a bit more. I stored it in the refrigerator overnight.

This soup story needed a little more meat. I found some bite size turkey meatballs that I had made a while back as well as one link of turkey italian sausage. I’m not sure why I only had one link, but it was the perfect little addition when I cut it in small pieces and baked it with the meatballs. They joined the stock in the refrigerator.DIGITAL CAMERAChapter two began the next day with cutting the vegetables that would happily swim in the soup. This task fit nicely into my mid-day window. I chose zucchini, colored bell peppers and frozen green beans.DIGITAL CAMERAThey created a vibrant splash of color, but they happened to be what I had on hand. They would go in near the end of the cooking. The shorter cooking time allowed them to keep their vivid color and a slightly crisp texture.

It isn’t Minestrone for me unless there is some kind of bean. Cannellini filled the bill beautifully. Drained and rinsed they would come fashionably late to the party. So, my mise en place was in place, ready for the final chapter that began when I got home from work.

The soup pot was ready on the stove and the tomato – turkey stock went back in. It heated slowly while I enjoyed a  glass of wine and some pleasant conversation with my husband.

When it was time to add the veggies, I wanted to give them a little extra love, so I briefly cooked them in a little olive oil and Italian Herb blend. The green beans sat this step out because they were already blanched.DIGITAL CAMERA

Finally the time was right to bring all the characters together for the denouement. The vegetables, beans, meatballs, and sausage joined together in the pot in perfect harmony.DIGITAL CAMERAA little more time over the heat and it was ready to eat. The only adornment was a little shaved Pecorino Romano. It was as satisfying as finishing a really  good book…DIGITAL CAMERAThis soup can easily be made all at once in the traditional way. That’s how the recipe is written. As always, make it your own…use the ingredients you love or what’s on hand. Use as many short cuts as you want or take the long way round. Here’s the basic recipe to get you started.

Fully Loaded Minestrone
Print Recipe
Servings
4
Servings
4
Fully Loaded Minestrone
Print Recipe
Servings
4
Servings
4
Ingredients
Servings:
Instructions
  1. Warm a large soup pot over medium heat. Add 1 tablespoon of the olive oil and heat for 1 minute. Add the chopped onions, carrots and garlic to the pan alond with the pepper flakes and 1 teaspoon of the Italian seasoning and cook stirring occasionally 5 minutes. The vegetables should begin to soften and become fragrant.
  2. Add the stock and bring just to a boil. Reduce the heat to low and simmer for about 30 minutes. Add the drained tomatoes and simmer for another 15 minutes.
  3. While the stock simmers cook the meatballs and sausage. This can be done in the oven at 350 degrees. It will take about 20 minutes. Set aside when cooked.
  4. In a large fry pan heat the remaining 1/2 tablespoon of olive oil. Add the peppers, zucchini and the remianing Italian Herb Blend. Cook for 5 minutes just until the vegetables are slightly soft.
  5. Add the meats and sauteed vegetables to the simmering soup pot. Cook for 5 minutes or so. Add the drained cannelinni and the green beans. Simmer 5 minutes more or until everything is heated through.
  6. Taste and make any adjustments to the seasonings. Ladle into bowls and serve with a bit of shaved Romano Cheese.
Share this Recipe
Powered byWP Ultimate Recipe