Pork and Green Chili Stew with a Chilaquiles Topper

January brings a new year, but here in the Midwest it also brings winter at its most aggressive. This is shaping up to be a winter that is unpredictable. We got our first snow (a major 12 inches, not a late Fall dusting) for Halloween, since then we have had temperatures ranging from the upper 50’s to well below zero (don’t get me started on wind chill).

Through all of these fluctuations, hearty bowls of love that simmer for hours, filling the house with delicious smells are a must. This is a recipe that I found at Eating Well. This site features an enormous variety of recipes that are geared towards various diets and nutritional needs. It is a simple recipe that starts with pork shoulder and comes together in the crock pot with corn, potatoes, and a lot of green chilies.

https://www.eatingwell.com/recipe/269916/pork-green-chile-stew/

That was a solid foundation, but I wanted to to make it a bit more interesting. I upped the spices which included ancho chili powder and cumin; easily going to a tablespoon of each. The oregano was Mexican, a fruity more complex flavor than its European cousin. I opted for fire roasted corn, more onions, and fresh chopped garlic. The result was flavorful and comforting. Use the above recipe and make the adjustments that make it sing to you.

One thing that I like about a slow cooker for soups and stews  is that you can generally dump all the ingredients and forget about it until it starts to smell amazing. The Slow Cooker holds a lot which means for our household of two there will always be at least one more meal. This was no exception. I froze half and pulled it out of the freezer just the other day. While it heated on the stove, I came up with an idea to create a topping to elevate it a bit more.

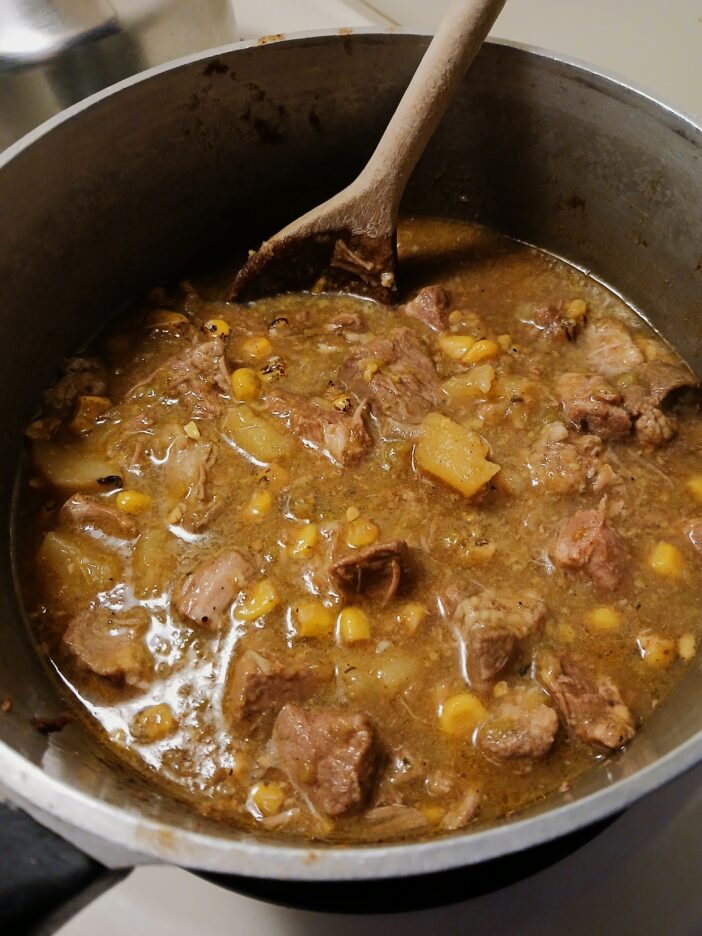
Enter the Chilaquiles Topper. Chilaquiles are a Mexican breakfast staple. Fried corn tortilla chips are cooked in a chili sauce until they are soft and have absorbed tons of flavor. They are often topped with an egg to make one of my favorite breakfasts. They are so tasty that they shouldn’t be relegated only to breakfast. Why not top a steaming bowl of pork stew (or chili or any other hearty soup that has a slightly southwestern flavor) with some Chilaquiles?

The ingredients are simple. Tortilla chips are the basis. You can fry them yourself or buy some really good quality ones, like these that came from a local market. They were perfect. Sturdy and unsalted with a full corn flavor. Just roughly crumble a good handful for each bowl of soup or stew that you want to top . You can make your own chili sauce or use some good fresh salsa.

Put the chips in a pan and add enough salsa to coat the chips. Heat over a medium flame until the chips are beginning to soften. I found that adding a small amount of water helped the whole process.

When the stew was piping hot, I spooned it into oven safe bowls and topped each with the warm chilaquiles. I also sprinkled a little cheese on the top. I used a pre-packaged Mexican cheese blend, but whatever kind of cheese you like will work. I put the bowls on a baking sheet and slid them into the oven (about 375 degrees). In a matter of minutes the cheese melted and the edges of the chilaquiles were golden brown. Finally, right before serving, I added a dollop of sour cream (Mexican crema would also be great) and it was ready to serve.Flavorful and satisfying Pork and Green Chili Stew with Chilaquiles Topper

Happy New Year from The Kitchen of Love.

Mustard Wet Rub…for Chicken or Pork


Even though we are unofficially heading into fall, in most places it still feels like summer. I grill no matter the season and I am sure I am not alone. Here is another way to impart flavor into those lean proteins you grill. It falls somewhere between a rub and a marinade so the somewhat questionable name “Wet Rub” seems to be pretty accurate.

The ingredients are simple with mustard as the key player. As with all my recipes, you have my blessing to change it up however you like. Think of all the mustards out there… think of all the herbs…all the spices, you could make variations of this for the rest of your grilling season.

I love this on  boneless-skinless chicken thighs and have done it with breasts as shown here. I think it would be great on pork tenderloin or chops as well.

So, here is the blueprint, make it your own. Happy grilling and a merry, merry Fall to all.

Mustard Wet Rub

A savory wet rub that is great on chicken or pork. Use whatever herbs you have on hand and feel free to adjust any of the ingredients to suit your taste. This is enough rub for two servings.

Keyword: Rubs and Marinades
Servings: 2
Author: binner216@comcast.net
Ingredients
  • â…“ Cup Dijon Mustard
  • 2 Tbsp Fresh Herbs Sage, rosemary or your choice
  • ½ Tbsp Lemon Zest
  • 1-2 Tbsp Olive Oil
  • 1 Tsp Brown Sugar
  • ÂĽ Tsp Red Pepper flakes
  • 1/2 Tsp Salt free Lemon Herb seasoning
  • Salt & Pepper To taste
Instructions
  1. Combine the ingredients in a small bowl and mix well. Give it a taste and make any adjustments.

  2. Cover and refrigerate for at least 2 hours to allow the flavors to blend.

  3. Brush evenly on both sides of the chicken (or pork) and refrigerate for about a half hour.

  4. Grill on medium direct heat until cooked through. Time will vary based on the type of protein.


Raiding the Refrigerator: Italian Pork Loin with Fennel

Refrigerators, much like pantries can go from neat and current to “what is that?” very quickly. While I have been able to identify most everything currently dwelling within, there are a few items that have over stayed their welcome. A recent exploration resulted in a jar of Sun-dried Tomato Pesto and a bottle of Balsamic Vinaigrette. What can these two items have in common other than shelf life? My solution was to use each of them as a marinade, and here is how the story goes…

The pesto became the primary component of a wet rub for a small Pork Loin. I added fresh basil and some olive oil and gave it a quick whirl in the processor. Then I slathered the  mixture over the roast, gave it a plastic wrap blanket, and let it chill in the refrigerator for 4 hours. I’m guessing that this would work with Basil, Artichoke, or any other kind of pesto you may come across and it certainly wouldn’t be wrong to use you own homemade creation.

I admit that there are several bottles of salad dressing in my refrigerator, not that there’s anything wrong with that. They come in handy to top a quick-lunch salad and in this story they make an easy marinade. The veggies that I chose for this dish included a bulb of fennel, a bag of cipollini onions, and some colored baby bell peppers. Of course there was garlic…remember whose kitchen this is.
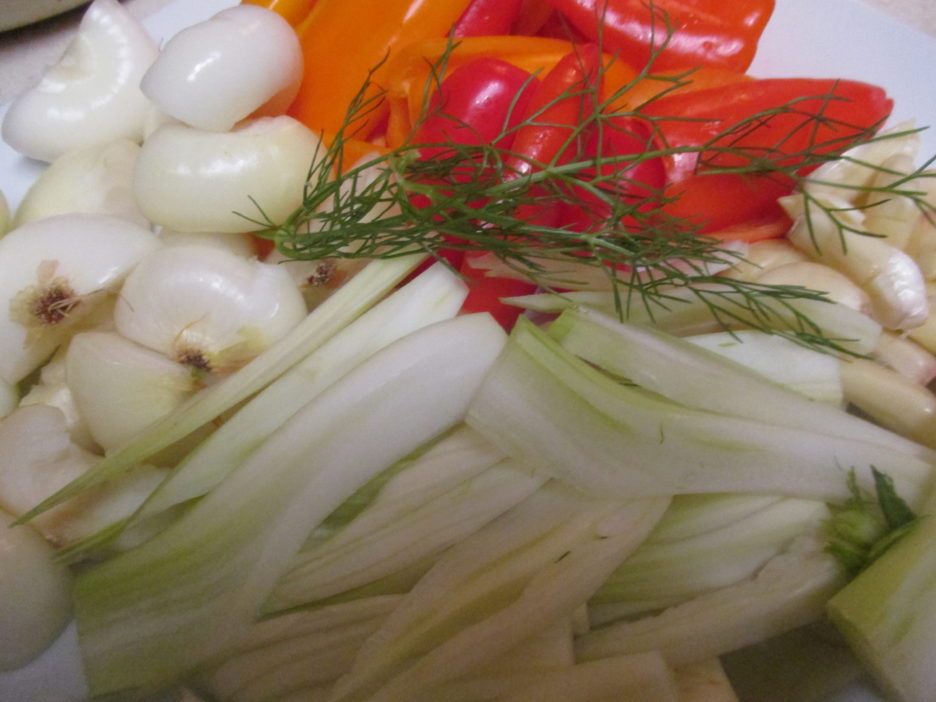
These gathered together and marinated in a healthy dose of Balsamic vinaigrette. They then went into a baking dish where, after a short head start, they were topped with the pesto rubbed roast.Roughly 40 minutes later, the roast was roasted to  perfection 
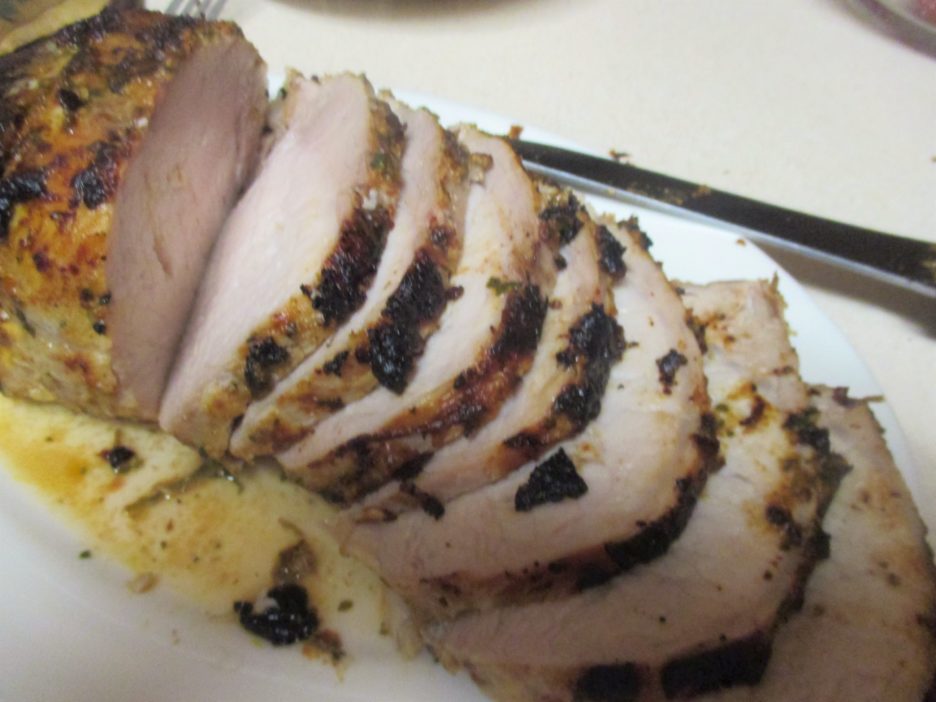
and the vegetables were a lovely golden shade.
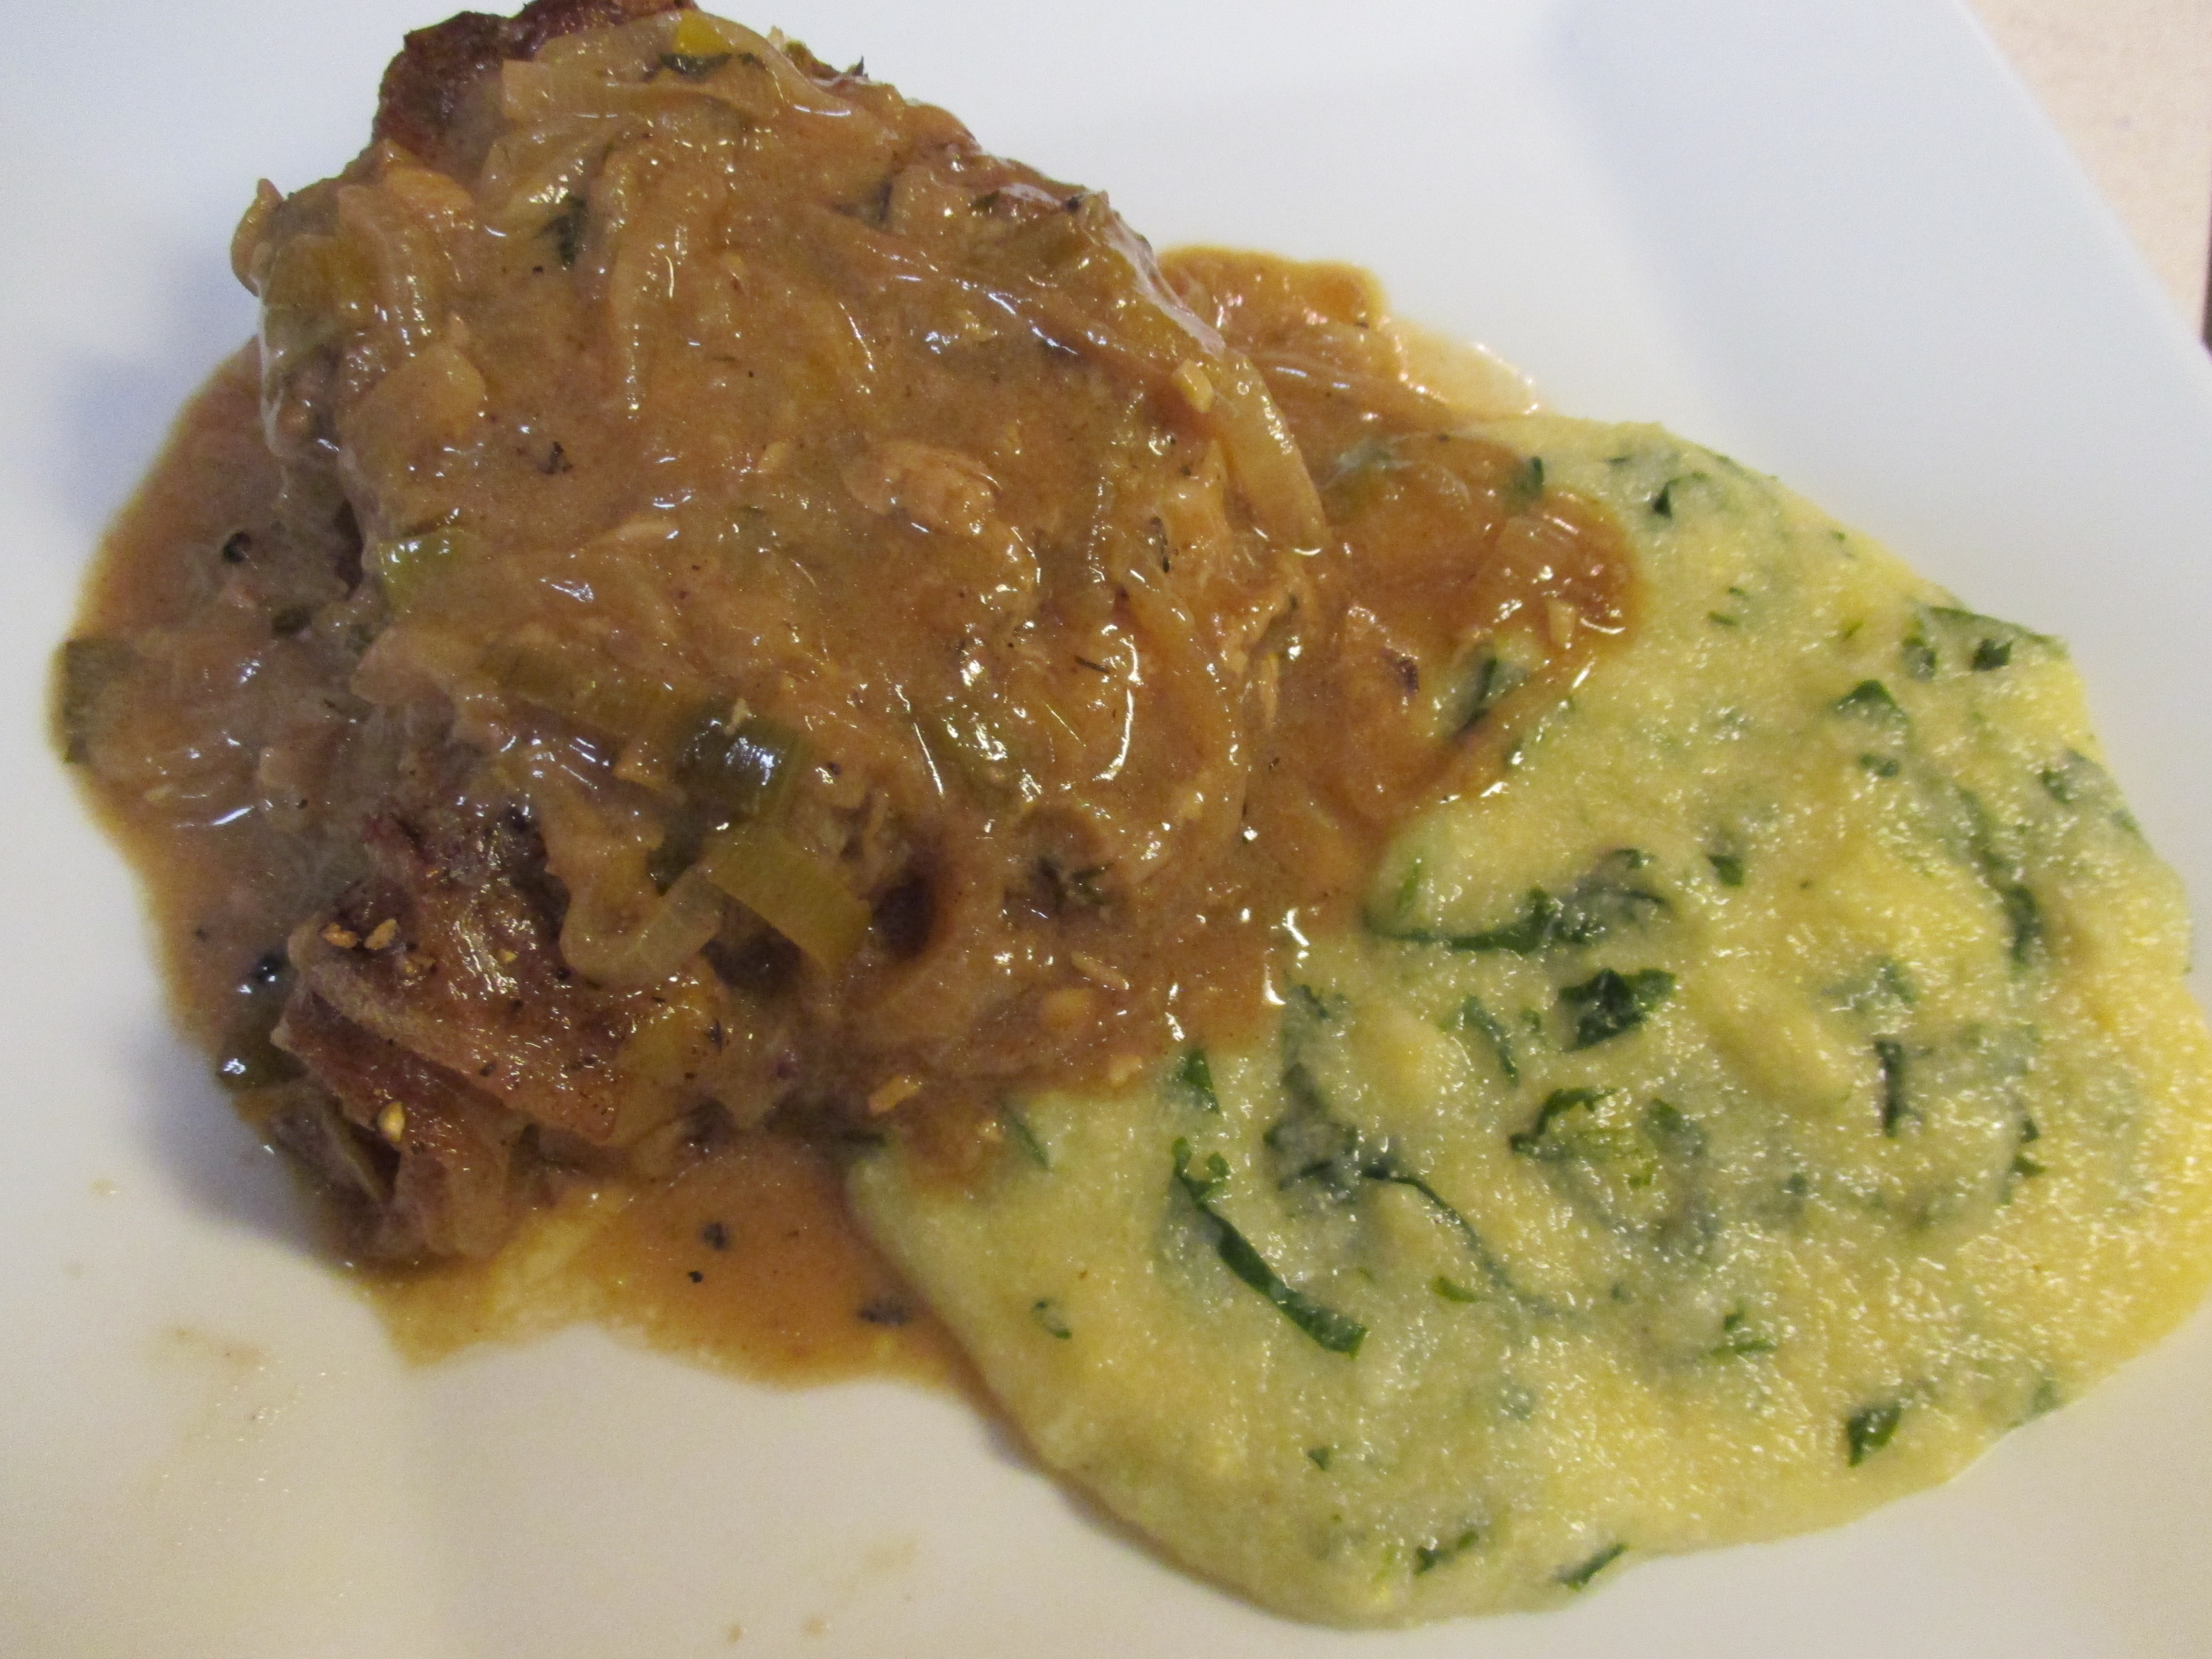
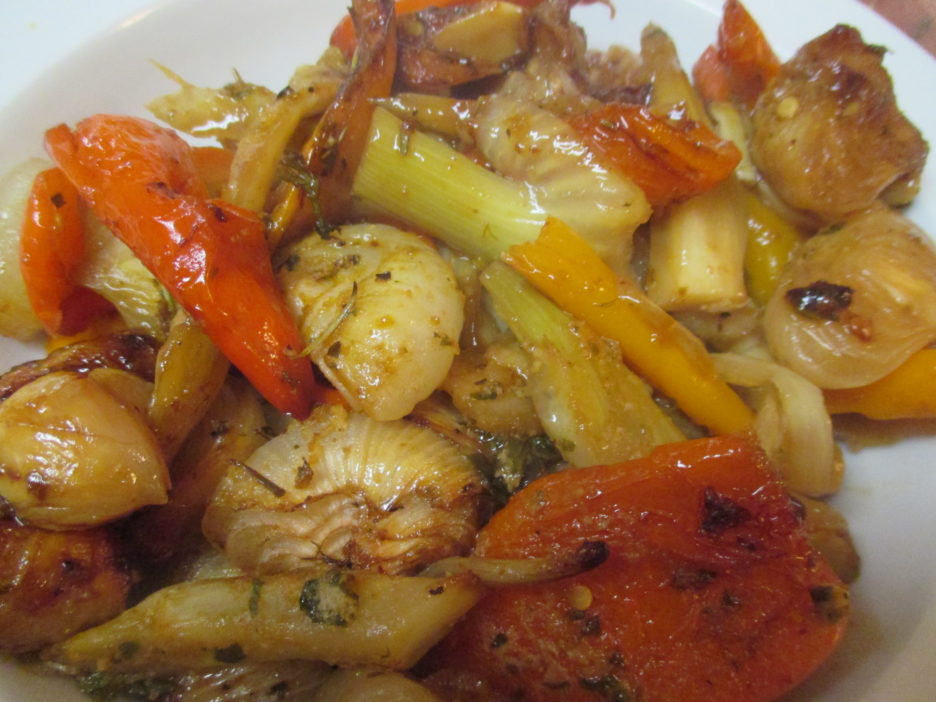
Keeping with the Italian spirit, Polenta, laced with Romano Cheese and Rosemary joined the plate. (Click here to see an earlier polenta adventure.)


Italian Pork Roast with Fennel
Servings: 4
Ingredients
  • 1 2-1/2 Lb. Pork Loin
  • 1/3 Cup Sun-dried Tomato Pesto Or pesto of your choice
  • 1/2 Cup Fresh Basil Leaves
  • 1 Tbsp. Olive Oil
  • 1 Bulb Fennel Cored and sliced
  • 4 Ounces Cipollini Onions Peeled and halved
  • 6 Ounces Baby Bell Peppers Cut in half
  • 1/2 Cup Balsamic Vinaigrette
Instructions
  1. Combine the pesto, basil, and olive oil in a small processor until well blended. Spread this mixture on the pork loin and cover and refrigerate for 4 hours, even overnight if you have the time.

  2. Combine the fennel, onions, and peppers in a large bowl. Toss with the Vinaigrette, cover and marinate in the refrigerator along with the pork. 

  3. When you are ready to roast. preheat the oven to 375 degrees. Spray a baking dish with cooking spray. Add the vegetables and about half of the salad dressing. Roast for 10 minutes or until the vegetables begin to soften.

  4. Place the roast on top of the vegetables and return the dish to the oven. Roast for about 40 minutes to an internal temperature of 145 degrees. Allow to rest before slicing.

  5. Serve the roast and vegetables on their own or add a starch of your choice. Polenta is very nice.

This was easy to prepare and very easy (and delicious) to eat. It turns out that pesto makes a very good marinade for meat and this story has a happy ending.

Let the Grilling (Season) Begin – Kale Stuffed Pork Tenderloin

Here in the Midwest, we seem to finally be having Spring like weather, (with Memorial day just around the corner, it’s about time). Warmer weather lends itself to grilling. Lighter meals and less time spent in the kitchen are both good reasons to take the cooking outside. Even though we grill year round, there’s something special about cooking out in warmer weather. The fact that it is staying light longer makes lingering outdoors to enjoy the warmer temperatures a real pleasure. Plain and simple, grilling just seems like the right thing to do.

A recent outing featured the ever popular Pork Tenderloin. While this lean cut of meat can be easily decimated on the grill, a few carefully chosen steps can result in a juicy and tender piece of meat. I opted to use a stuffing to add moisture deep inside the pork. Then just to make sure that everything stayed juicy, I wrapped it in bacon. Yes folks, we had pork on pork goodness.

The stuffing was a simple blend of onions, garlic, and kale sautĂ©ed in olive oil that cooked down to caramelized deliciousness. A little salt and pepper was the only other addition. Once the tenderloin had been opened up, the filling went into every nook and cranny.IMG_1798
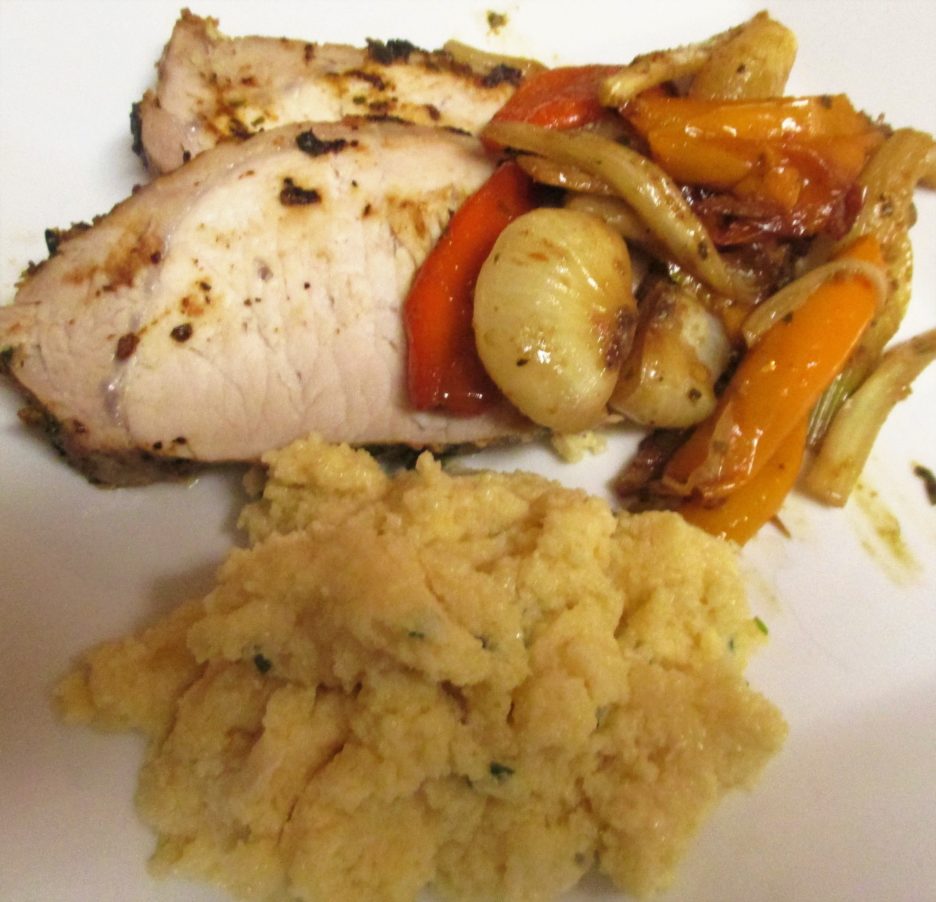
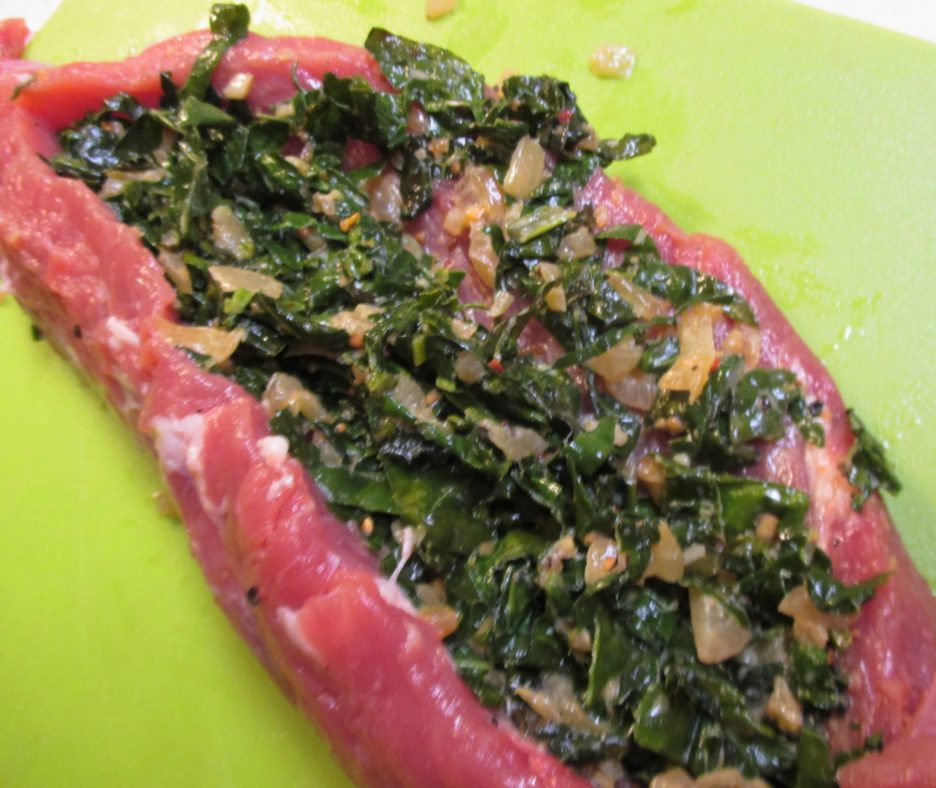
How to securely enclose this lovely filling? There is always butcher’s twine, but since the little torpedo was going on the grill, something that could provide a bit of protection seemed like a better choice. Enter Thick Cut Peppered Bacon. I precooked it a little before inrobing the tenderloin. It rendered a bit of the fat and ensured both of the porks would be ready at the same time. Again, butcher’s twine could have and probably should have come into service. Instead I used toothpicks, eight to be exact. Knowing the exact number is actually pretty important; it prevents someone getting an unexpected surprise.IMG_1800Off to the grill it went. The wonderful thing about Pork Tenderloin is that it cooks very quickly making it a perfect weeknight meal. This was average size, weighing in at around a pound and it was ready in about 25 minutes. It rested for a few minutes while the rest of the dinner came together (in this case, steamed broccoli). IMG_1804
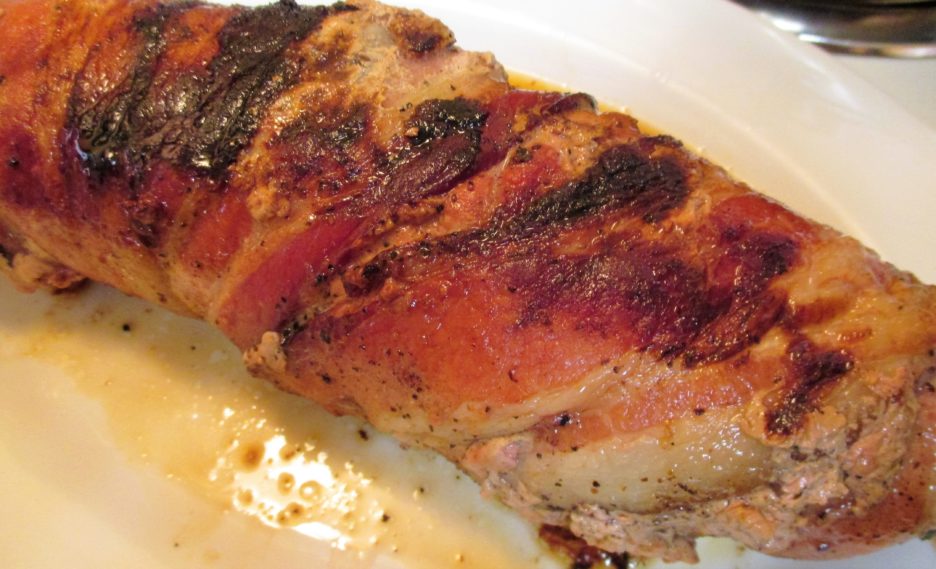
Not to brag, but the slices looked beautiful. The filling created a perfect green bullseye on each slice.IMG_1807

The taste matched the visual appeal. The rich, slightly bitter kale was a perfect counterpoint to the smokey flavor that the pork received from the bacon. All things considered, this was an excellent use for the last of the kale I had on hand. It had lost some of its luster and there wasn’t enough to create a true dish, but as the star of this filling, it stood proud and I felt noble having saved it from the compost bin. Any vegetables that you have on hand would work in this filling, so use what you have. As with the filling, the outer wrap is subject to what you have on hand. Prosciutto or pancetta would be wonderful. 

Grilled Pork Tenderloin Stuffed with Kale
Print Recipe
Servings
4
Servings
4
Grilled Pork Tenderloin Stuffed with Kale
Print Recipe
Servings
4
Servings
4
Ingredients
Servings:
Instructions
  1. Heat the olive oil in a medium size skillet. Add the onions and toss to coat. Cook for 2 - 3 minutes.
  2. Add the kale and the garlic and continue to cook for another 5 minutes or so. The kale should be wilted and somewhat tender and the onions and garlic should be golden.
  3. Add a little half and half to keep things moist and continue to cook until everything is very tender. Set aside
  4. If you choose to precook the bacon, lay the strips in a medium skillet and cook over low heat 5 -7 minutes until the bacon begins to render some fat. Remove from the pan and drain on paper towels while you prepare the tenderloin.
  5. Trim any fat from the tenderloin. Using a sharp knife, cut along the length of the tenderloin so that it lays flat. Be careful not to cut all the way through. Set aside.
  6. Spoon the filling into the pork tenderloin stopping a bit short of the ends. Smooth the filling out stopping about 1/2 inch from the edges.
  7. Pull the cut edges together so that the filling is completely enclosed and the tenderloin is more or less back to its original shape.
  8. Wrap the bacon strips around the tenderloin covering it completely. Overlap the strips as necessary to create the coverage. Secure with tooth picks. Know how many you are putting in and make sure to take the same number out prior to serving.
  9. Place the tenderloin on a preheated grill and cook over medium high heat, turning as needed to brown and cook evenly, 20 - 25 minutes. Tenderloin is done when it reaches an internal temperature of 145 degrees.
  10. Allow the tenderloin to rest at least 5 minutes before slicing.
Share this Recipe
Powered byWP Ultimate Recipe

As we head into the first “Official” weekend of the summer, fire up those grills (if you haven’t already) and let you imagination run free. There should always be an affirmative answer to the question, “Can you grill it?”

Lovin’ From the Oven – Smothered Pork Chops

As you probably know, Mama D runs a pretty healthy kitchen. Fresh and light are terms often used in the posts that appear here. Every once in a while though, especially when the weather is getting chilly, she loosens her apron strings and goes for a little more gusto. Smothered Pork Chops from the oven is one such dish. It is a little richer than what I usually prepare, but it is lightened up in a few places as well. It’s the perfect weekend splurge that won’t break the calorie bank.

Pork is probably my favorite meat and pork chops are high on my list of favorite cuts. I wanted to see if I could come up with a different spin on this Southern favorite. I poked around the internet to get some background on this dish. Some called it Creole, some called it Soul Food, but everyone called it a comfort food staple. I kept some of the ingredients and a few of the techniques, but in the end it was a Mama D original.

It starts with thick center cut pork chops. Keep the bone in, the flavor it imparts is amazing. I skipped the dredge and seasoned the chops with Italian Herb Seasoning. I got a small cast iron skillet screaming hot and sprayed it lightly with Olive Oil Cooking Spray.IMG_0647 The chops got a quick sear before they took a seat on a nearby plate. I left all the wonderful bits and drippings in the pan and turned the heat to low before I added a bit of olive oil.IMG_0648 I added onions, leeks, and garlic and let them cook undisturbed for 5 minutes. I added a small pinch of salt and let them cook slowly for another 20 minutes giving them a stir every now and then.

Smothered Pork Chop Gravy can be anything from decadent and creamy to rich and savory. I opted to create a lighter sauce  without short-changing the flavor. The carmelized onion and garlic mixture was the perfect flavor base. A little Wondra Flour went in and cooked for a couple of minutes. Then I gradually added chicken broth and 1% milk and let it bubble into a beautiful thick sauce. I added some thyme sprigs while it was bubbling to give a delightful woodsy scent. Rosemary would also be wonderful as would any combination of woody herbs.IMG_0655

I added the chops back to the pan. The sauce almost covered the chops but I gave them a few turns to make sure every nook and cranny was coated. Some cracked black pepper went on the top before it headed into the oven to become a skillet full of golden love.IMG_0658The gravy was beyond fabulous. I even caught myself eating the leftover golden goodness out of the pan as I cleaned up. Gravy is meant to top something and the pork chops were delighted I chose them.

I rounded out the plate with some Polenta. I happened to have instant in the pantry so that;s what I used. I have to say I prefer the longer cooking variety as it has more texture, but this did fill in nicely. I added some sautéed spinach and garlic to the polenta as it was cooking. It made a wonderful side dish that also enjoyed a bit of gravy love.

IMG_0660

Smothered Pork Chops
Print Recipe
Servings
2
Servings
2
Smothered Pork Chops
Print Recipe
Servings
2
Servings
2
Ingredients
Servings:
Instructions
  1. Heat a small cast iron skillet over high heat. Sprinkle the Italian seasoning on both sides of the pork chops. Spray the skillet with the cooking spray. Add the pork chops and sear 3 minutes on each side. Remove the chops from the pan and set aside.
  2. Reduce the heat to medium and add the olive oil to the skillet. Add the onions, leeks, and garlic to the skillet and cook undisturbed for 5 minutes. Add a pinch of salt and continue to cook slowly for 20 minutes, stirring occasionally until they are golden brown.
  3. Add the flour to the skillet. Cook and stir for 2 minutes. Slowly add the broth and milk stirring to keep everything smooth. Add the thyme sprigs and continue to cook until the gravy begins to thicken, 5 minutes or so.
  4. Return the chops to the pan and turn several times to coat them with the gravy. Top with a generous dose of cracked black pepper. Place the skillet in a preheated 350 degree oven. Bake 20 - 30 minutes until the are cooked. Remove the thyme stems. Allow to cool slightly before plating.
Spinach Polenta
  1. Saute 2 cups of chopped spinach in a little olive oil with a clove or two of minced garlic. Set Aside
  2. Cook 1/2 cup polenta according to the package directions using equal parts of milk and chicken broth. When the polenta is the consistency you like, add the spinach mixture, 1 small pat of butter, and a small handful of Romano cheese. Serve.
Share this Recipe
Powered byWP Ultimate Recipe