A New Year…A New Project…A New Pasta

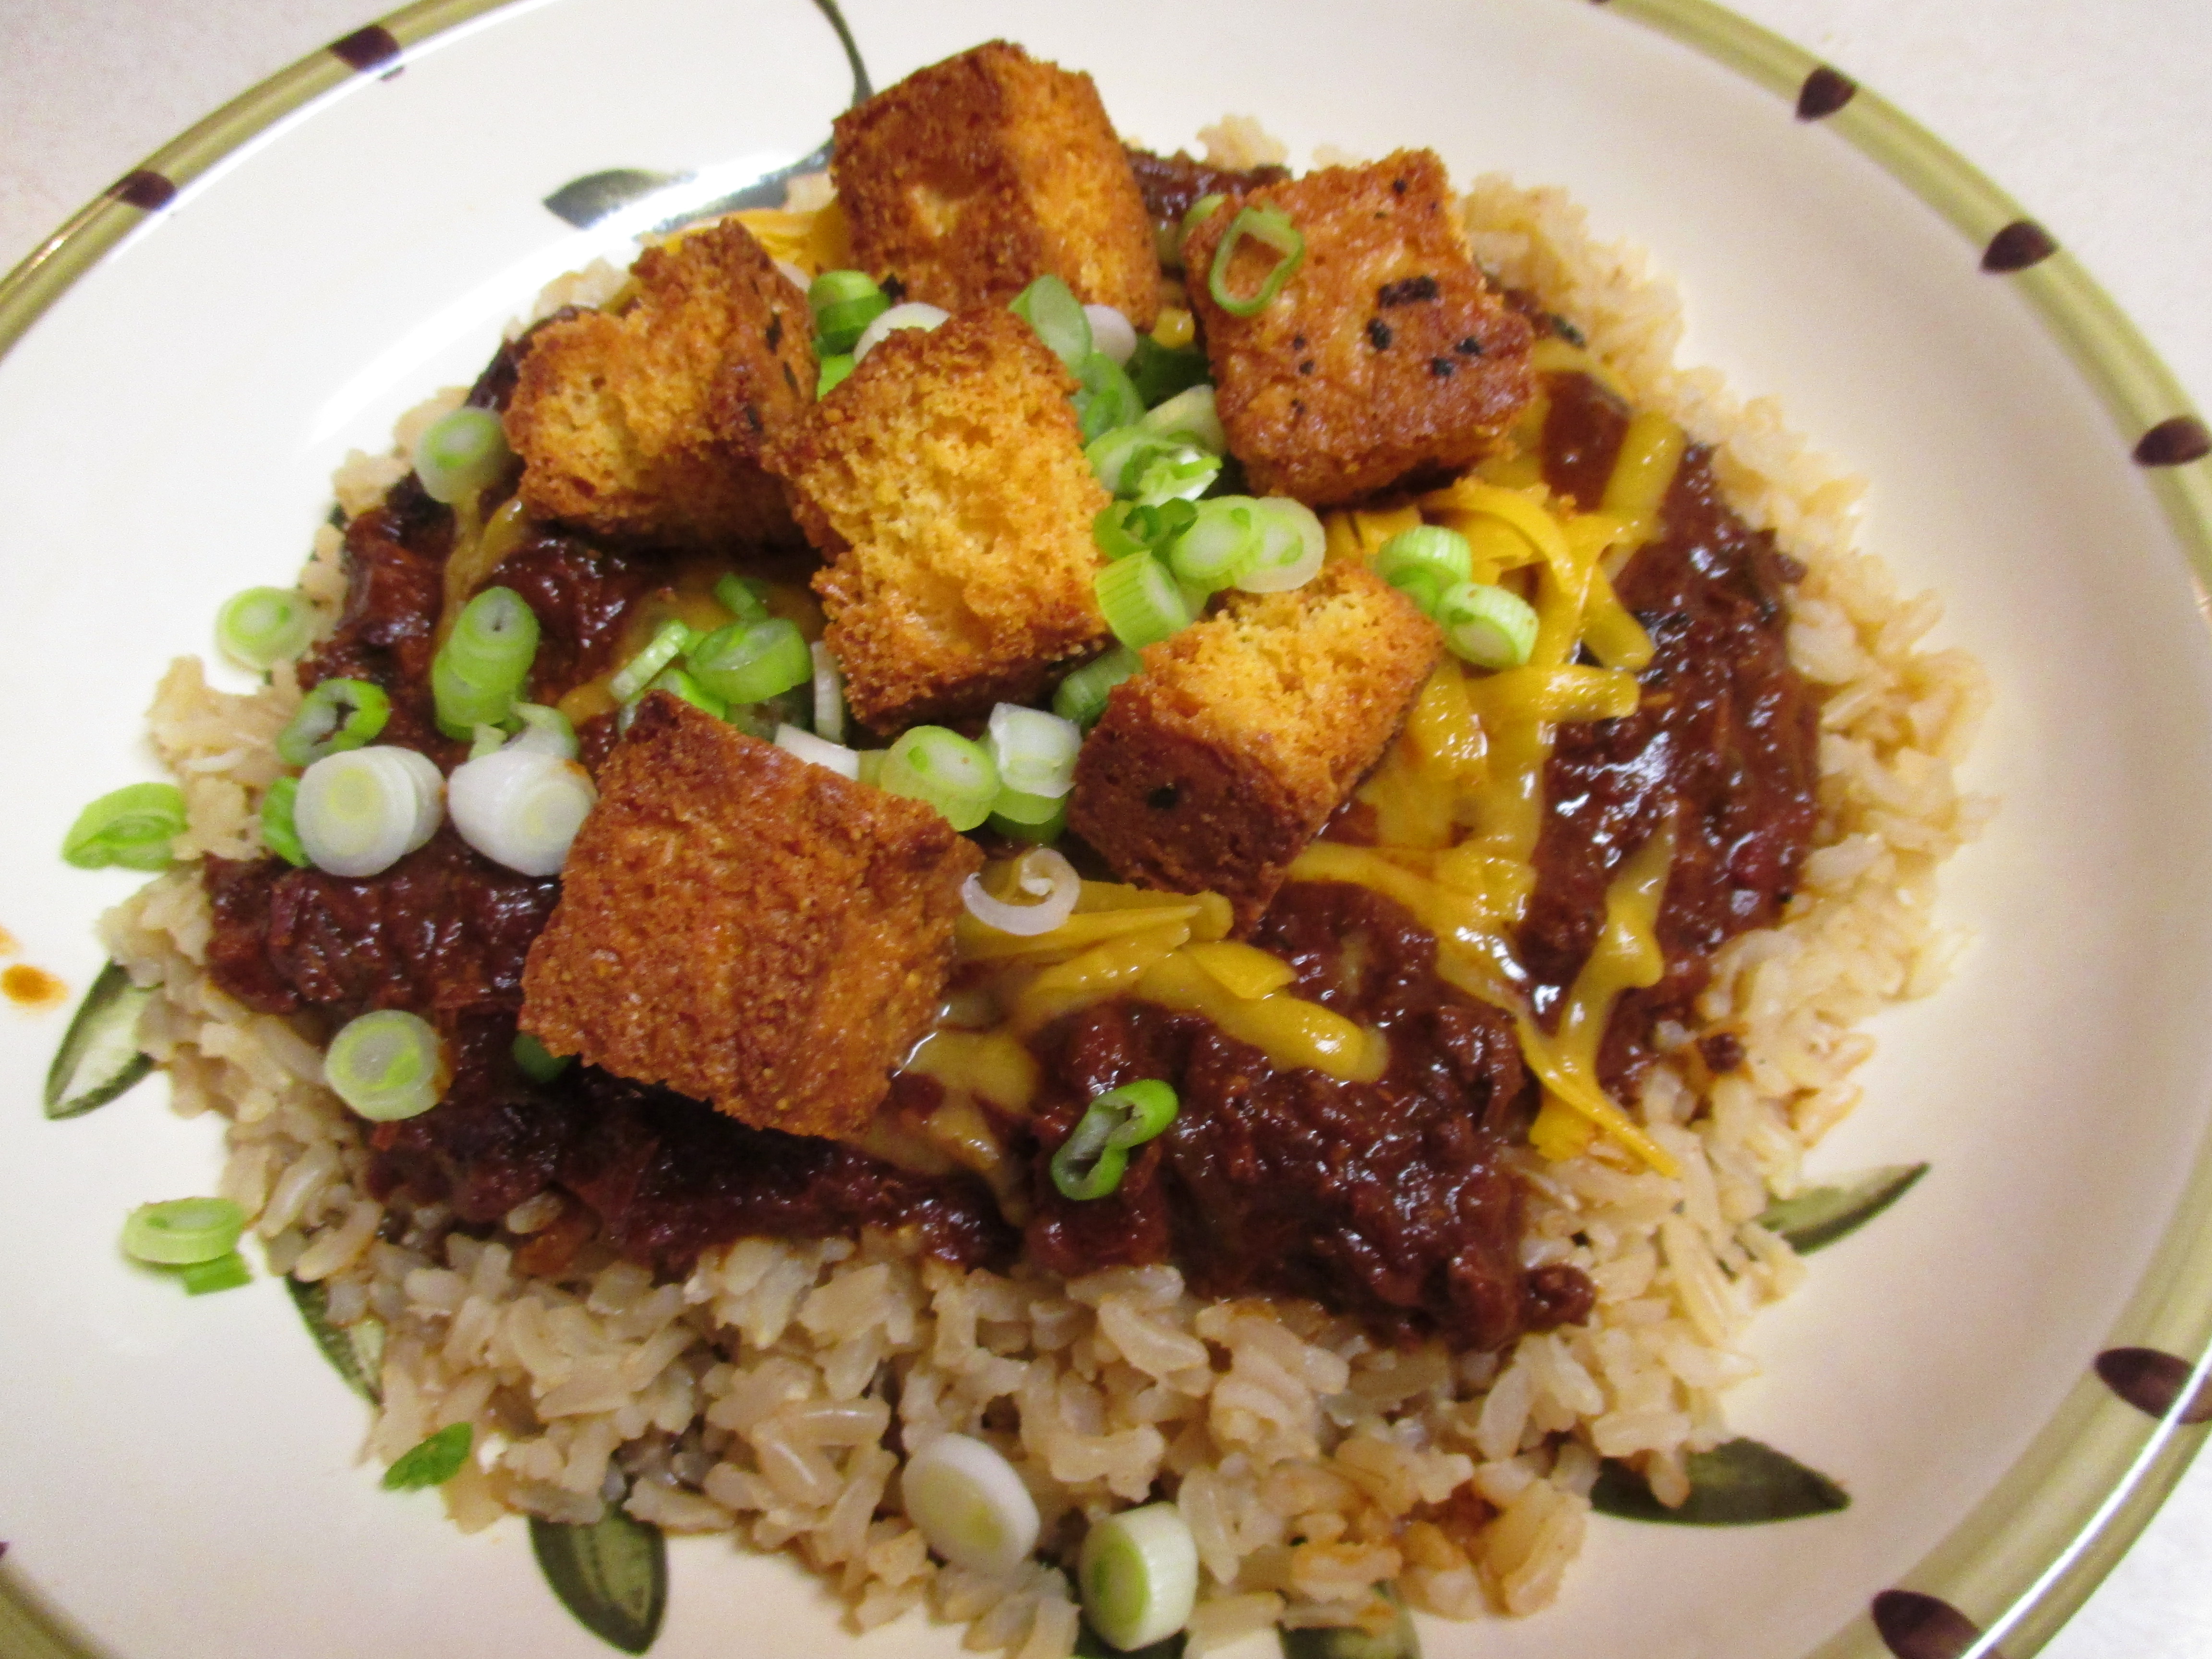
We are already a week into the new year. I’ve decided that I want to challenge myself to be more mindful of the food I create this year. I know that every dish that I make doesn’t need to have its own moment as the star of a post, but I thought that I would try to catalog each dish that I create with a picture and a brief description. I will admit that this is partly to help me keep track of what I make, my memory, after all, isn’t getting any younger. You need have no fear of being overwhelmed with posts because I will only be sharing some of them in detail.  Bear with me this first week, I’ll share several of the plates that graced our table and yes, there will be a recipe (just one) at the end.

We started the year off with what I think was a wonderful NYE dinner. Yes it was technically 2015, but I wanted to set the tone for the coming year and no it does not mean that we will eat like this on a regular basis. We had Surf, and Turf, and Turf.IMG_0998

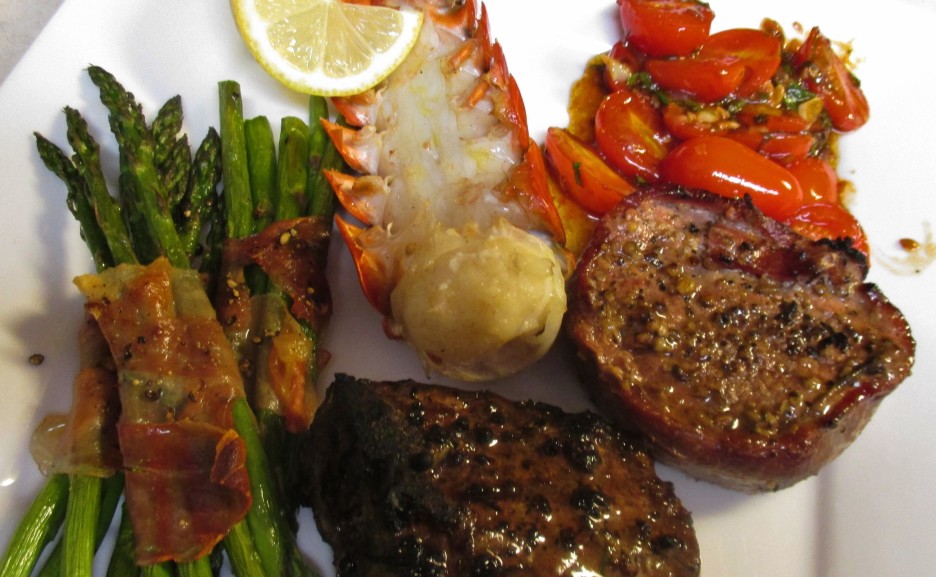
A small lobster tail, a bacon wrapped filet, and a lamb chop all were grilled to perfection by Papa D. Proscuitto wrapped asparagus and sautéed grape tomatoes completed the plate. We said goodbye to the old year with full and happy stomachs….

With the meat feast behind us we entered into the new year. Continuing on the theme of healthy vegetable forward meals, I turned 8 ounces of pork into  colorful kabobs that  were as tasty as they were healthy. Peppers, onions, yellow squash, and potatoes were marinated and grilled before they came to rest on a bed of sautéed spinach.IMG_1012

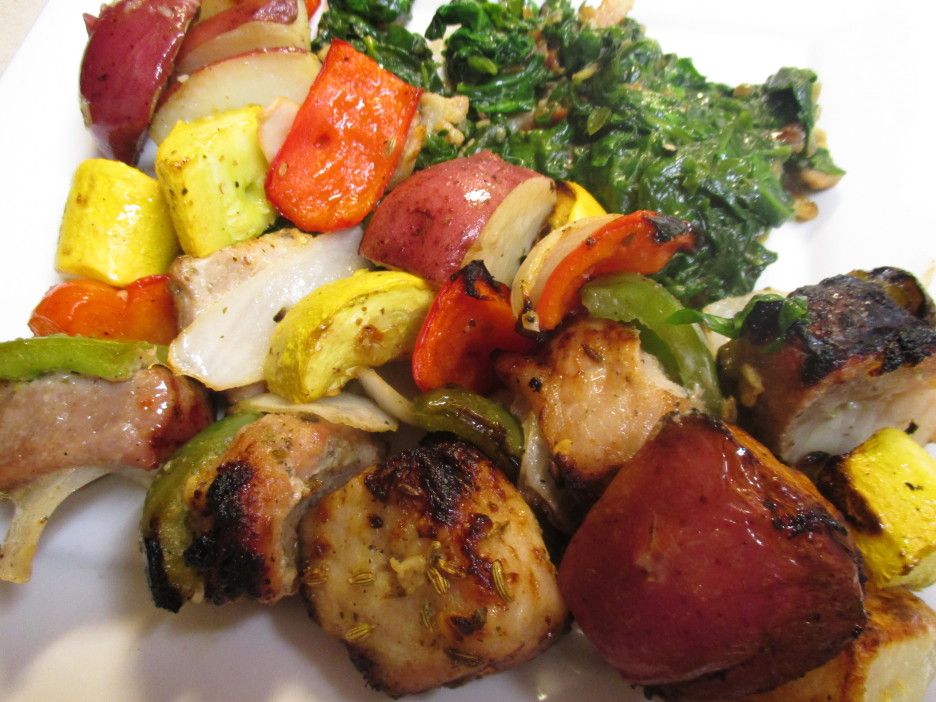
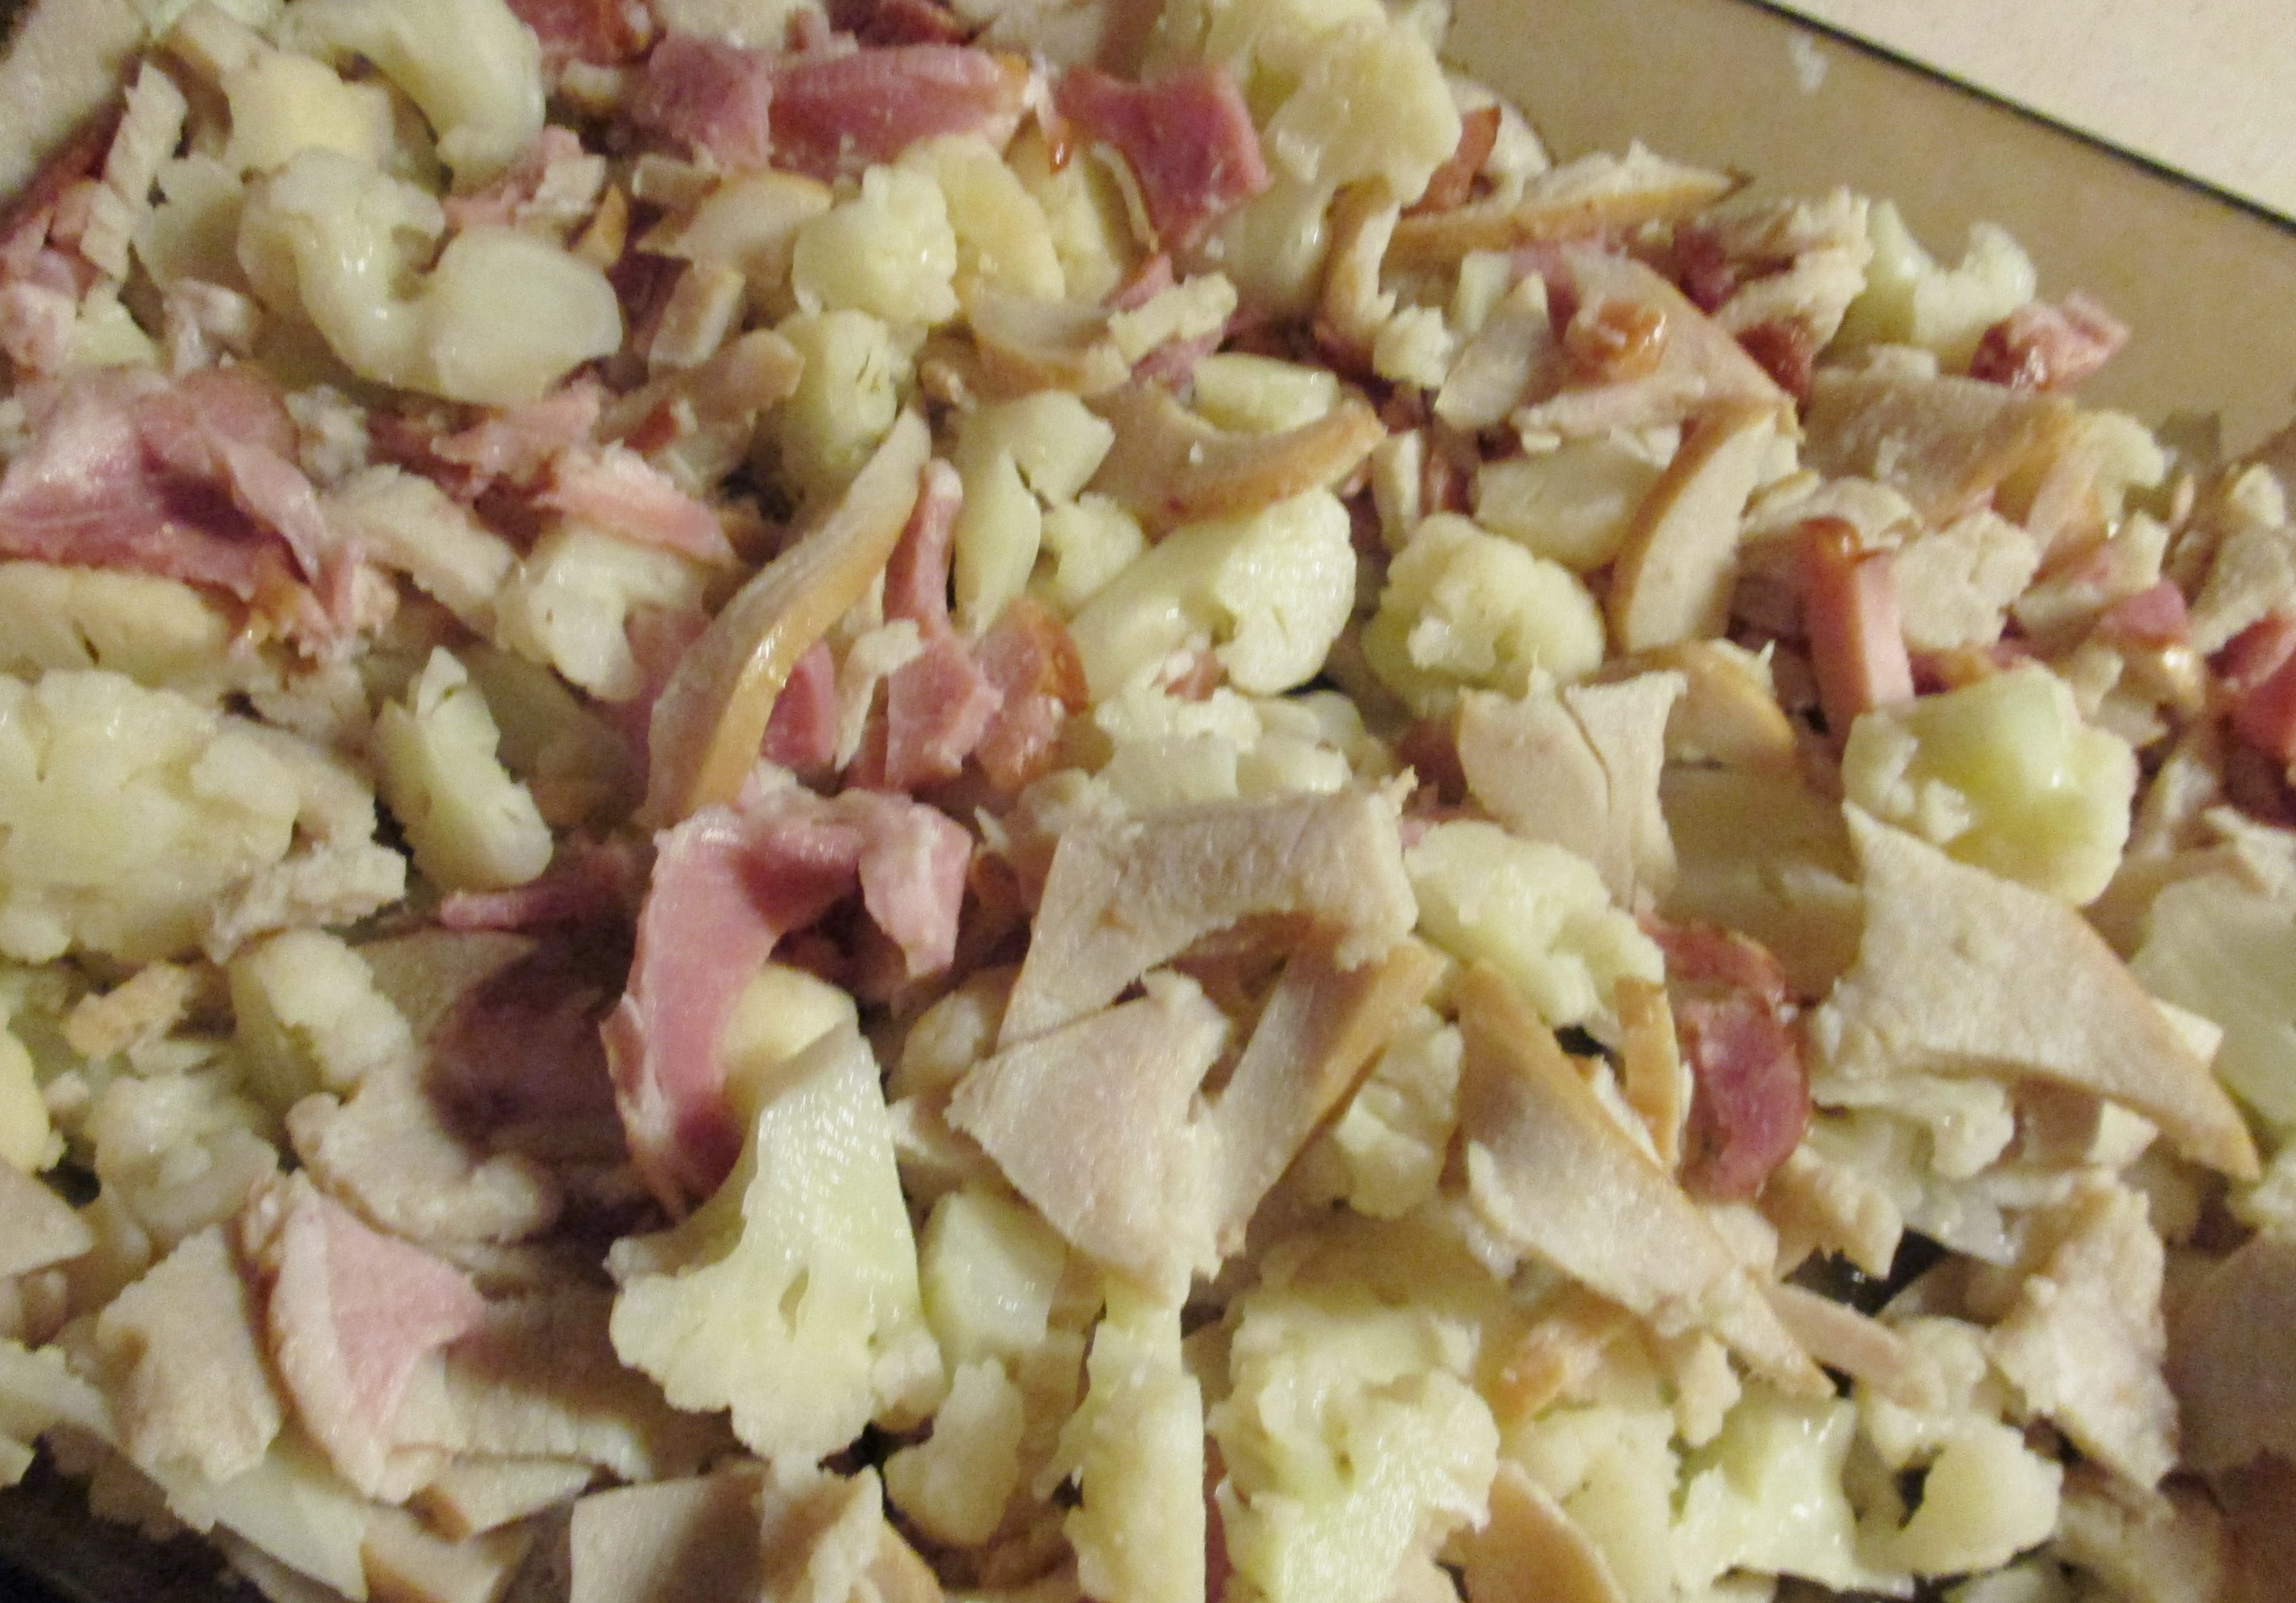
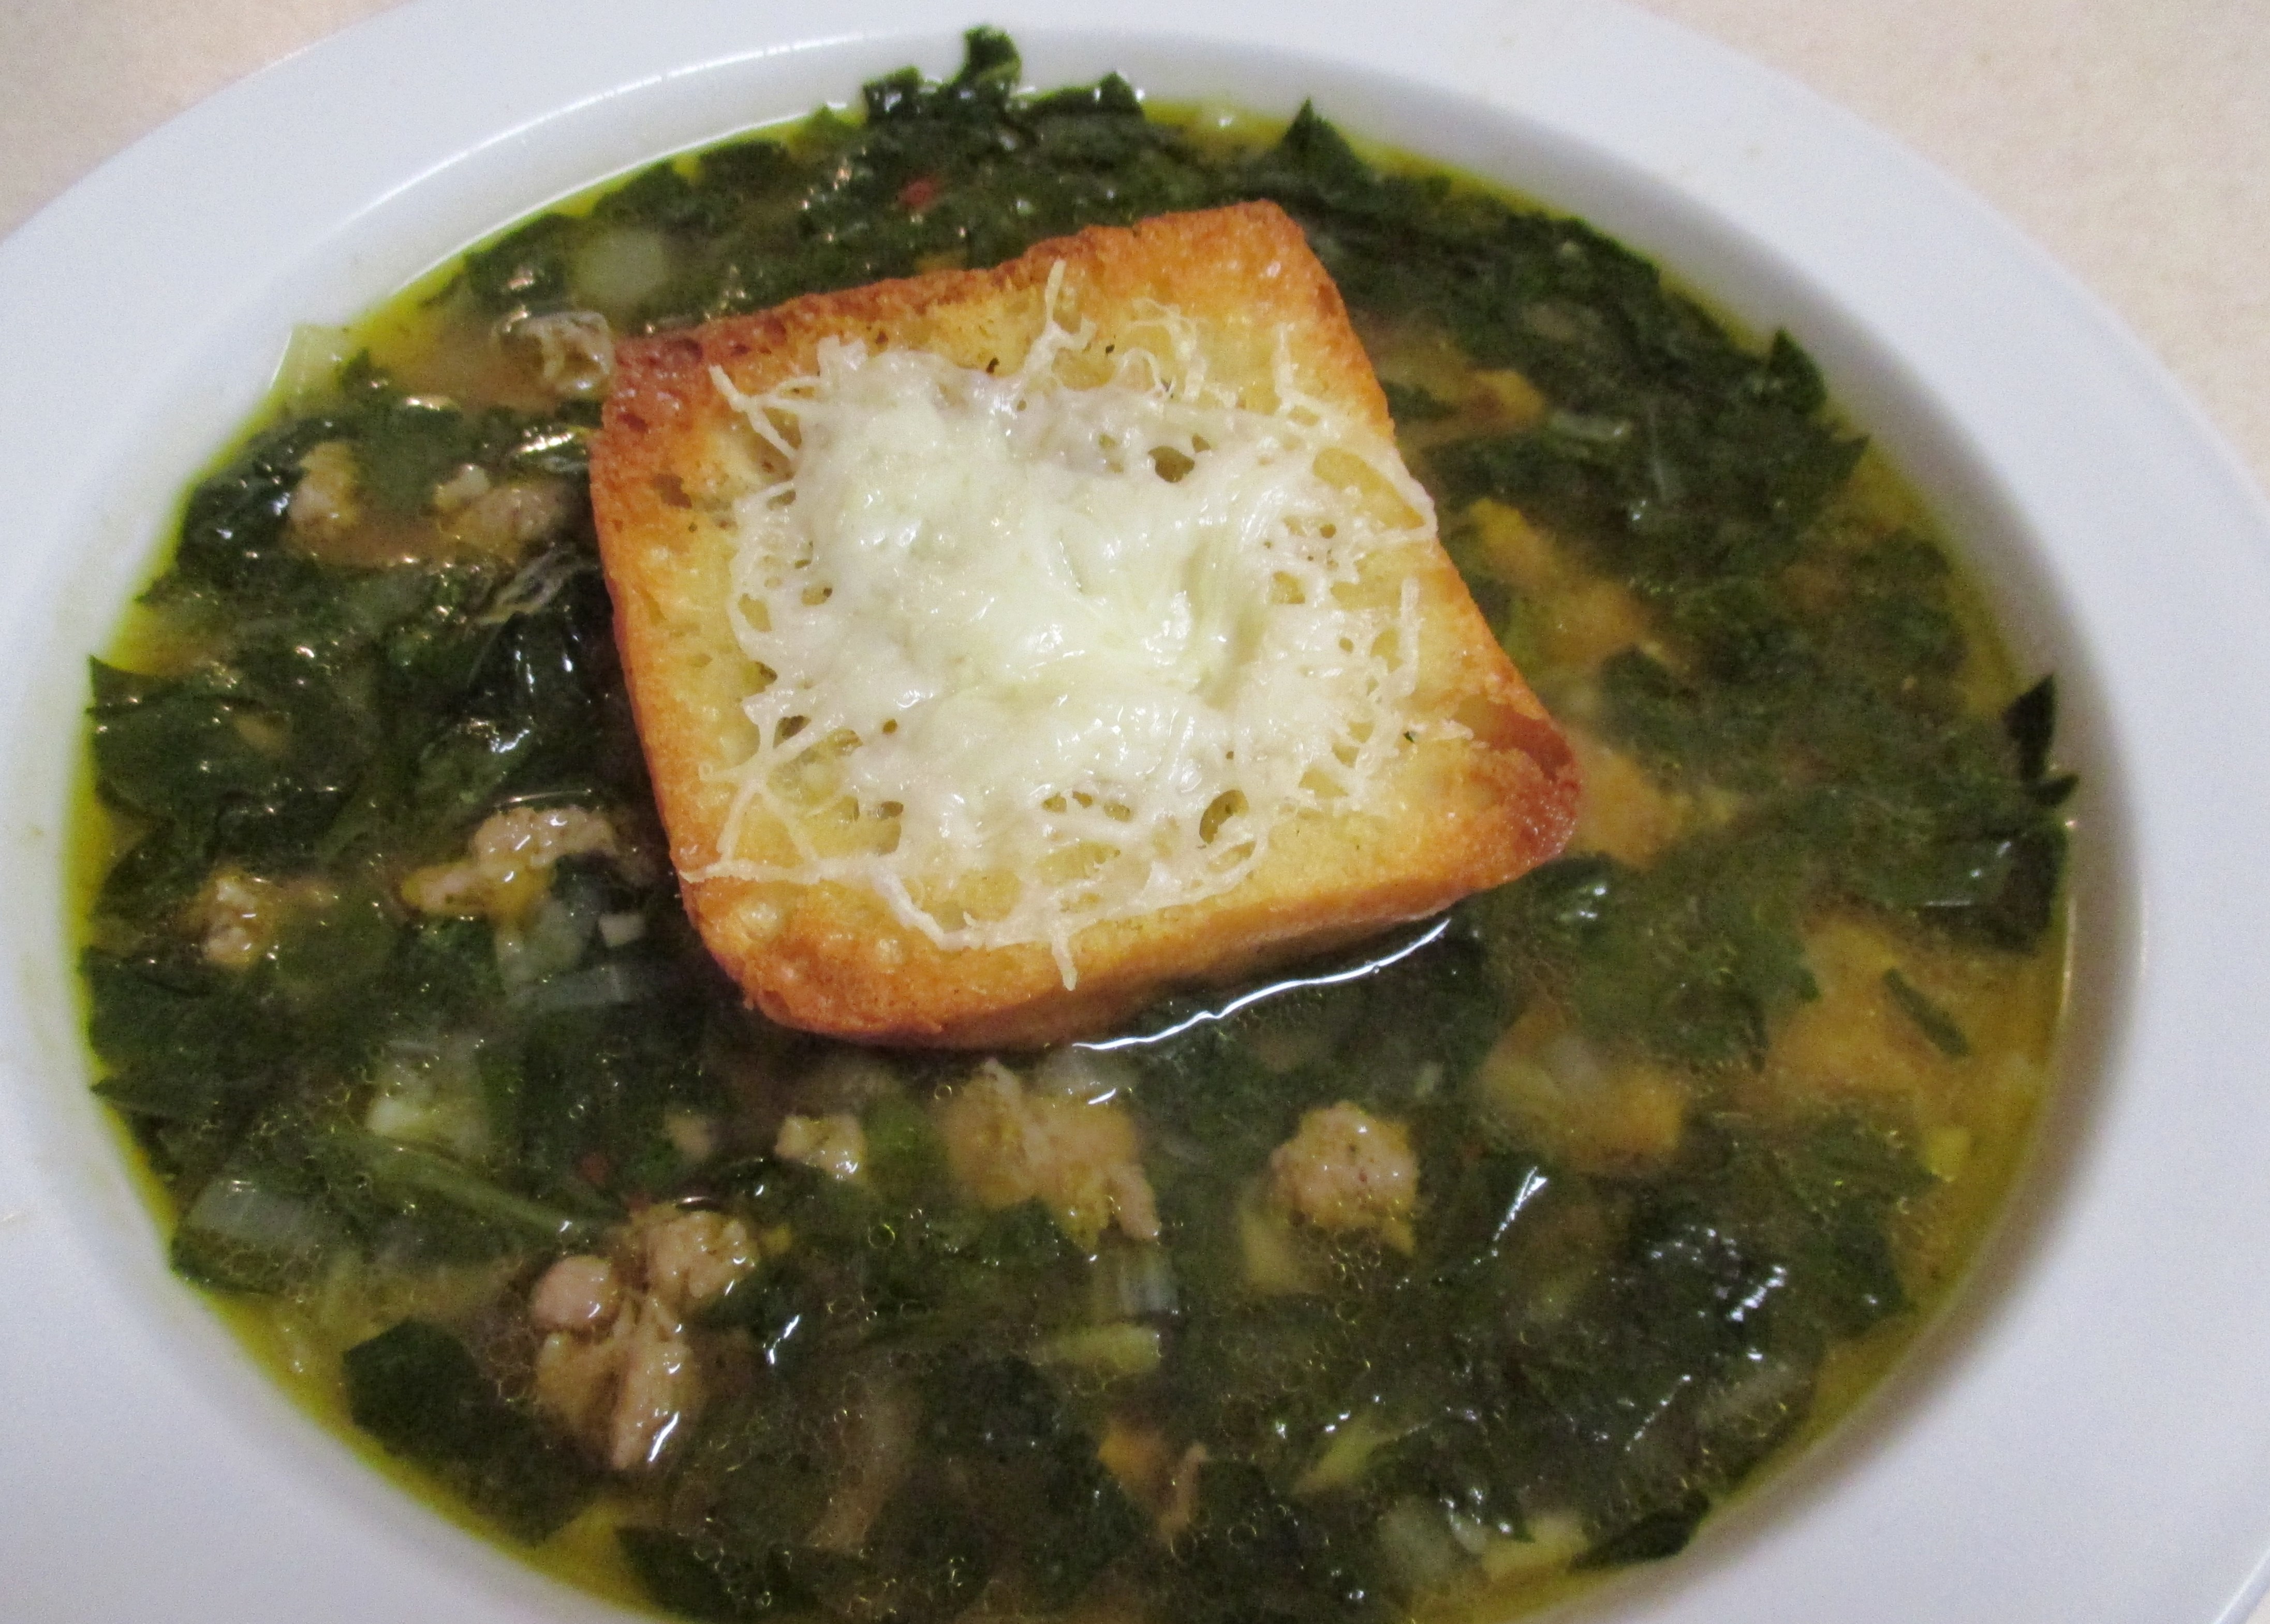
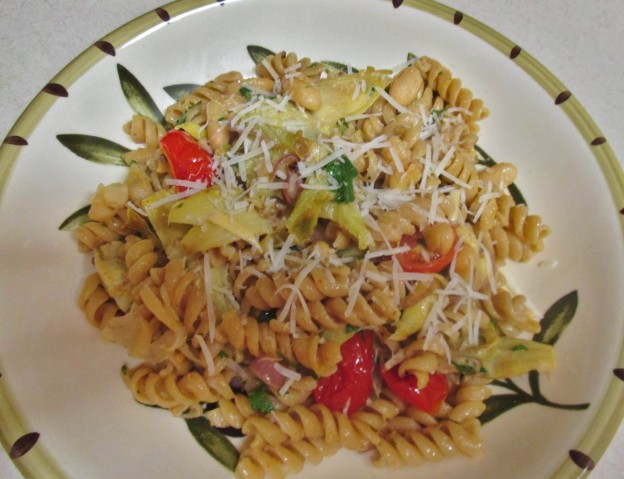
I plan to keep “Meatless Mondays” on the menu. I may even throw in a Meatless Wednesday or IMG_1033
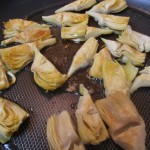
Thursday from time to time. Our first Monday Minus Meat was a pasta dish that featured Artichokes and Cannellini Beans with Whole Wheat Rotini. I started with a can of whole artichoke hearts. I prefer these because they hold together better than the quartered variety and you can cut them to the size that works for you. In this case, I quartered them (ironic, huh?) before I browned them in a skillet with olive oil. Frozen hearts are another good option, but unless you are near a Trader Joe’s, you may not find them. Of course, if you can find fresh baby artichokes that would be wonderful…I didn’t have any luck with that, either, but I did have the can of hearts in the pantry.

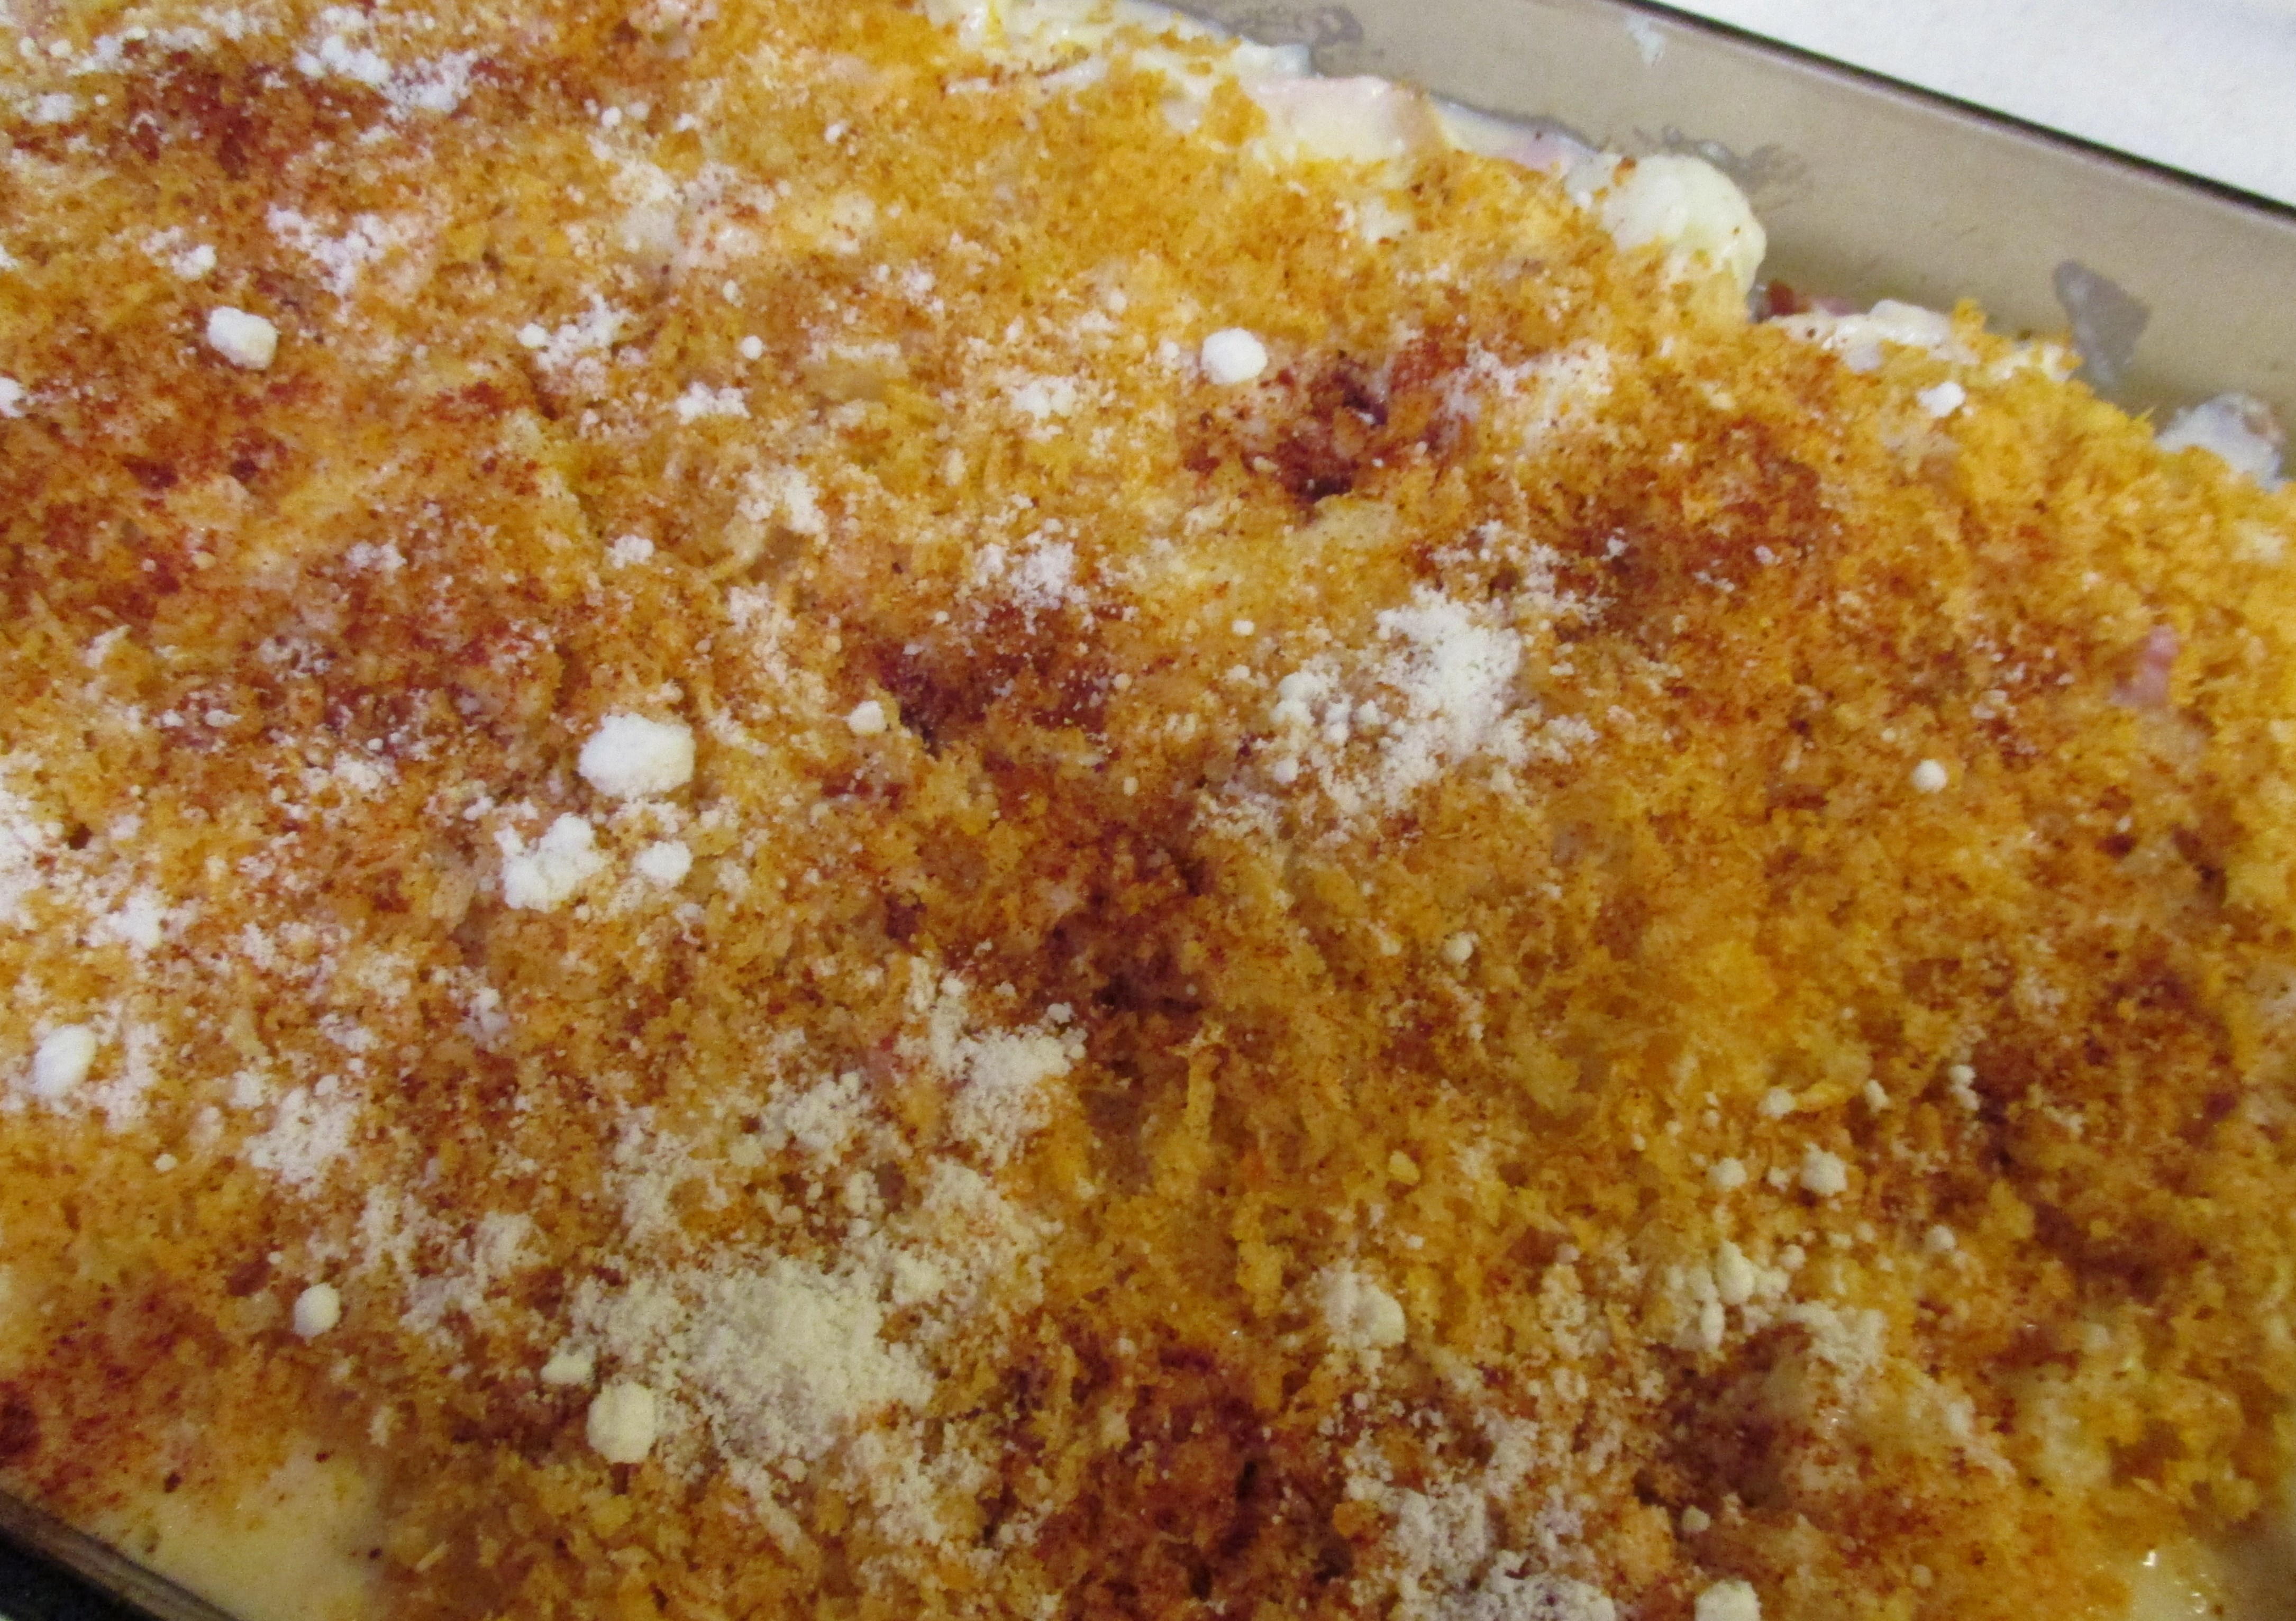
Mama D’s Trinity went into the pan. This time the onions were red and the garlic was sliced. I cut all the grape tomatoes that I had in half and added them to the pan along with the drained and rinsed beans. I added a generous splash of vegetable stock to keep everything lubricated. The sauce would later be bulked up with a cup of the pasta water. I added some red pepper flakes and fresh parsley to seal the deal. Then I let it rain Pecorino Romano Cheese.IMG_1043

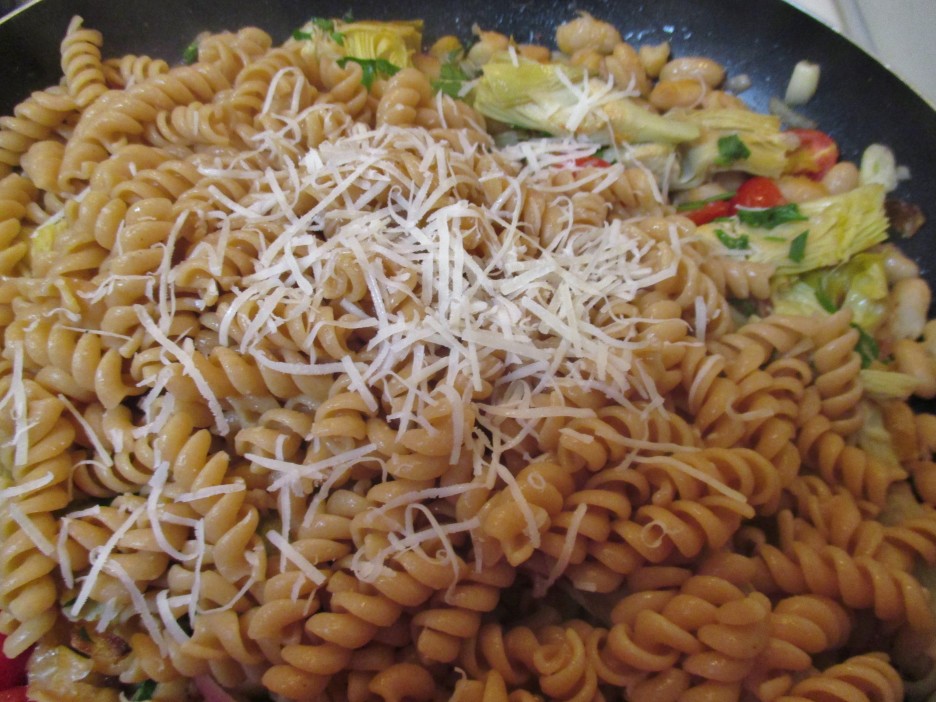
This dish will feed two lavishly with enough left over  for someone to have a nice lunch the next day.IMG_1045

Pasta with Artichokes and Cannellini Beans
Print Recipe
Servings
3
Servings
3
Pasta with Artichokes and Cannellini Beans
Print Recipe
Servings
3
Servings
3
Ingredients
Servings:
Instructions
  1. Cook the pasta according to the package directions minus a minute or 2. While the pasta is cooking, make the sauce.
  2. Add 1 tablespoon of the olive oil to a hot skillet. Place the artichoke hearts in a single layer in the pan. Cook until lightly brown, turning as needed, 4-5 minutes. Remove from the pan and set aside.
  3. Add the remaining olive oil to the pan and add the onions and garlic. Cook a few minutes until they soften and smell wonderful.
  4. Add the beans and tomatoes and toss to combine. Add the vegetable stock and cook for 4 minutes or so. If the mixture seems dry, add a little more stock.
  5. Return the Artichokes to the skillet. When the pasta is cooked, reserve one cup of the pasta water. Drain the pasta and add to the skillet.
  6. Add the pasta water, parsley and pepper flakes to the skillet along with the cheese. Toss everything to combine and allow to cook for another few minutes until the cheese has melted.
  7. Serve with more cheese to add at the table.
Recipe Notes

Share this Recipe
Powered byWP Ultimate Recipe

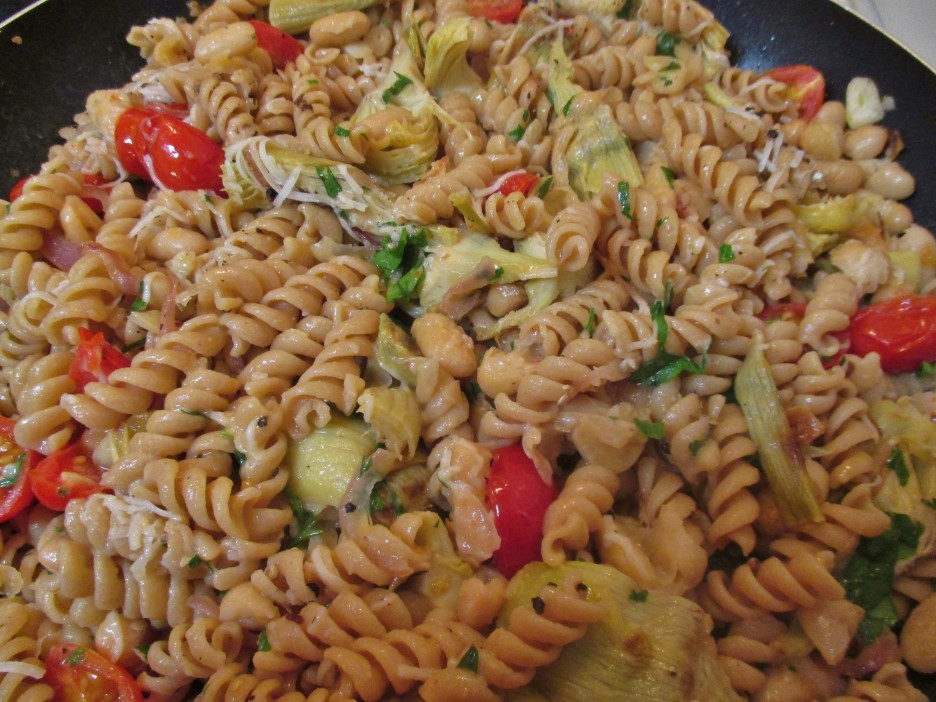
The new year will hold many new adventures and many of them will happen in the kitchen. There will hopefully be a little travel, a lot of family time, and of course, lots of love.

One More Post ….Spinach Fettuccine with Peppers and Salami

This year has flown by. So much has happened that it’s hard to believe that it has only been a year. It’s been a year filled with many good things. The bad things weren’t really bad, just things that happened for the best, as my mother always said. We buried two cars, but got two very nice sensible ones to replace them. We continued at our part-time, semi-retired, jobs and were able to drive to Florida for a long overdue visit with family. We now know that we really like apartment living and have only replaced a few things that we got rid of too hastily. Oh, and the kitchen has been full of love and the recipes I’ve shared have been stellar examples of that. Here’s one more ….

We had lots of leftovers from Christmas Eve and the time had come to use them or loose them. A few carefully chosen items went into this pasta dish. It was simple, easy, and oh so tasty. It was also a riff on another quick pasta dish that I shared long ago…I think I might like this new version even better. Red and green bell pepper strips joined some peppered salami to become a decadent sauce for some spinach fettuccine.IMG_0958

The rest of the ingredients were standard fixtures in the Kitchen of Love…Mama D’s Trinity joined in and  got the party started.IMG_0966
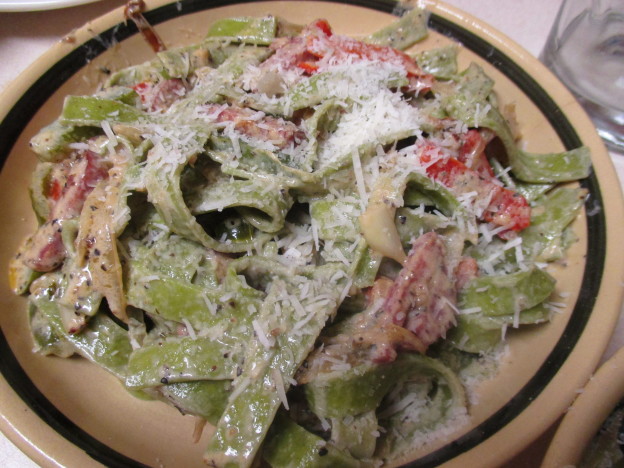
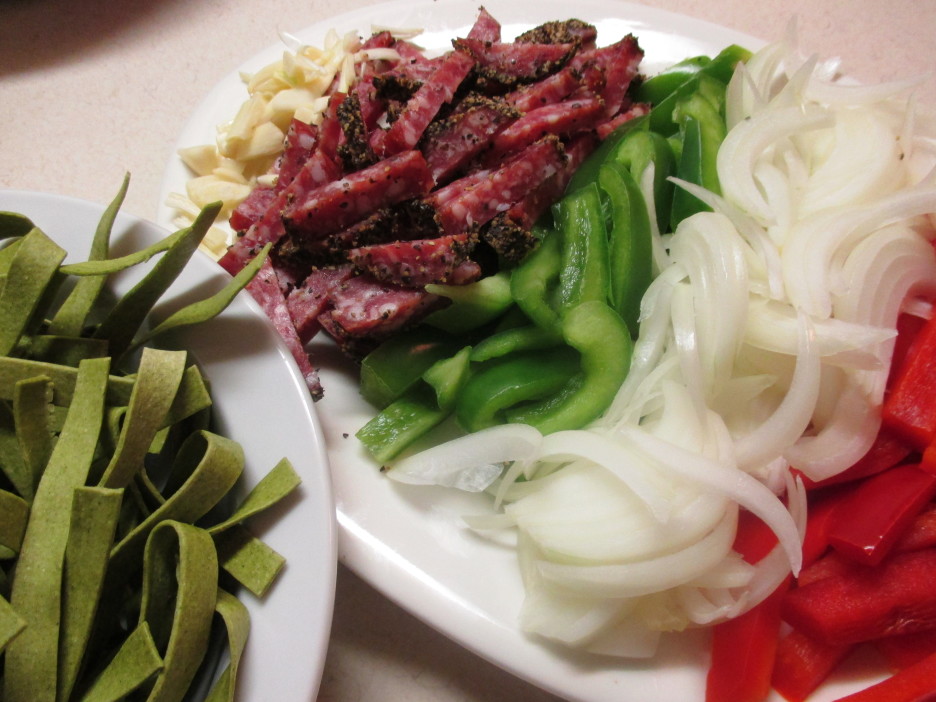
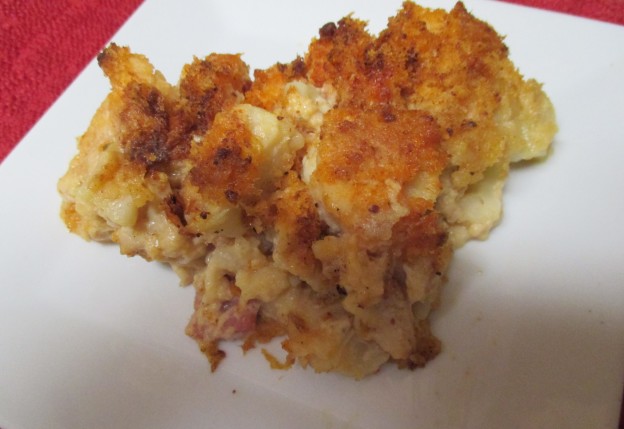
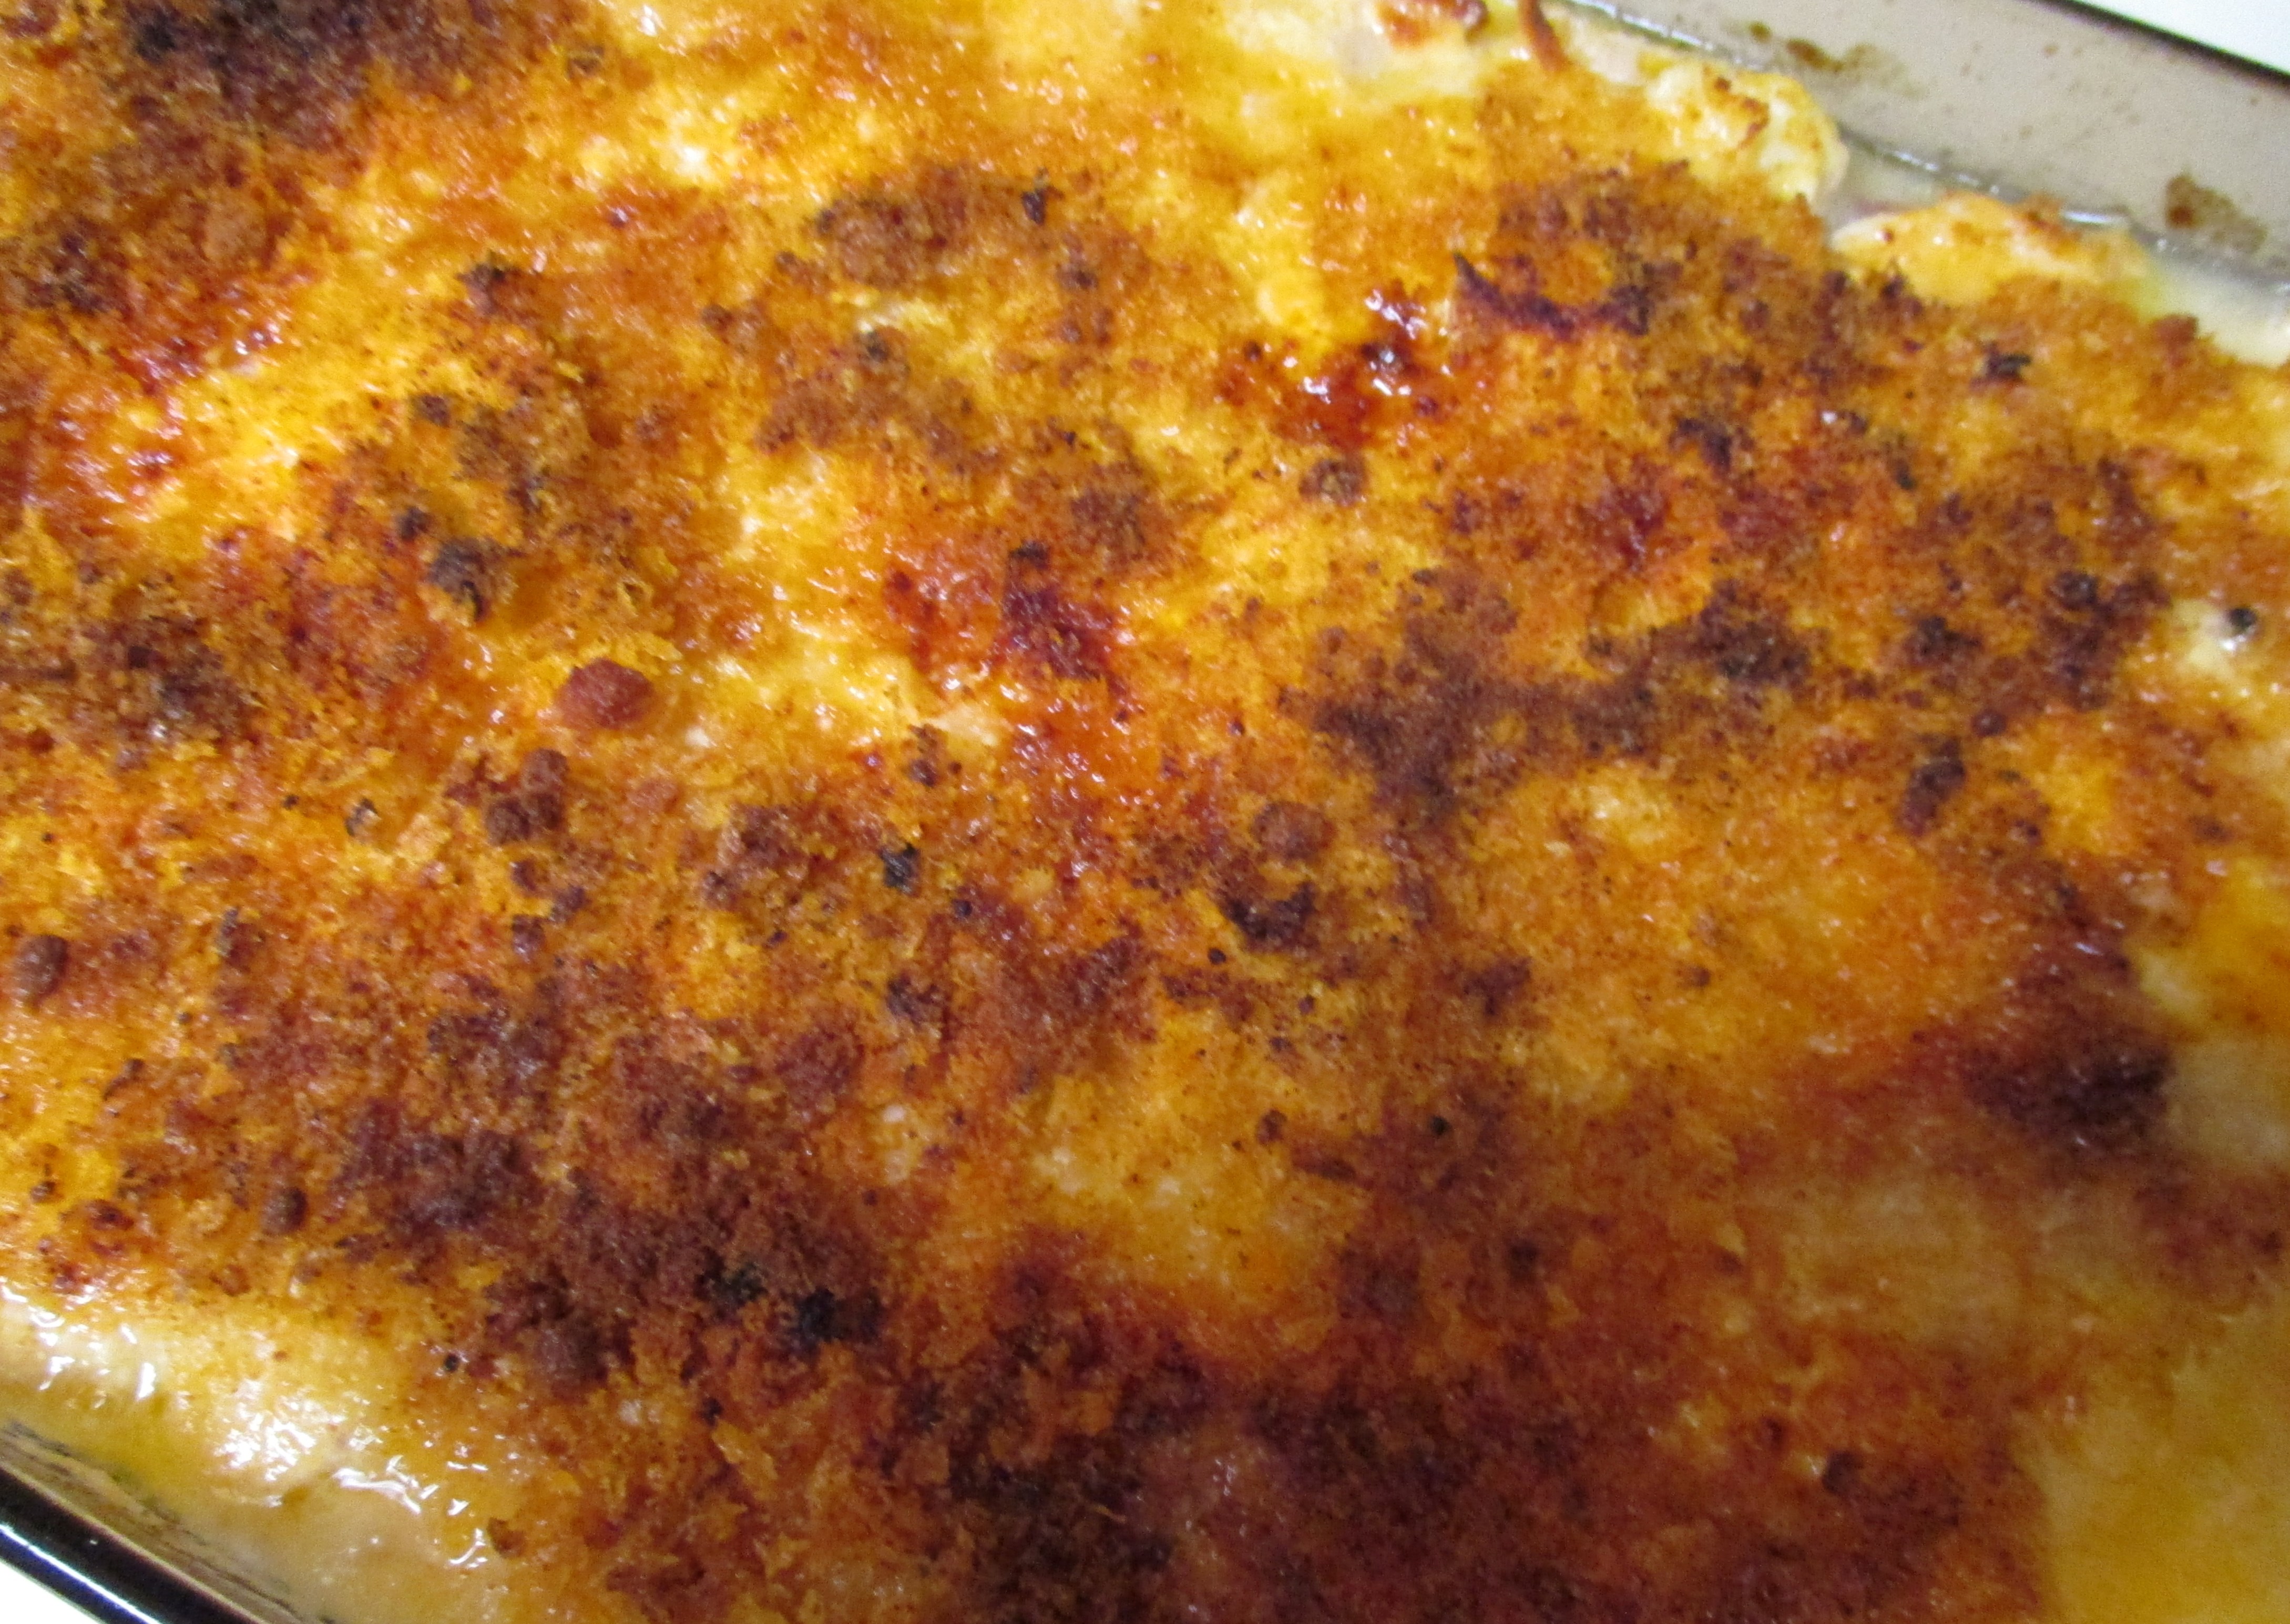
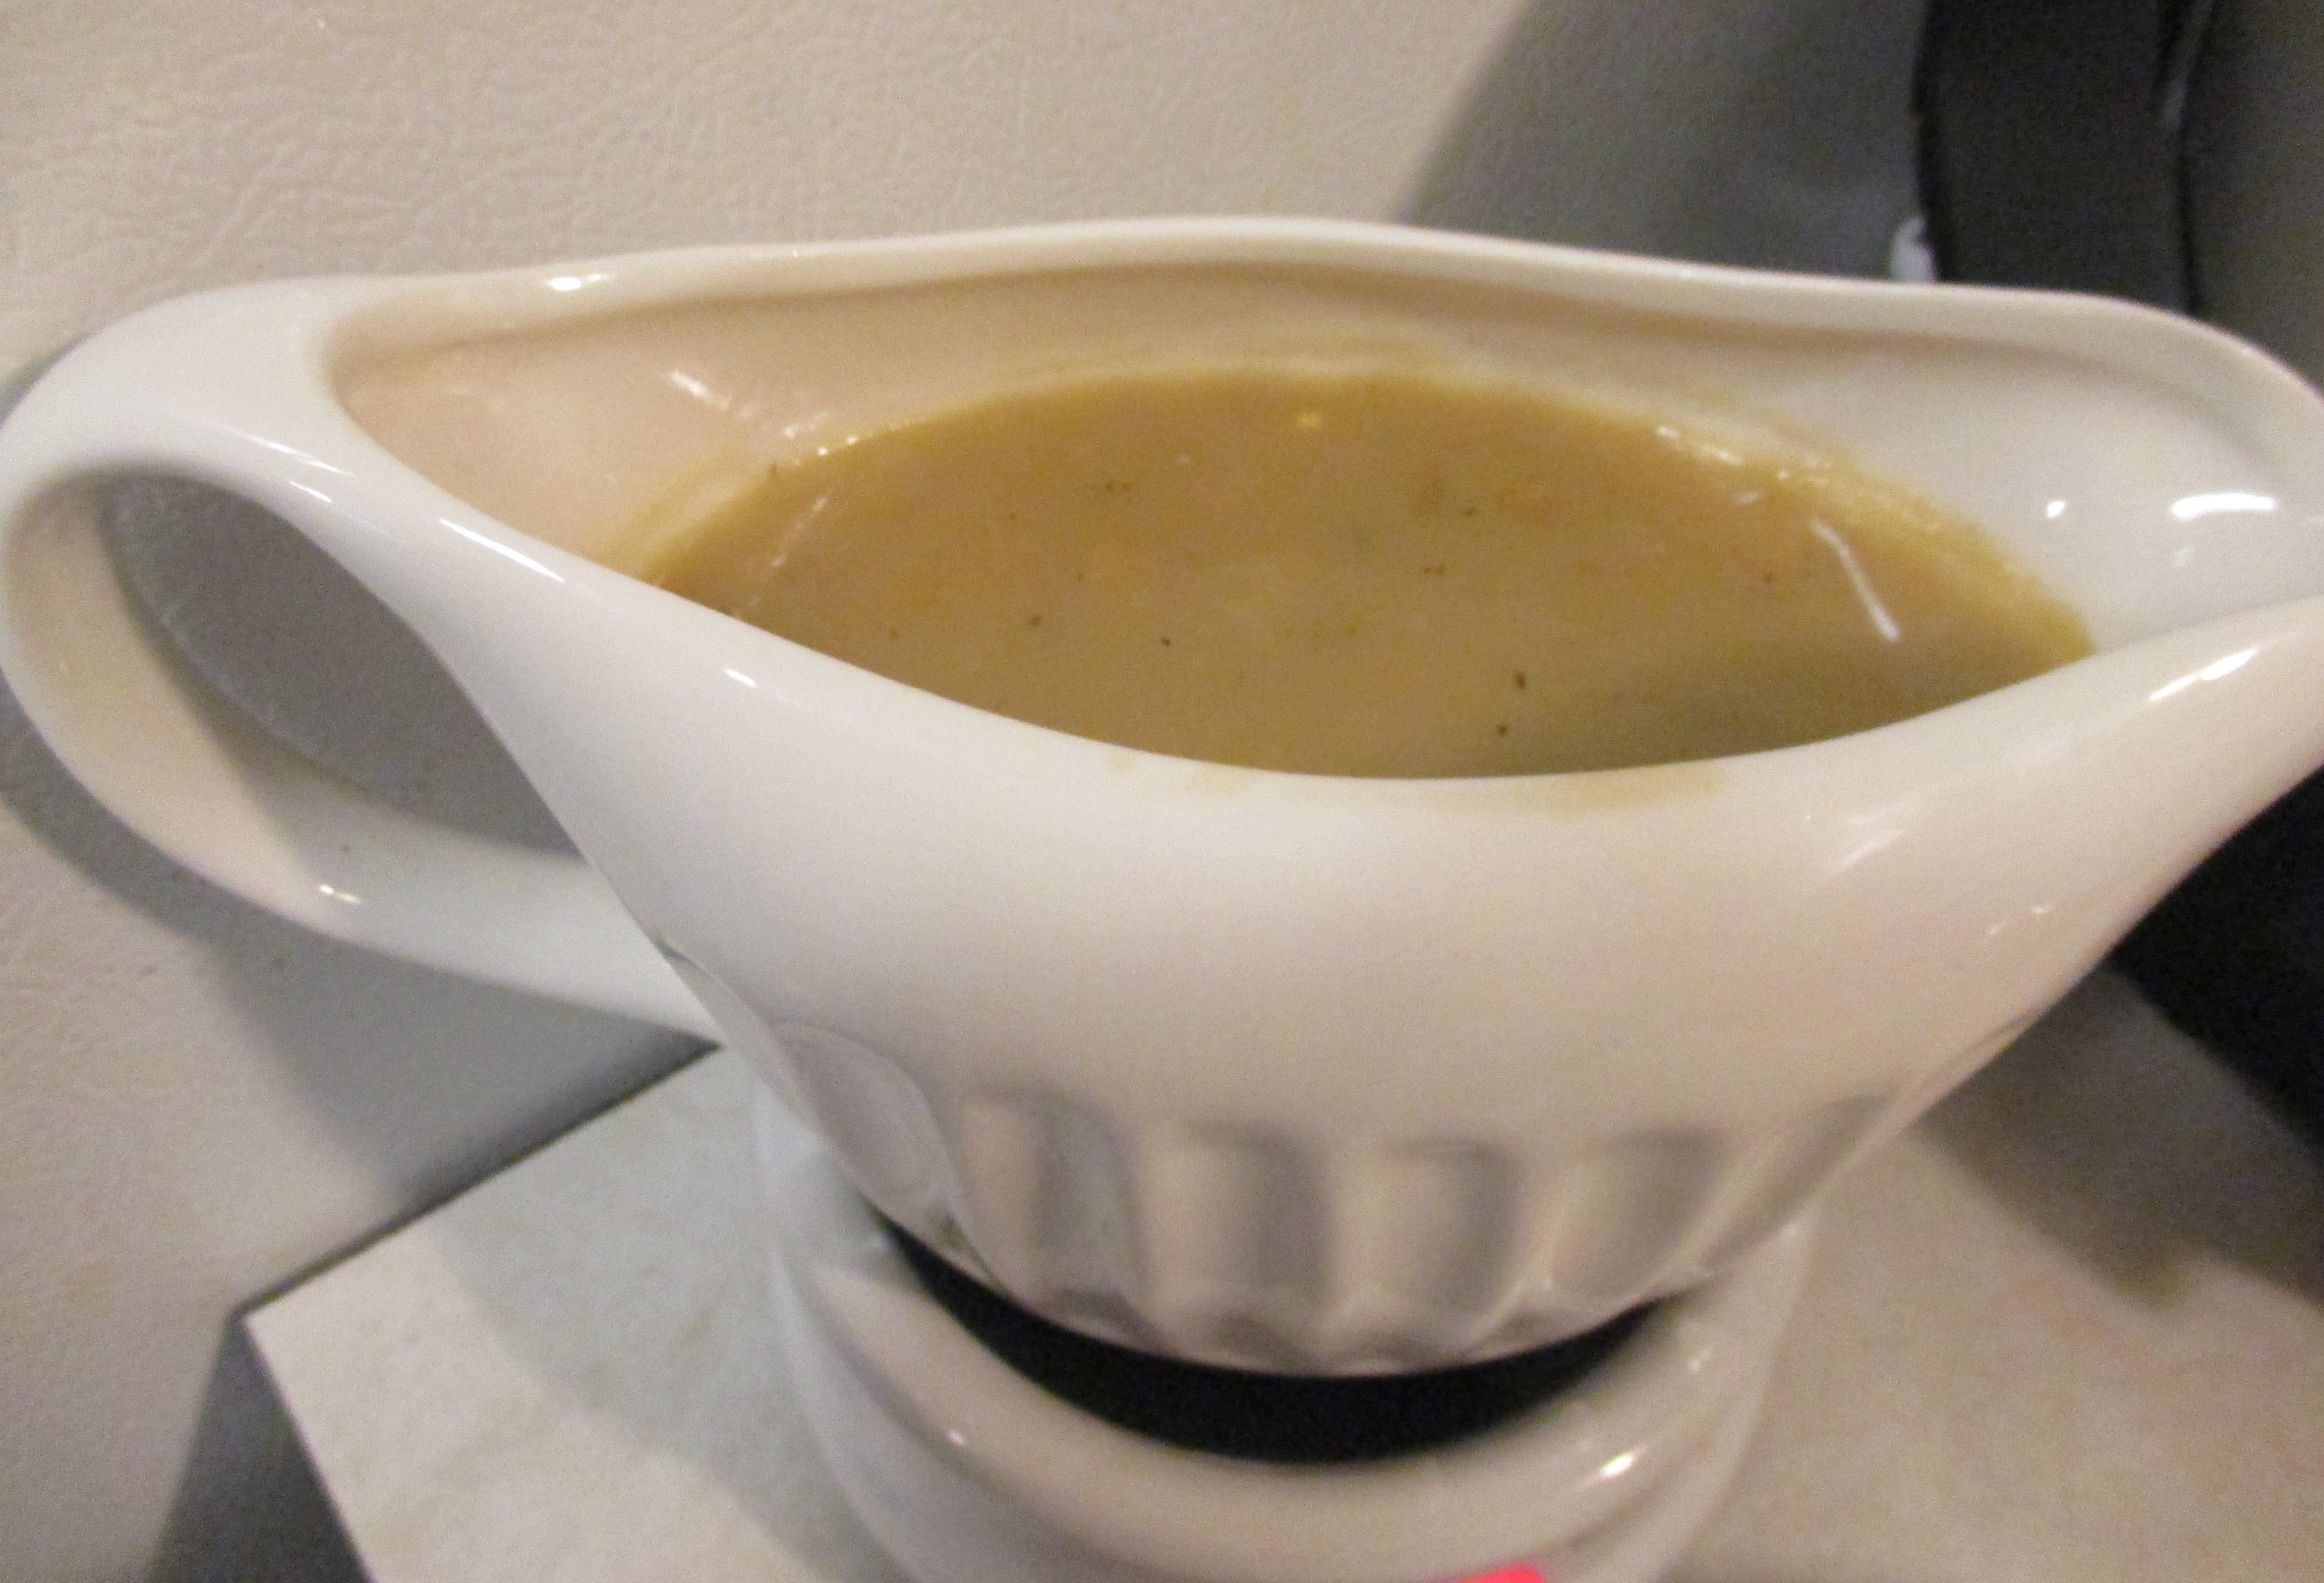
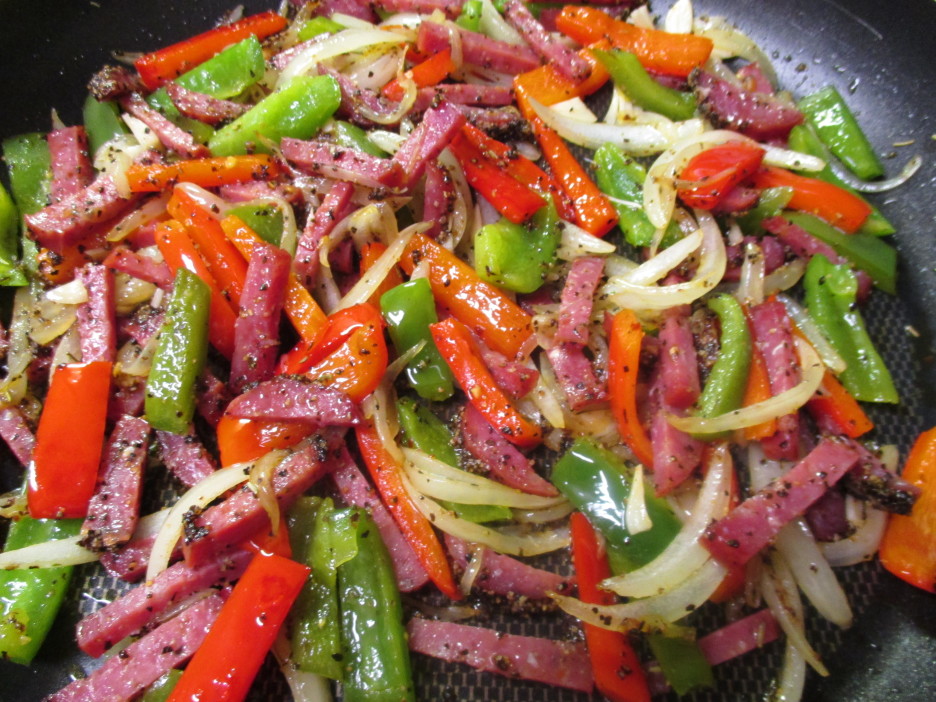
A touch of heavy cream and some milk created a sauce that enveloped the dish luxuriously.IMG_0979
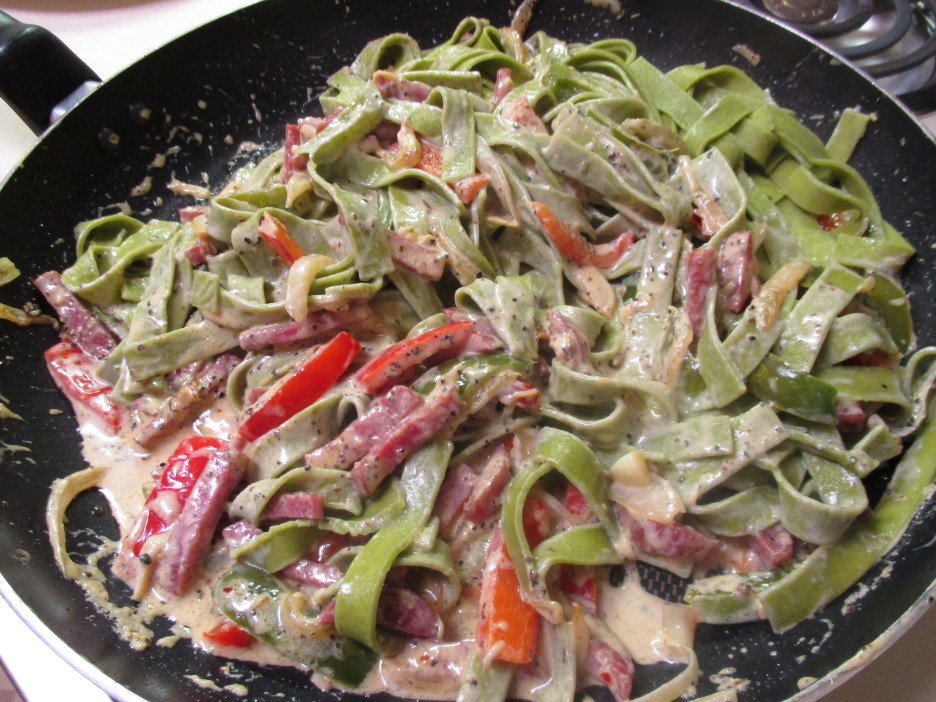
A generous sprinkle of Pecorino Romano and it was ready to eat.IMG_0982
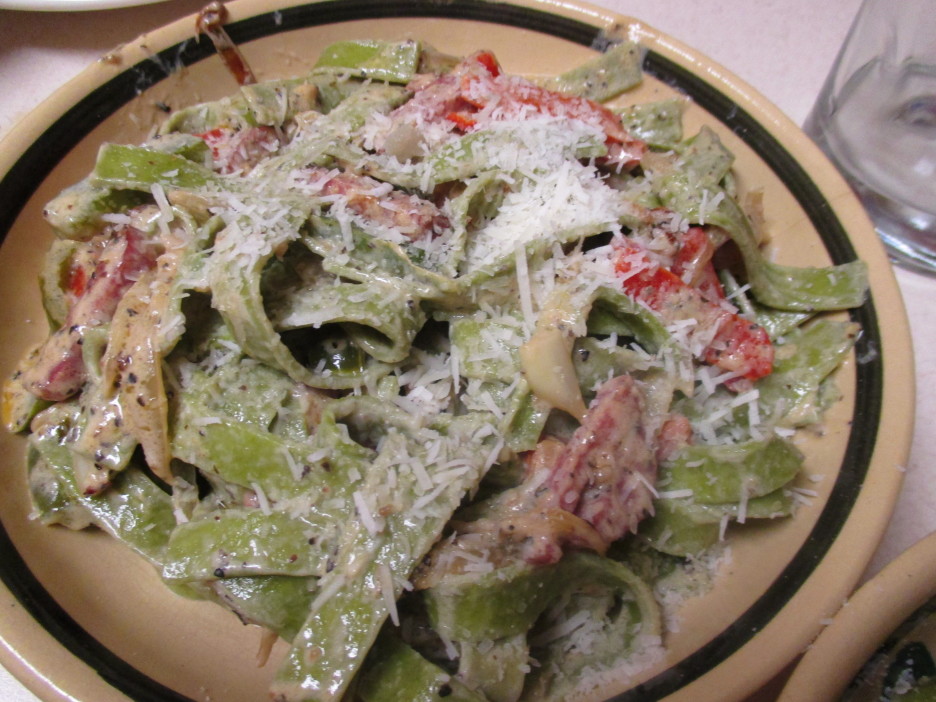
And eat it we did, Papa D and I. We ate it all…the New Year will be here soon and we’ll focus on the healthier side of the kitchen again. Right now, this was the perfect dish to warm a Winter’s Night that finally felt like a Winter’s Night.

This recipe was literally made with what was on hand. Quantities could go in any direction that works for you. I used a combination of milk and cream because I only had a little cream. More cream would be delightful, if you dare. I aimed to keep the peppers onions and salami in similar size pieces mostly because it’s easier to eat that way. So, without further ado, here’s a simple way to say goodbye to the year.

Spinach Fettuccine With Salami and Peppers
Print Recipe
Servings
2
Servings
2
Spinach Fettuccine With Salami and Peppers
Print Recipe
Servings
2
Servings
2
Ingredients
Servings:
Instructions
  1. Cook the pasta in salted boiling water 1 minute less than package directions. While the pasta cooks, prepare the sauce.
  2. Heat the olive oil in a large skillet over medium heat. Add the onions and peppers and cook for 7 - 8 minutes, until the onions are golden and the peppers are soft.
  3. Add the salami and the garlic and cook another 3 - 4 minutes.
  4. Pour in the milk and cream and simmer for 5 minutes or so until the sauce thickens slightly. Stir in 2 tablespoons of the cheese and continue to cook until the cheese melts.
  5. Drain the pasta and add it to the skillet. Toss to coat and cook for a minute or two more.
  6. Divide the goodness into two pasta bowls. Sprinkle one tablespoon of the cheese on each bowl and serve.
Share this Recipe
Powered byWP Ultimate Recipe

The coming year will hold many wonderful things, including the arrival of our third grandson. I know there will be new adventures in the kitchen and in the world. I’ll be sharing the best of everything with you. That’s part of my resolution…to be grateful for the best year yet, and to share my gratitude with my friends… Happy New Year!

                                                              Love, Mama D


Savory Seasoning Trio

“Omne trium perfectum.” Latin scholars know that this means that three makes a perfect set.  That may or may not always be the case, but in Mama D’s Kitchen a set of three makes a very nice gift.

I love to bake and cook at the holidays…giving homemade gifts is something that I have done for years. It never gets old, though the variety and quantity changes from year to year. As I planned out what to make this year, things kept coming up in groups of three. Cookies, chocolate bark, and savory snack mixes all came out in threes. I hope to share many of these “perfect sets” with you and I’m starting with a trio of seasoning blends.

I love lemon. It is bright in taste, its acidity brings out the best in many dishes, and it just looks pretty. This Lemon and Herb blend uses dried fresh lemon zest at center stage. IMG_0899
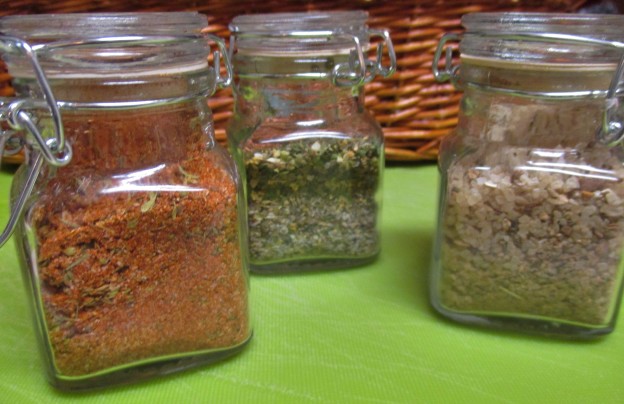
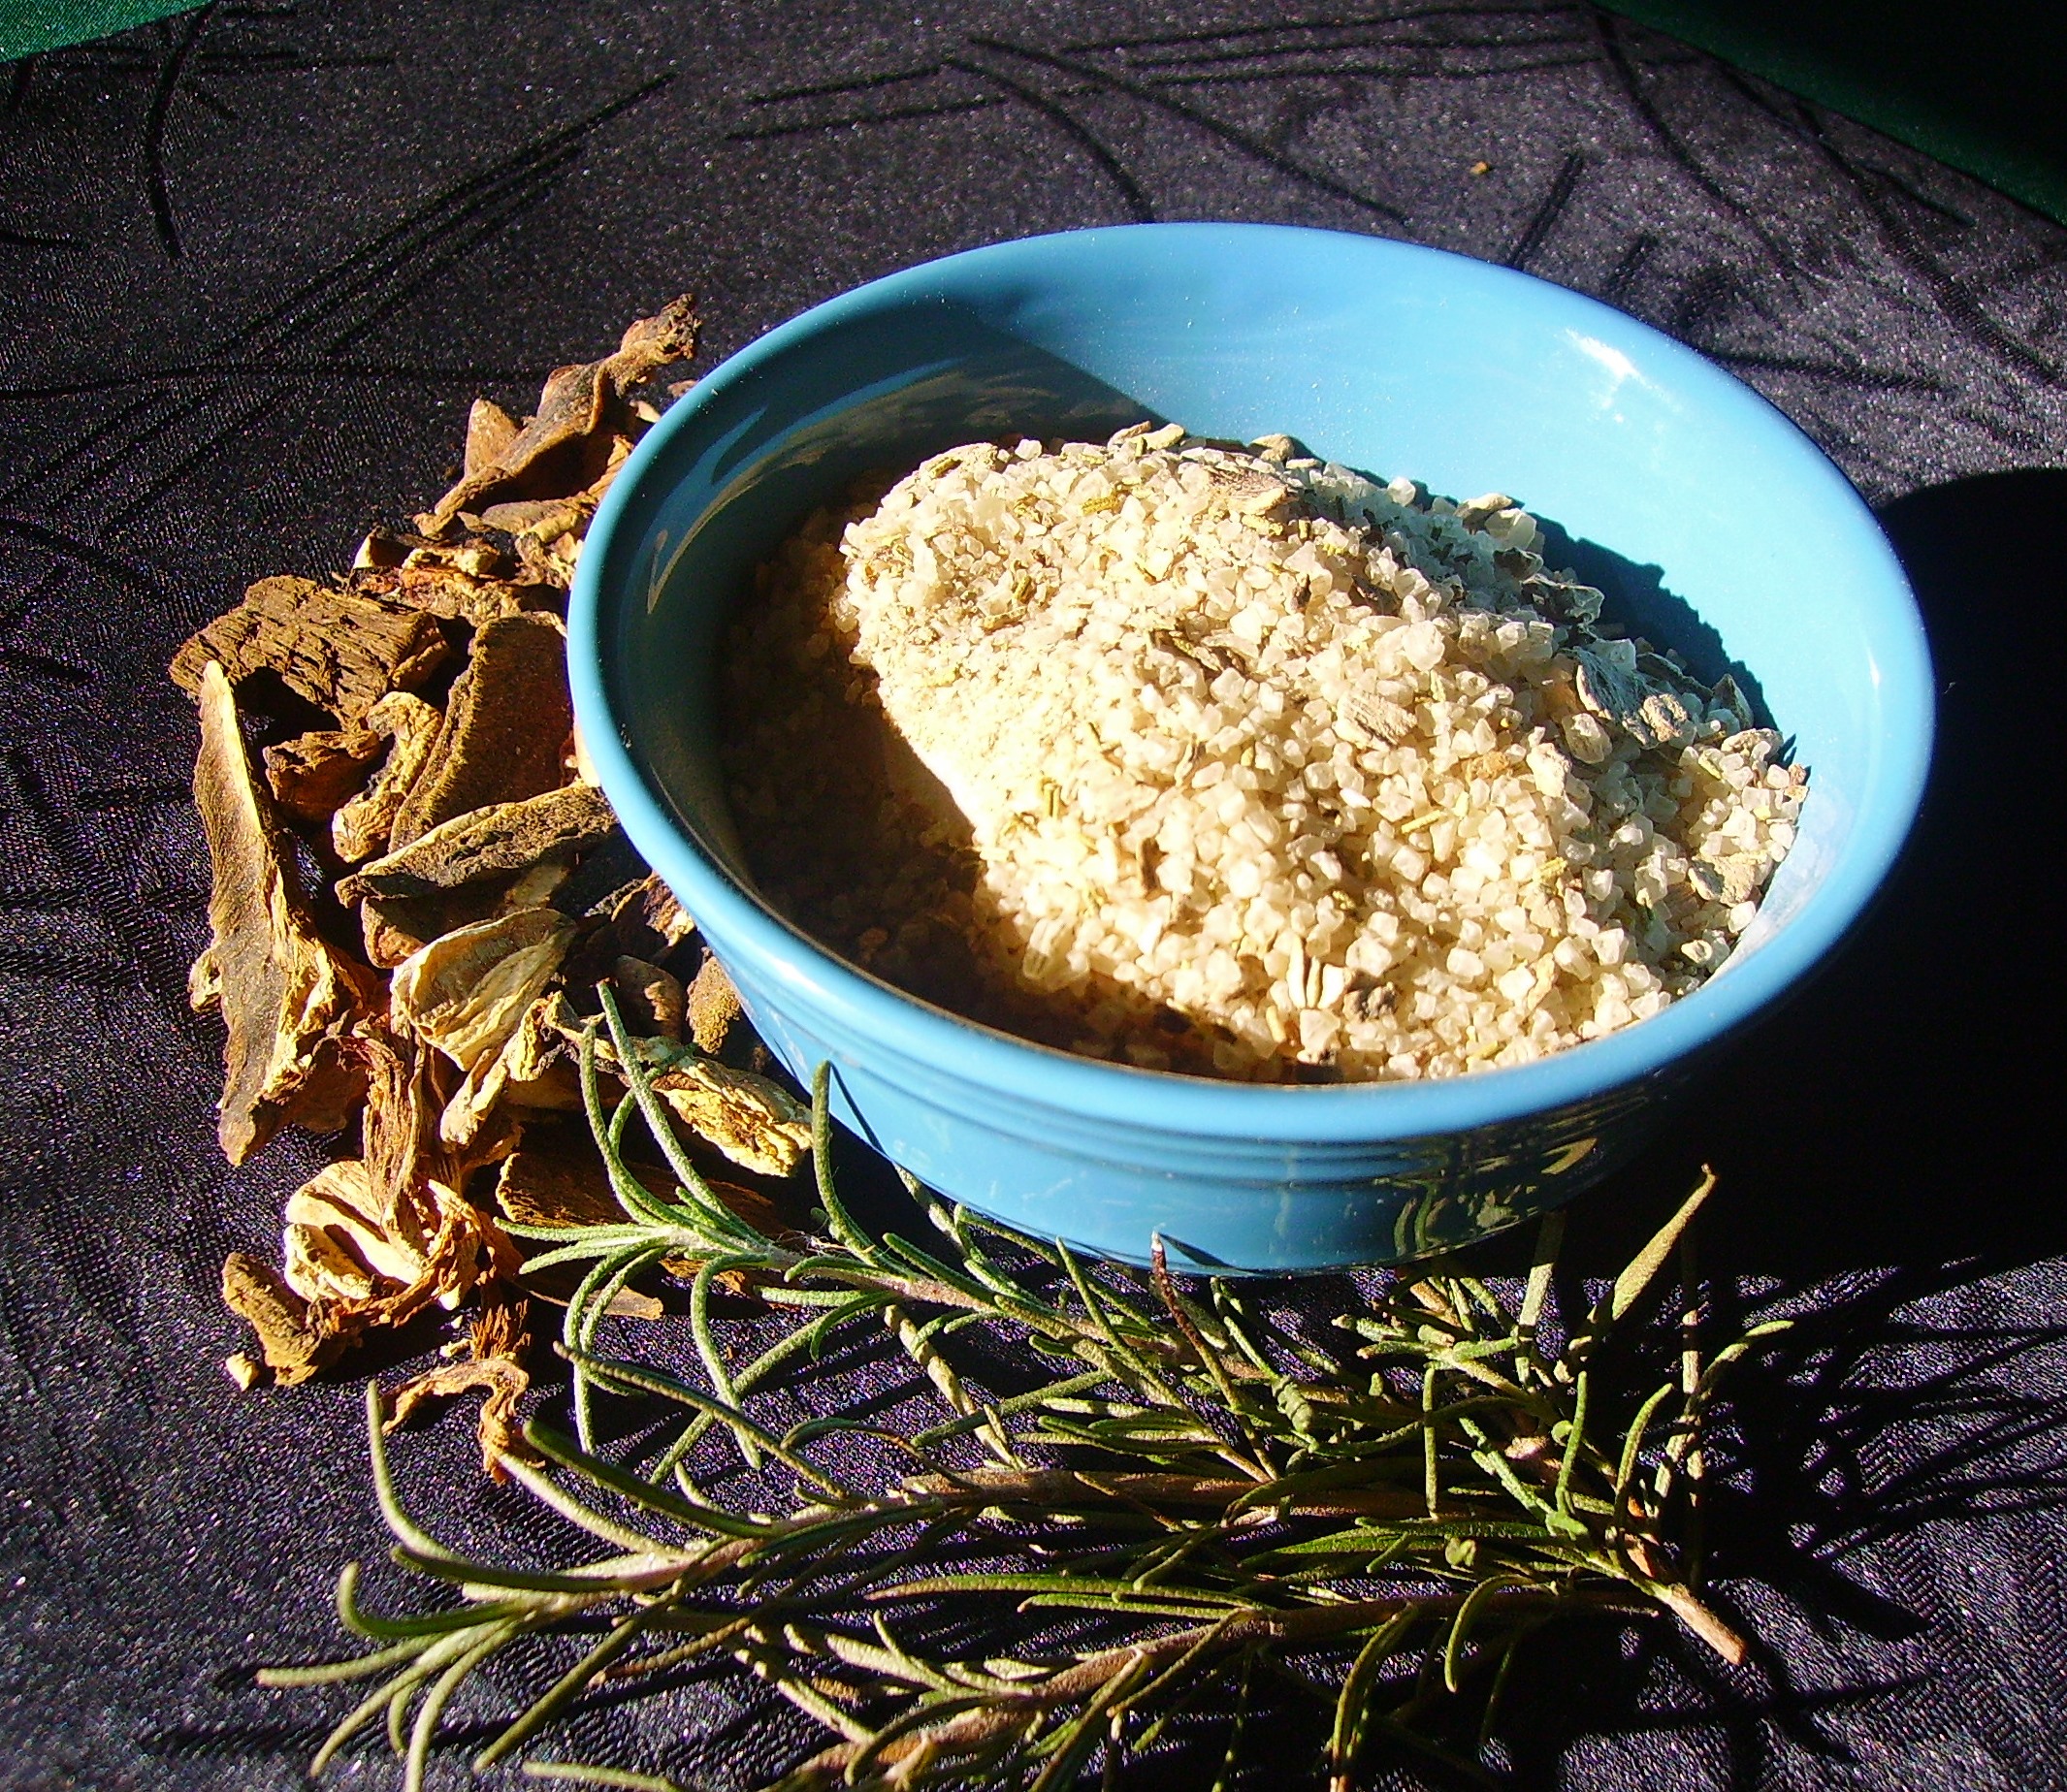
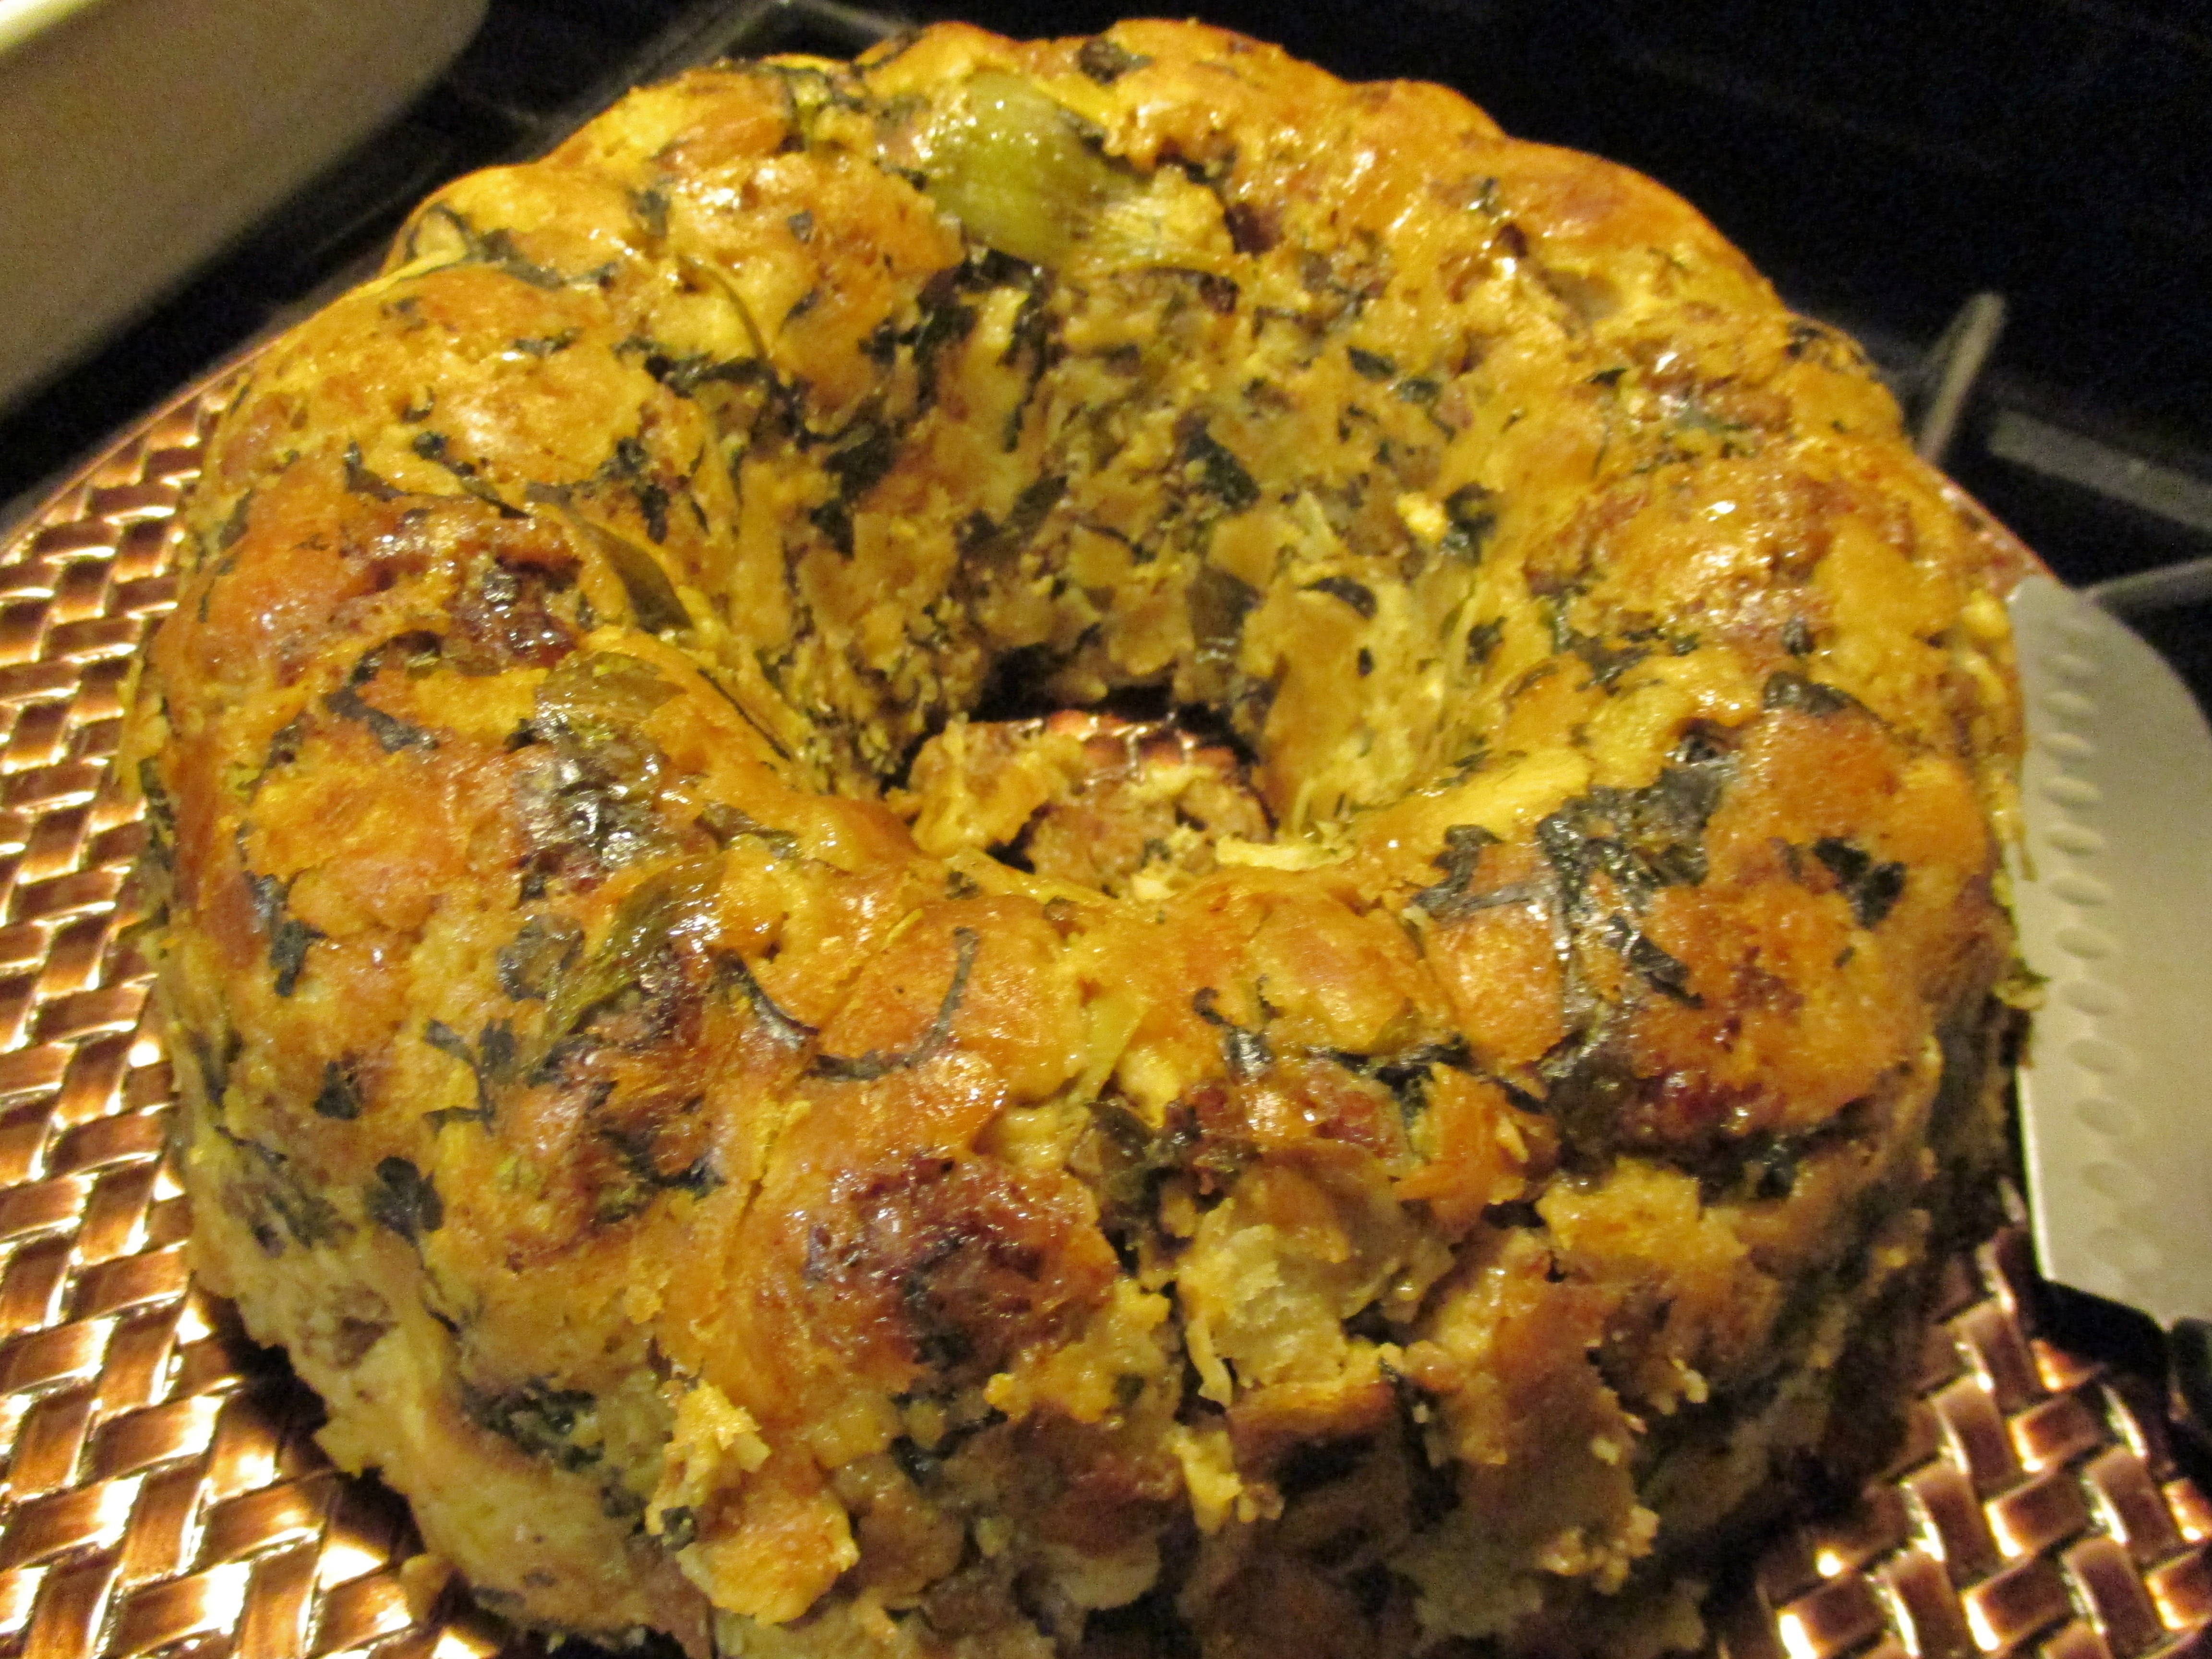
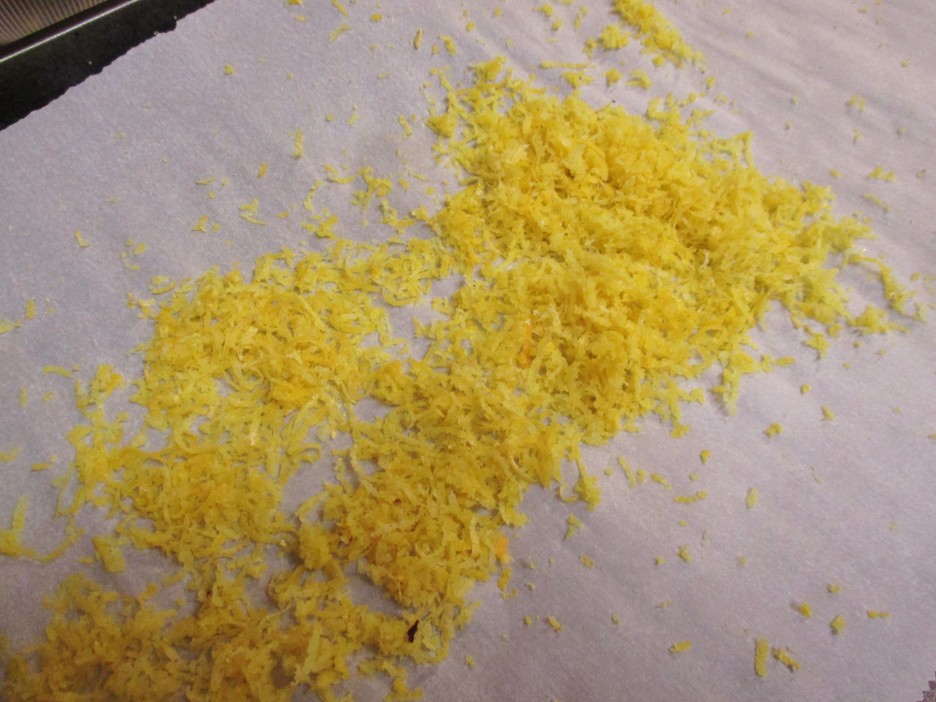
Six large lemon gave up their vivid yellow dresses to make enough zest for the recipe. The naked lemons then were squeezed to yield a hefty cup of juice that thanks to the freezer will be flavoring many a dish to come. Once the lemon peel was dry, it joined a fragrant array of herbs to become a wonderful seasoning.

Lemon Herb Seasoning
Print Recipe
Servings
4 Ounces
Servings
4 Ounces
Lemon Herb Seasoning
Print Recipe
Servings
4 Ounces
Servings
4 Ounces
Ingredients
Servings: Ounces
Instructions
  1. To dry the Lemon Zest: Spread the zest of 5-6 lemons on a baking sheet lined with parchment paper and allow to air dry for 24 hours.
  2. Combine the dried lemon zest with the rest of the ingredients. Spoon into spice jars and cover tightly.
Share this Recipe
Powered byWP Ultimate Recipe

Cajun flavors are always a spicy boost to many dishes whether they come from New Orleans or not. I like a Cajun blend that features plenty of the pepper trio; white, black, and red (a.k.a. cayenne) and lots of dried thyme. This delivers on both of those fronts with more than a token dose of onion and garlic. You know that you can always play with the amounts here to suit your own taste. Try it on fish or chicken to bring a bold taste to a simple protein.

Last, but not least, Porcini Rosemary Salt is making a return appearance. It’s divine on steak, but is wonderful in soups and pasta sauces as well.DIGITAL CAMERA

Porcini and Rosemary Salt
Print Recipe
This is a perfect seasoning for steak, but it is wonderful on eggs, in soups, or anywhere you want a subtle mushroom flavor. This is a lovely Hostess gift, but save some for yourself.
Porcini and Rosemary Salt
Print Recipe
This is a perfect seasoning for steak, but it is wonderful on eggs, in soups, or anywhere you want a subtle mushroom flavor. This is a lovely Hostess gift, but save some for yourself.
Ingredients
Servings: Cups
Instructions
  1. Put all ingredients in the bowl of a processor. Pulse until everything is ground. This will take a bit of time. The porcini will not completely grind so the end product will have small bits of mushroom, which makes it even more delicious. Store in airtight containers.
Share this Recipe
Powered byWP Ultimate Recipe

These three seasoning blends make a wonderful gift for anyone who spends time in the kitchen, and don’t forget to save a jar of each for yourself.

Here Comes Christmas…But First: Ham and Turkey Au Gratin

The halls have been decked and the shopping is more than half done ( a new record for me). Mama D’s Kitchen will soon be alive with holiday goodies both sweet and savory. Before I get started on all the wonders that will find their way onto trays and into baskets and jars, I thought I’d share one more recipe with you.

I’m sure your Thanksgiving leftovers are long gone (if not it’s probably time to clean out the fridge)  but, another army of holiday meals lies ahead and this recipe would transform some of the leftovers into a delicious and slightly healthy supper. I give you Ham, Turkey, and Cauliflower Au Gratin.

The inspiration for this came from my teen years. My mother and I lived within walking distance of the Oak Park shopping area on Lake Street. We loved to browse in the shops and occasionally buy something from the sale racks. We would stop for dinner at a restaurant on Lake Street. Sadly, I don’t remember the name of it. All I remember was that they served a Ham and Turkey Au Gratin that was to die for.

I felt so sophisticated when it arrived at the table, bubbling and golden brown in an individual gratin dish. The cheese sauce was thick and rich and the slices of ham and turkey were juicy. I always burned my tongue because I couldn’t wait to taste it.

I’ve made versions of this through the years, but this time, I think I came up with a true winner. The ham and turkey actually came from the deli, but this would be a fitting finale for your holiday meats. I added cauliflower because I was also going for a “not macaroni” and cheese dish. IMG_0689An inspired rummage through the refrigerator resulted in the addition of beer to the cheese sauce. I actually made the cheese sauce with 1% milk. It cut back on the fat and thanks to the aforementioned beer, no flavor was sacrificed. I used Extra Sharp Cheddar because it packs a lot of punch in a modest amount ( about 2 cups for at least 6 generous servings). Every cheese sauce needs a little mustard, a dash of Worcestershire, and a splash of hot sauce, so I added all of the above.

While the dish from years ago didn’t have one, I wanted the extra crunch of a Panko crumb topping. A bit of grated Parmesan added to the wonderfulness of that crust.IMG_0697A bake in the oven resulted in a golden crust, bubbly sauce, and the perfect marriage of ham, turkey, and cauliflower. IMG_0700

This dish took me back to a simpler time, yet paid a bit of respect to my healthier habits of the present.

Ham and Turkey Au Gratin
Print Recipe
Servings
6
Servings
6
Ham and Turkey Au Gratin
Print Recipe
Servings
6
Servings
6
Ingredients
Servings:
Instructions
  1. Spray a rectangular baking dish with cooking spray. Combine the ham, turkey and cauliflower in the baking dish and set aside.
  2. Melt 2 tablespoons of the butter in a medium saucepan. Add the shallots and cook for several minutes until the shallots begin to soften.
  3. Whisk in the flour and cook for 2 minutes stirring frequently. Add the beer to the pan and continue to whisk until a smooth paste forms. Allow to cook for another 2 minutes.
  4. Slowly whisk in the milk. Continue to cook, stirring constantly until the mixture comes to a boil. Reduce the heat to low.
  5. Add the mustard, Worcestershire sauce, and hot sauce to the pan. Cook until the sauce thickens which should take several minutes.
  6. Remove the pan from the heat and gradually stir in the cheddar cheese. Once everything is melted, pour the sauce over the meat and cauliflower mixture. Stir to combine.
  7. Melt the remaining butter and toss with the bread crumbs. Sprinkle the crumbs evenly over the top of the casserole. Top with the Parmesan cheese and give the top a light blast of cooking spray.
  8. Bake at 375 degrees for 25 minutes until everything is bubbly. Turn the oven to broil and let it go for 2 - 3 minutes until the top is golden brown.
  9. Remove from the oven and allow to rest for 10 minutes before serving.
Share this Recipe
Powered byWP Ultimate Recipe

A note here on using cauliflower as a starch alternative: This vegetable is a veritable blank canvas and because of its color and texture can make a credible stand in for potatoes or pasta… it’s all in how you cut and cook it. It is considered a super food by many and as the Recipe Archive will show has been a guest in the Kitchen on several occasions.

Let the holidays begin (or should I say continue) and don’t forget to take some time to reflect and be thankful for all the year has given you, and if it wasn’t all that you dreamed, remember, you get to start over very soon.


Let’s Talk Turkey… All Week Long

As I write this, we are barely a day away from the ultimate turkey feast. Birds are waiting patiently for their close up. Some are thawing, some may have been strutting around only a few days ago, and some are soaking in one savory salt bath or another. Mama D’s kitchen doesn’t have a turkey in waiting this year, but that doesn’t mean that her week hasn’t had a more than a few turkey adventures… Obviously that intro was written prior to Turkey Day, here’s how it went down. By the way, you can click on those little red links for more recipes.

My son and his girlfriend  hosted Thanksgiving this year and I once again brought the stuffing (to be correct it was dressing as it never saw the inside of a bird). Thanks to Pinterest, this year  Mama D’s Cali-Itali Stuffing  arrived in a bundt pan. Who doesn’t love stuffing enough to eat it like cake? Instead of frosting, I opted to create a gravy. How does one do this without actually having a turkey? Why by using turkey wings, of course. This idea came from Cooking Light Magazine  and it resulted in a wonderful stock that is the base for a  gravy that is low in fat yet delicious. I used their method for making the stock, but took some liberties when it came to the gravy itself (see the recipe below).IMG_0817 I ended up with a lot of stock; four quarts to be exact. One of those quarts became the Garlic and Wine Gravy….that left 3 quarts of this flavorful stock to play with, and play I did.

First up was a simple soup that I made the day I cooked the stock. I browned some Turkey Italian Sausage along with Mama D’s Trinity (olive oil, onions and garlic). I added some spinach and a modest amount of the Turkey stock and let everything simmer for 45 minutes. I topped it with a Ciabatta roll covered with melted Asiago Cheese and a satisfying Sunday Supper was the result. This is truly an non-recipe recipe, but, if you want the measurements for two hearty bowls, it was 2 sausage links, a 6 ounce bag of spinach, 4 cups of stock and a respectable amount of onion and garlic.IMG_0825The day before Thanksgiving was set to be a busy one, so I opted to use yet another quart IMG_0831of my turkey stock and create some Turkey Mole Chili . I had planned on making it for dinner the night before, but I got lazy and we went out instead. (Yes, I do choose not to cook every so often.) Much of the prep had been done earlier and I added the turkey wing meat to the mix since it was sitting in the fridge doing nothing. It was a nice combination with the ground turkey and added a bit more texture. I combined all the ingredients then put it in the crock pot. The all day simmer gave the chili time to really come together. It worked as well as making it a day ahead. (Note to self: you’ve got a crock pot, use it!) It was a warm tasty supper that required nothing more than a touch of cheese and some corn bread croutons. A bed of brown rice was a comforting addition.IMG_0864

The stuffing cake was a huge success. My only adjustment to the original recipe was to add an extra egg and a little more of the turkey stock. I packed the bundt pan pretty tightly. I covered it tightly with foil for its initial baking which lasted about 30 minutes.IMG_0835Once we arrived at the gathering, I uncovered it and let it continue to bake for another 20 minutes. (Note: It was sharing the oven with a green bean casserole that was being reheated so the time was longer than if it was in the oven on its own.)

It un-molded without a hitch, always a good thing. and made quite the attractive presentation.IMG_0840We sliced it as you would any bundt cake and gave it a little drizzle of gravy. The gravy stayed nice and hot for everyone’s seconds and thirds because of an electric gravy boat. This is one gadget that I’m glad I impulsively bought.IMG_0841

Here’s the recipe for that gravy.

Garlic and Wine Turkey Gravy
Print Recipe
Servings
12
Servings
12
Garlic and Wine Turkey Gravy
Print Recipe
Servings
12
Servings
12
Ingredients
Servings:
Instructions
  1. Heat the olive oil in a small fry pan. Add the garlic and shallots and cook until golden brown. Be careful not to burn them.
  2. Add the wine to the pan and bring to a boil. Reduce the heat to medium and simmer until the wine is reduced by half, 5 - 7 minutes. Set aside.
  3. In a medium saucepan, melt the butter over medium heat. Whisk in the flour and cook stirring often for 2 minutes.
  4. Add about 1 cup of the stock and continue to whisk until it is smooth. Gradually stir in the rest of the stock. Bring the mixture to a boil, reduce the heat and add the reserved garlic and wine mixture and the Italian Herb Blend.
  5. Continue to simmer for 5 - 10 minutes until the gravy thickens. Give it a taste and add salt and pepper as needed.
  6. Serve with turkey, dressing, or anything else you want to put it on.
Share this Recipe
Powered byWP Ultimate Recipe

So, my Turkey Week is coming to an end.The food that was created was wonderful but, it couldn’t come close to how wonderful it was to be with my family. I hope that your Thanksgiving was filled with just as much love and deliciousness.