Memories of Good Cakes… and a Memorable Marble Poundcake

Scan_Pic0018When it comes to baking the possible Undisputed Queen of the Oven is Cake. Cookies and breads, muffins and pies, all are wonderful in their own right, but cake is something bigger. Baking a cake is kitchen chemistry at it’s finest. Cakes have been around since man discovered flour, Check out this brief but entertaining  History of Cake for more information.

When I was growing up cake was always the star of the dessert table at special occasions. Birthday cakes were always homemade, and often cakes were made for no special reason at all. Cake was the go to dessert in the fifties and I’m sure long before I was licking beaters and sneaking a finger full of frosting, cake was every wife and mother’s testament to good baking.Scan_Pic0020

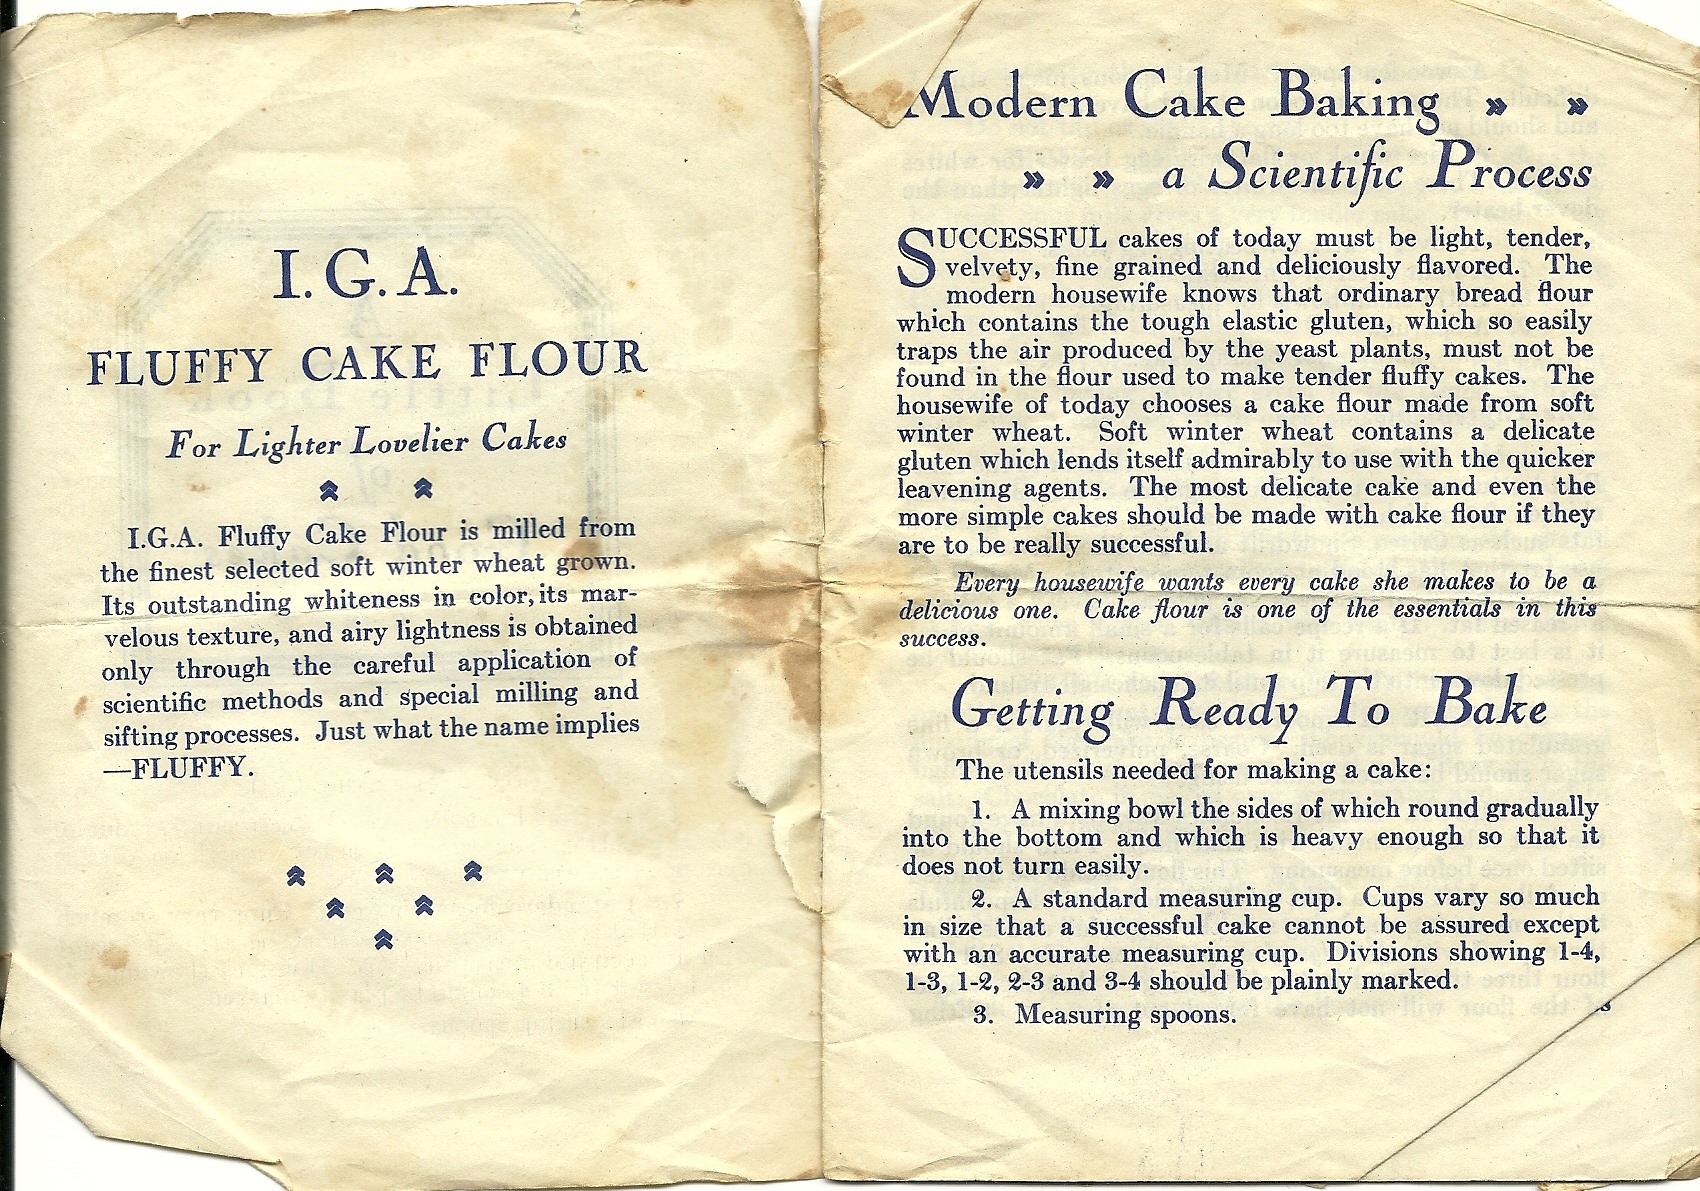
My mother had her go to cakes; the ones that she could probably make in her sleep but that always earned her high praise. The two I remember the most are Carrot Cake and Banana Cake. Her Carrot Cake was a straight forward take on the popular recipe. It was a one bowl wonder that included walnuts, carrots of course, and cinnamon. No raisins or pineapple. not even cream cheese frosting. This was the essence of carrot cake resting atop a  fluted milk-glass cake stand. Baked in a tube pan, it sliced into moist and  tender wedges.Scan_Pic0022

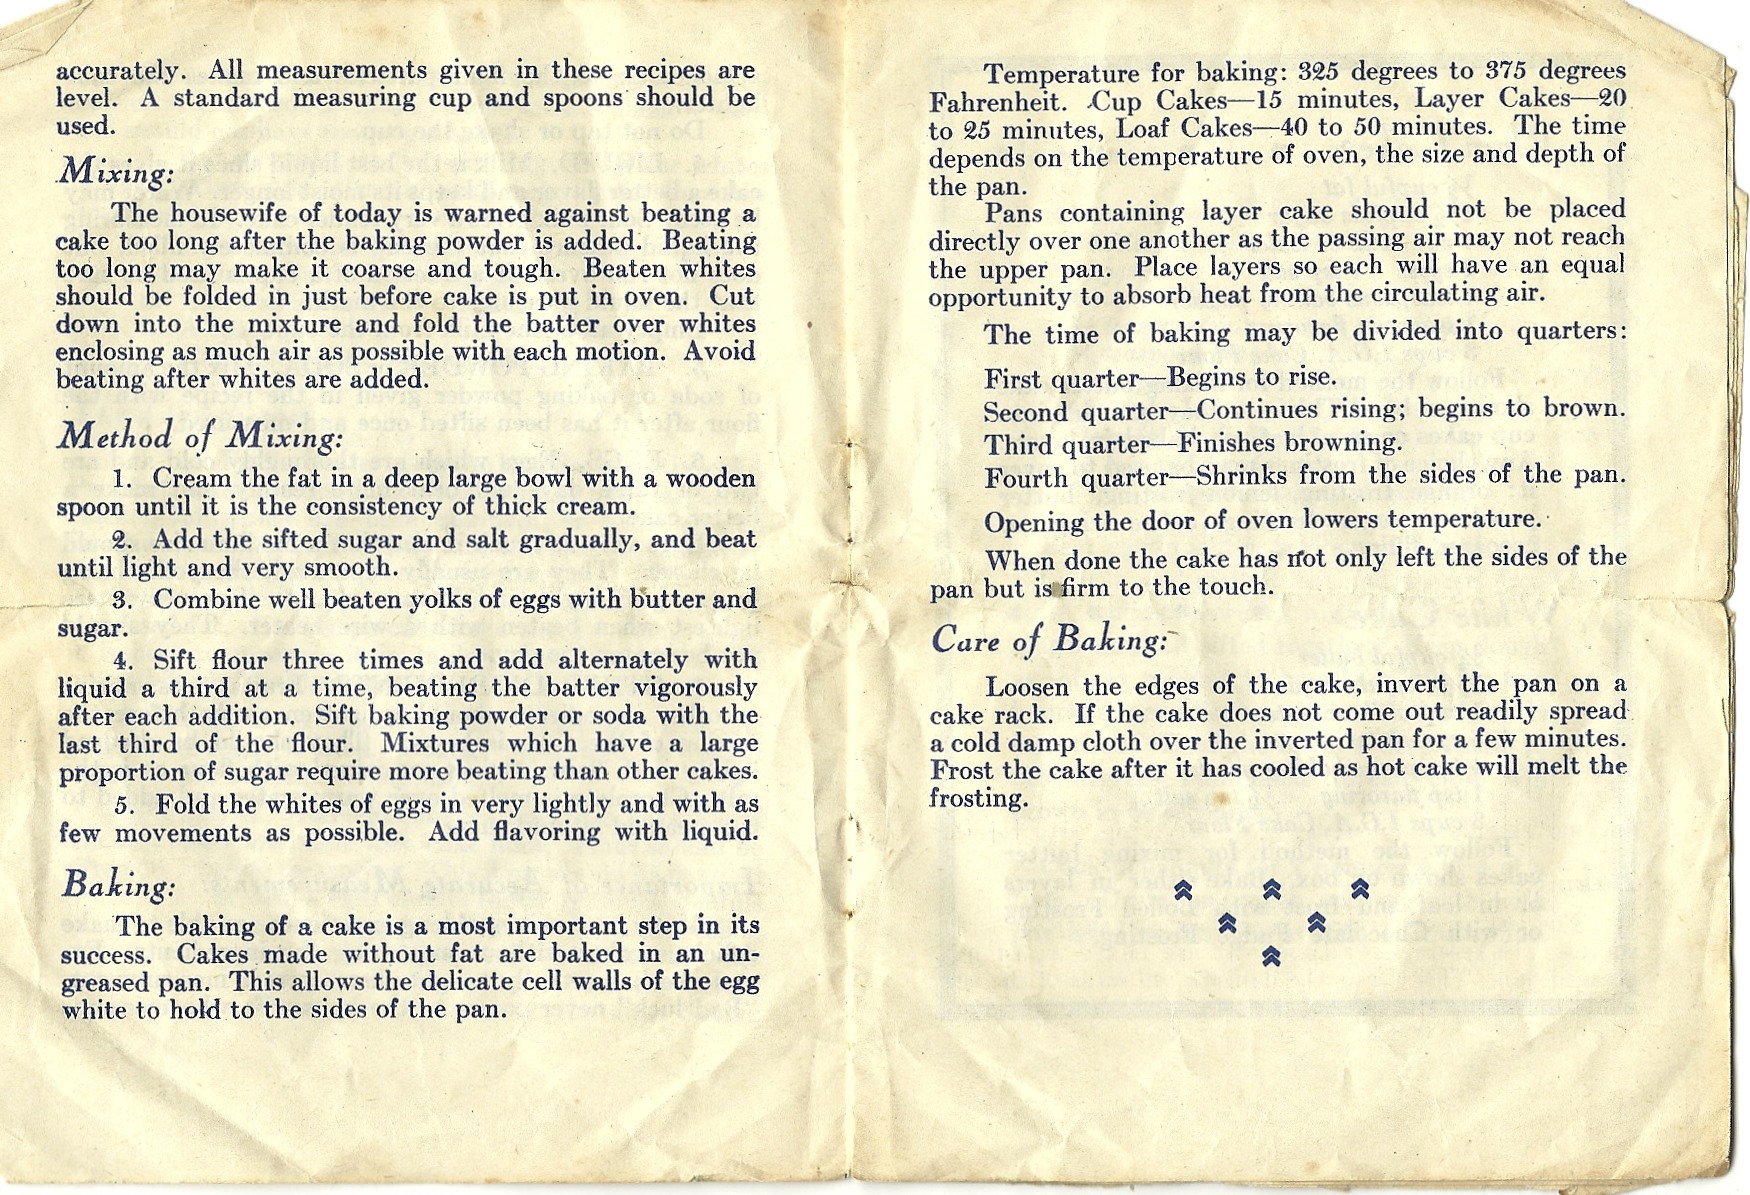
Her Banana Cake was also a study in less is more, so much more. It was a “2 Egg Sour Milk Cake” with the special addition of ripe mashed bananas, baked in a 13 X 9 inch pan that featured her never duplicated Buttercream Frosting. I say it’s never been duplicated because I’ve never been able to make it properly, even with the recipe right in front of me. It turned out so abysmally that I stopped trying about twenty years ago. I have however, made a promise to myself that I will master this “Dough Frosting” and when I do, I’ll share it right here.

Scan_Pic0021

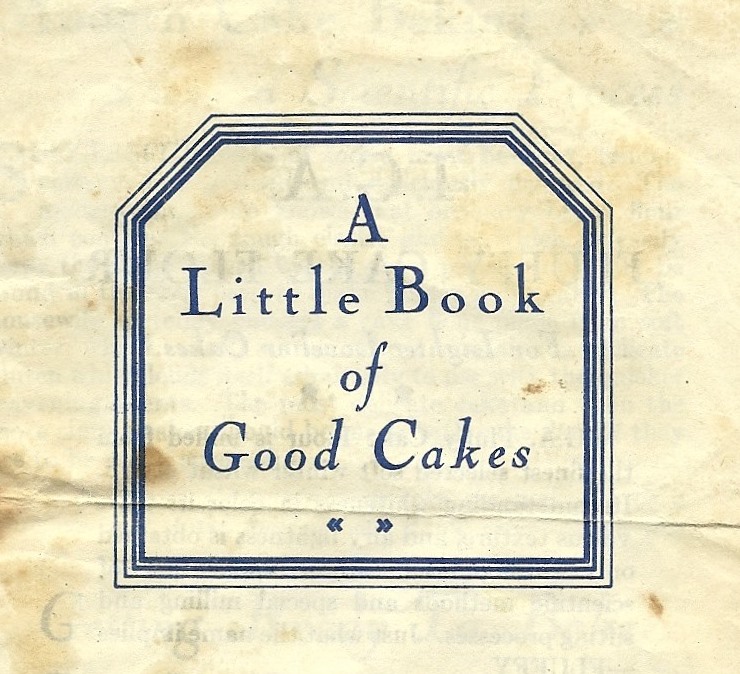
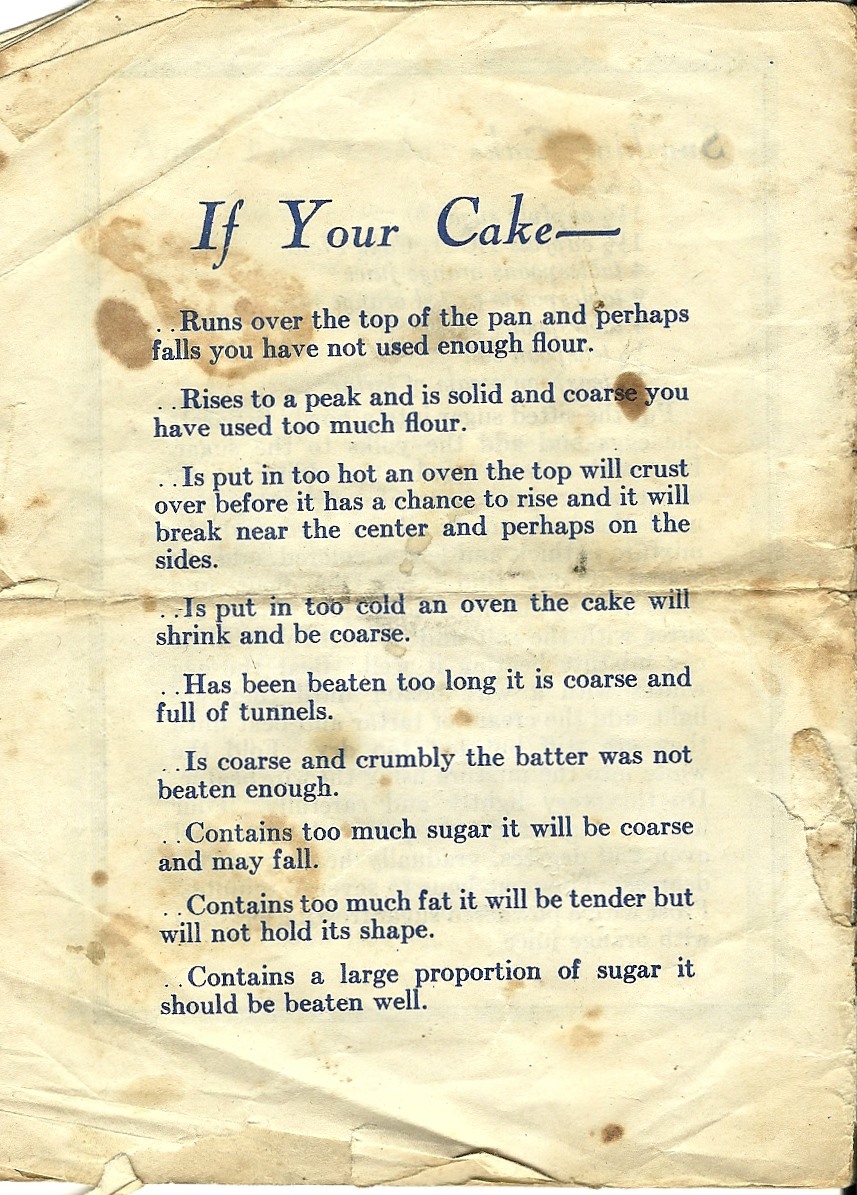
Neither of these cakes is appearing in this post. Due to the copious amount of “family recipes” that I’ve amassed over the years and filed away in no apparent order. I just found them this morning. Speaking of family recipes, I found this Little Book of Good Cakes  in my husband’s Grandmother’s wooden recipe box. It was a free booklet given away with IGA cake flour. Unfortunately, it isn’t dated and other than someone who has one to sell, I didn’t find any more information on it. My guess is it dates from 1950 or earlier. It covers almost everything  you’d find in a modern (high priced) cake cookbook in fourteen pages, with some darn good recipes to boot.

Scan_Pic0023

There is a cake recipe in this post. It’s been my “go to” cake for over thirty years. It is partly homemade since it uses Cake Mix and Instant Pudding. Yes it’s that workhorse home-baked treat from the seventies, The Pudding Pound Cake (aka Bundt Cake). I think Duncan Hines may have created the recipe. If not, they were responsible for furthering its popularity. It’s an easy sell. Simple to make, fancy looking, and possessing endless variations, it is comfortable on a party table or on a chipped cake plate as Wednesday night dessert.

It has traditionally been made in a bundt pan. The fluted tube pan that became the darling of baking in the sixties. Traditionally I’ve made this cake in a bundt pan. Sadly, my bundt pan in all its Avocado Green glory went to the Teflon graveyard several months ago and I haven’t replaced it yet. This Marble Pound Cake had to be baked in loaf pans. Ironically the cake mix package recipe called for two loaf pans…Could it be  a sign of the times?

The ingredients are simple. Cake mix, pudding mix, eggs, water and oil.DIGITAL CAMERA

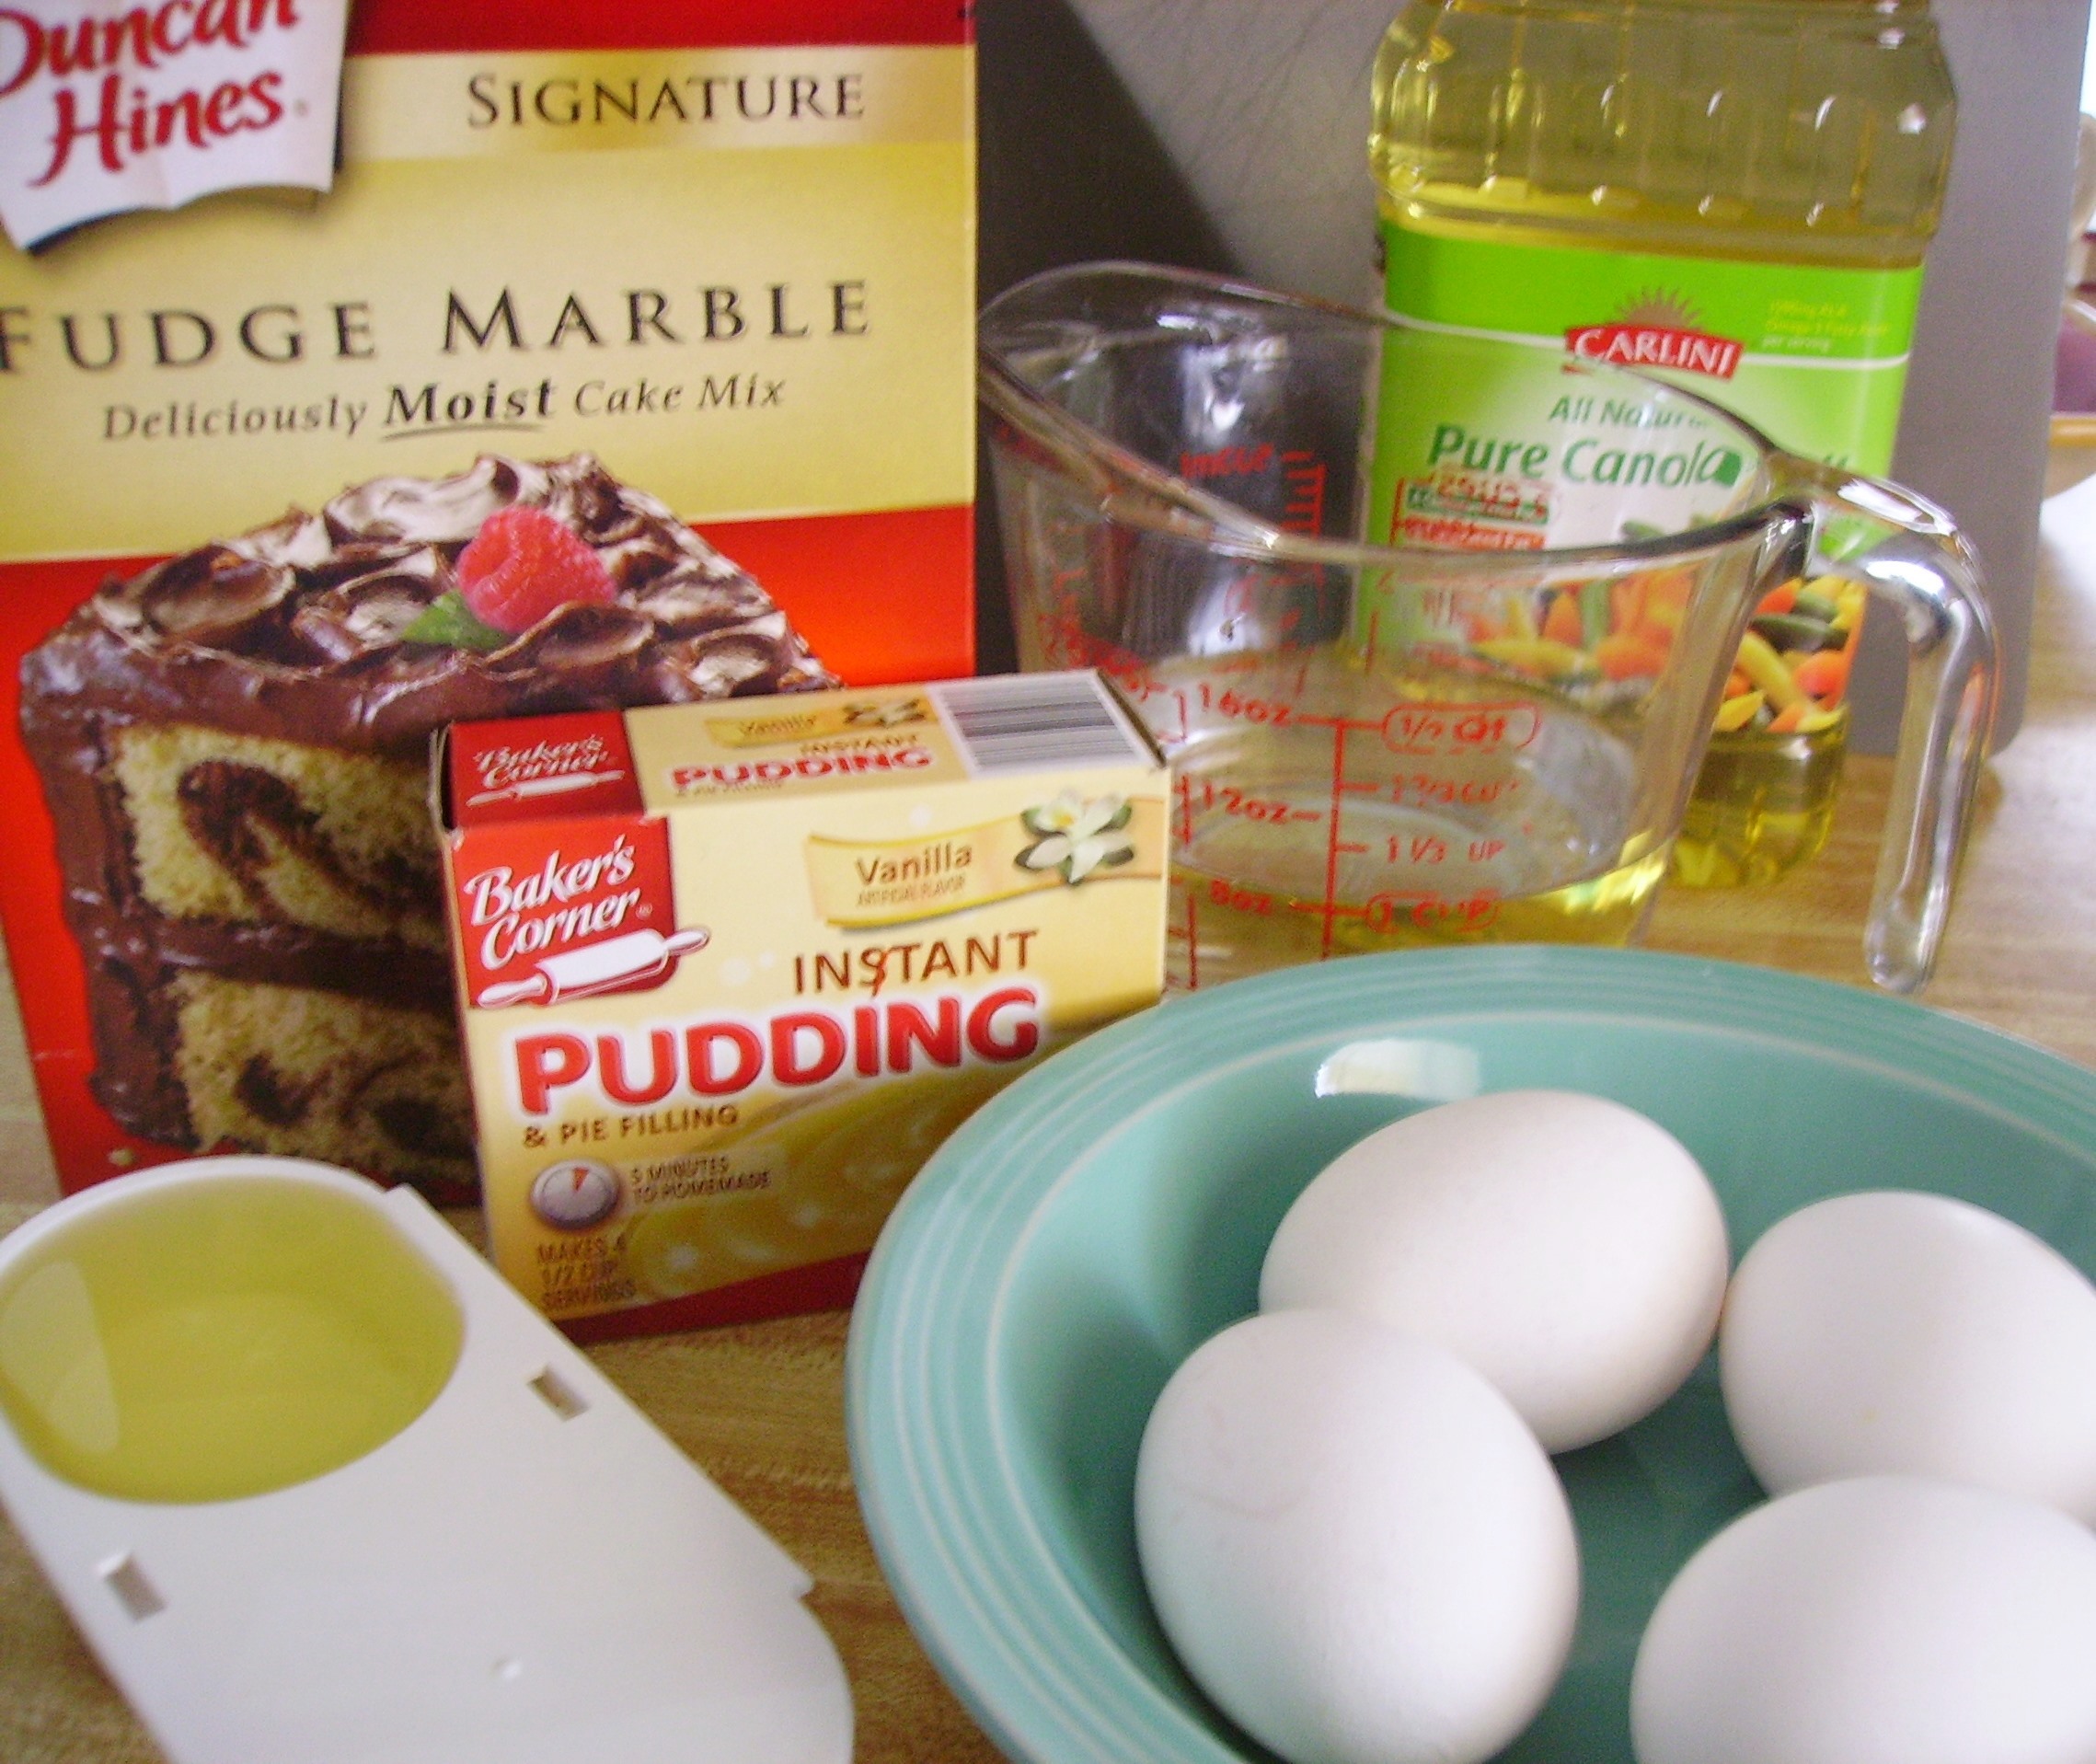
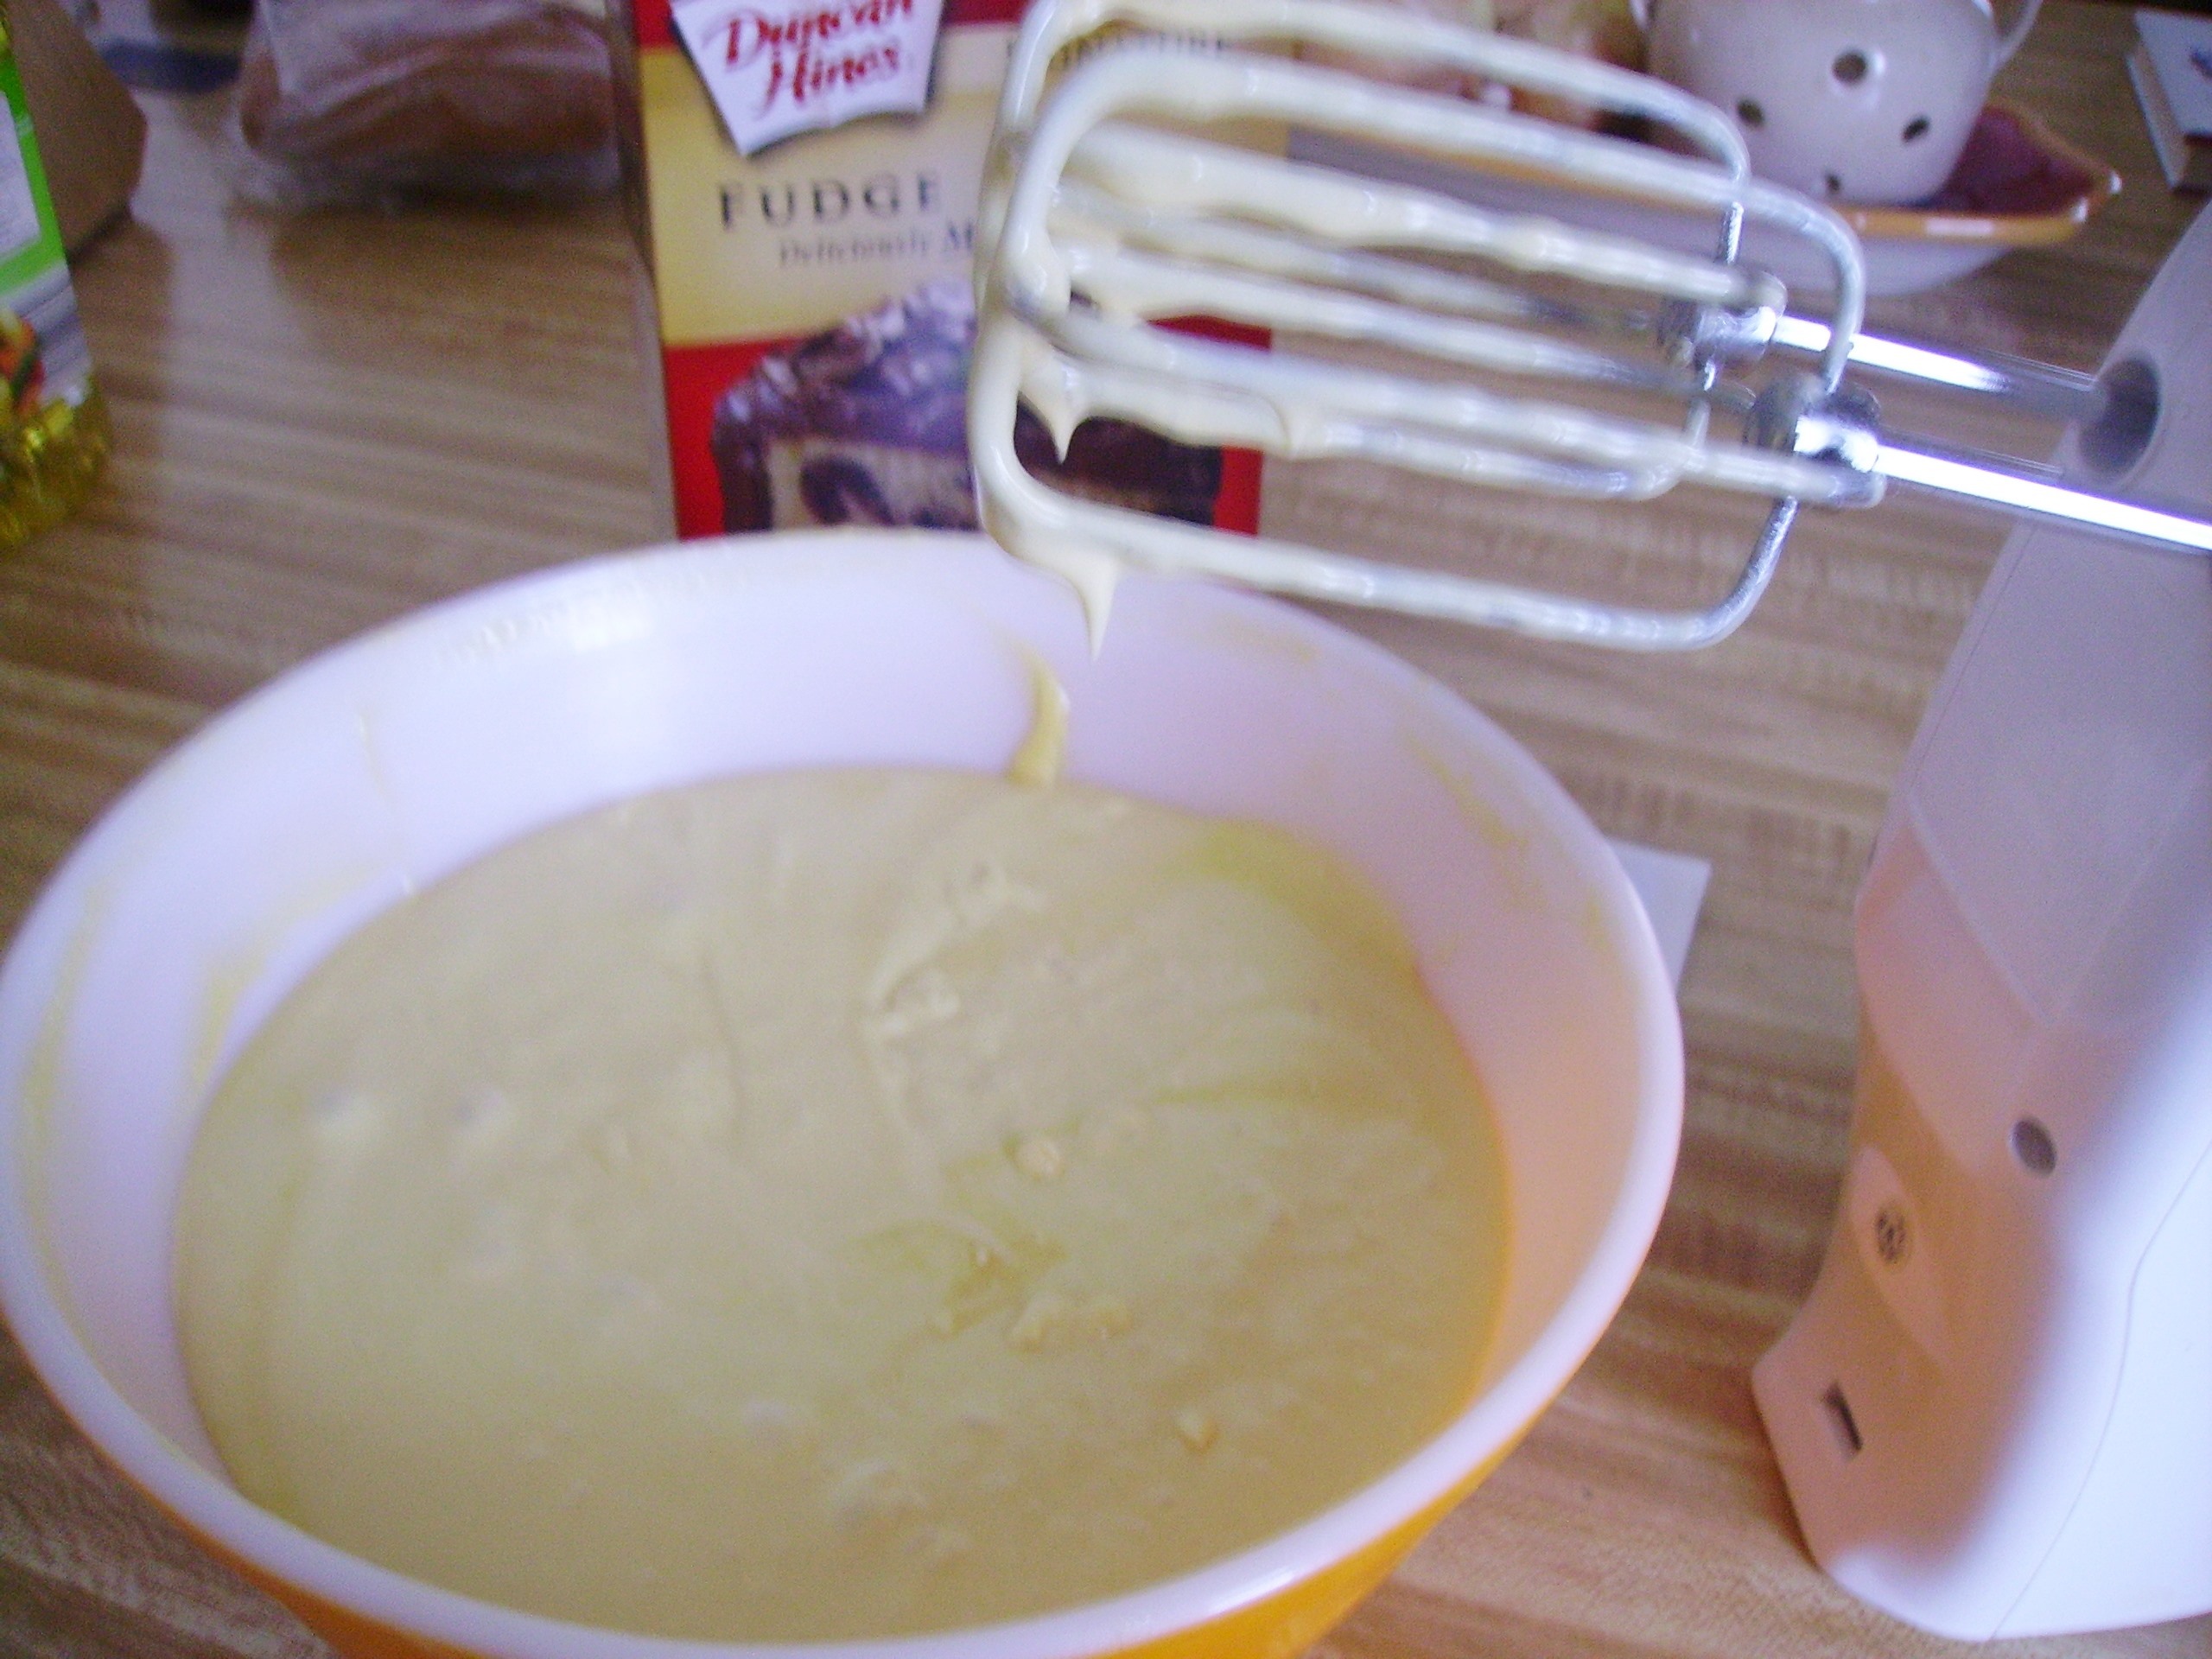
 The ingredients are beaten until they become light and fluffy. This only takes a few minutes, but more than the 2 minutes that the recipe suggests.

DIGITAL CAMERAOne cup of the batter is removed   and combined with the chocolate packet in a small bowl.  DIGITAL CAMERA

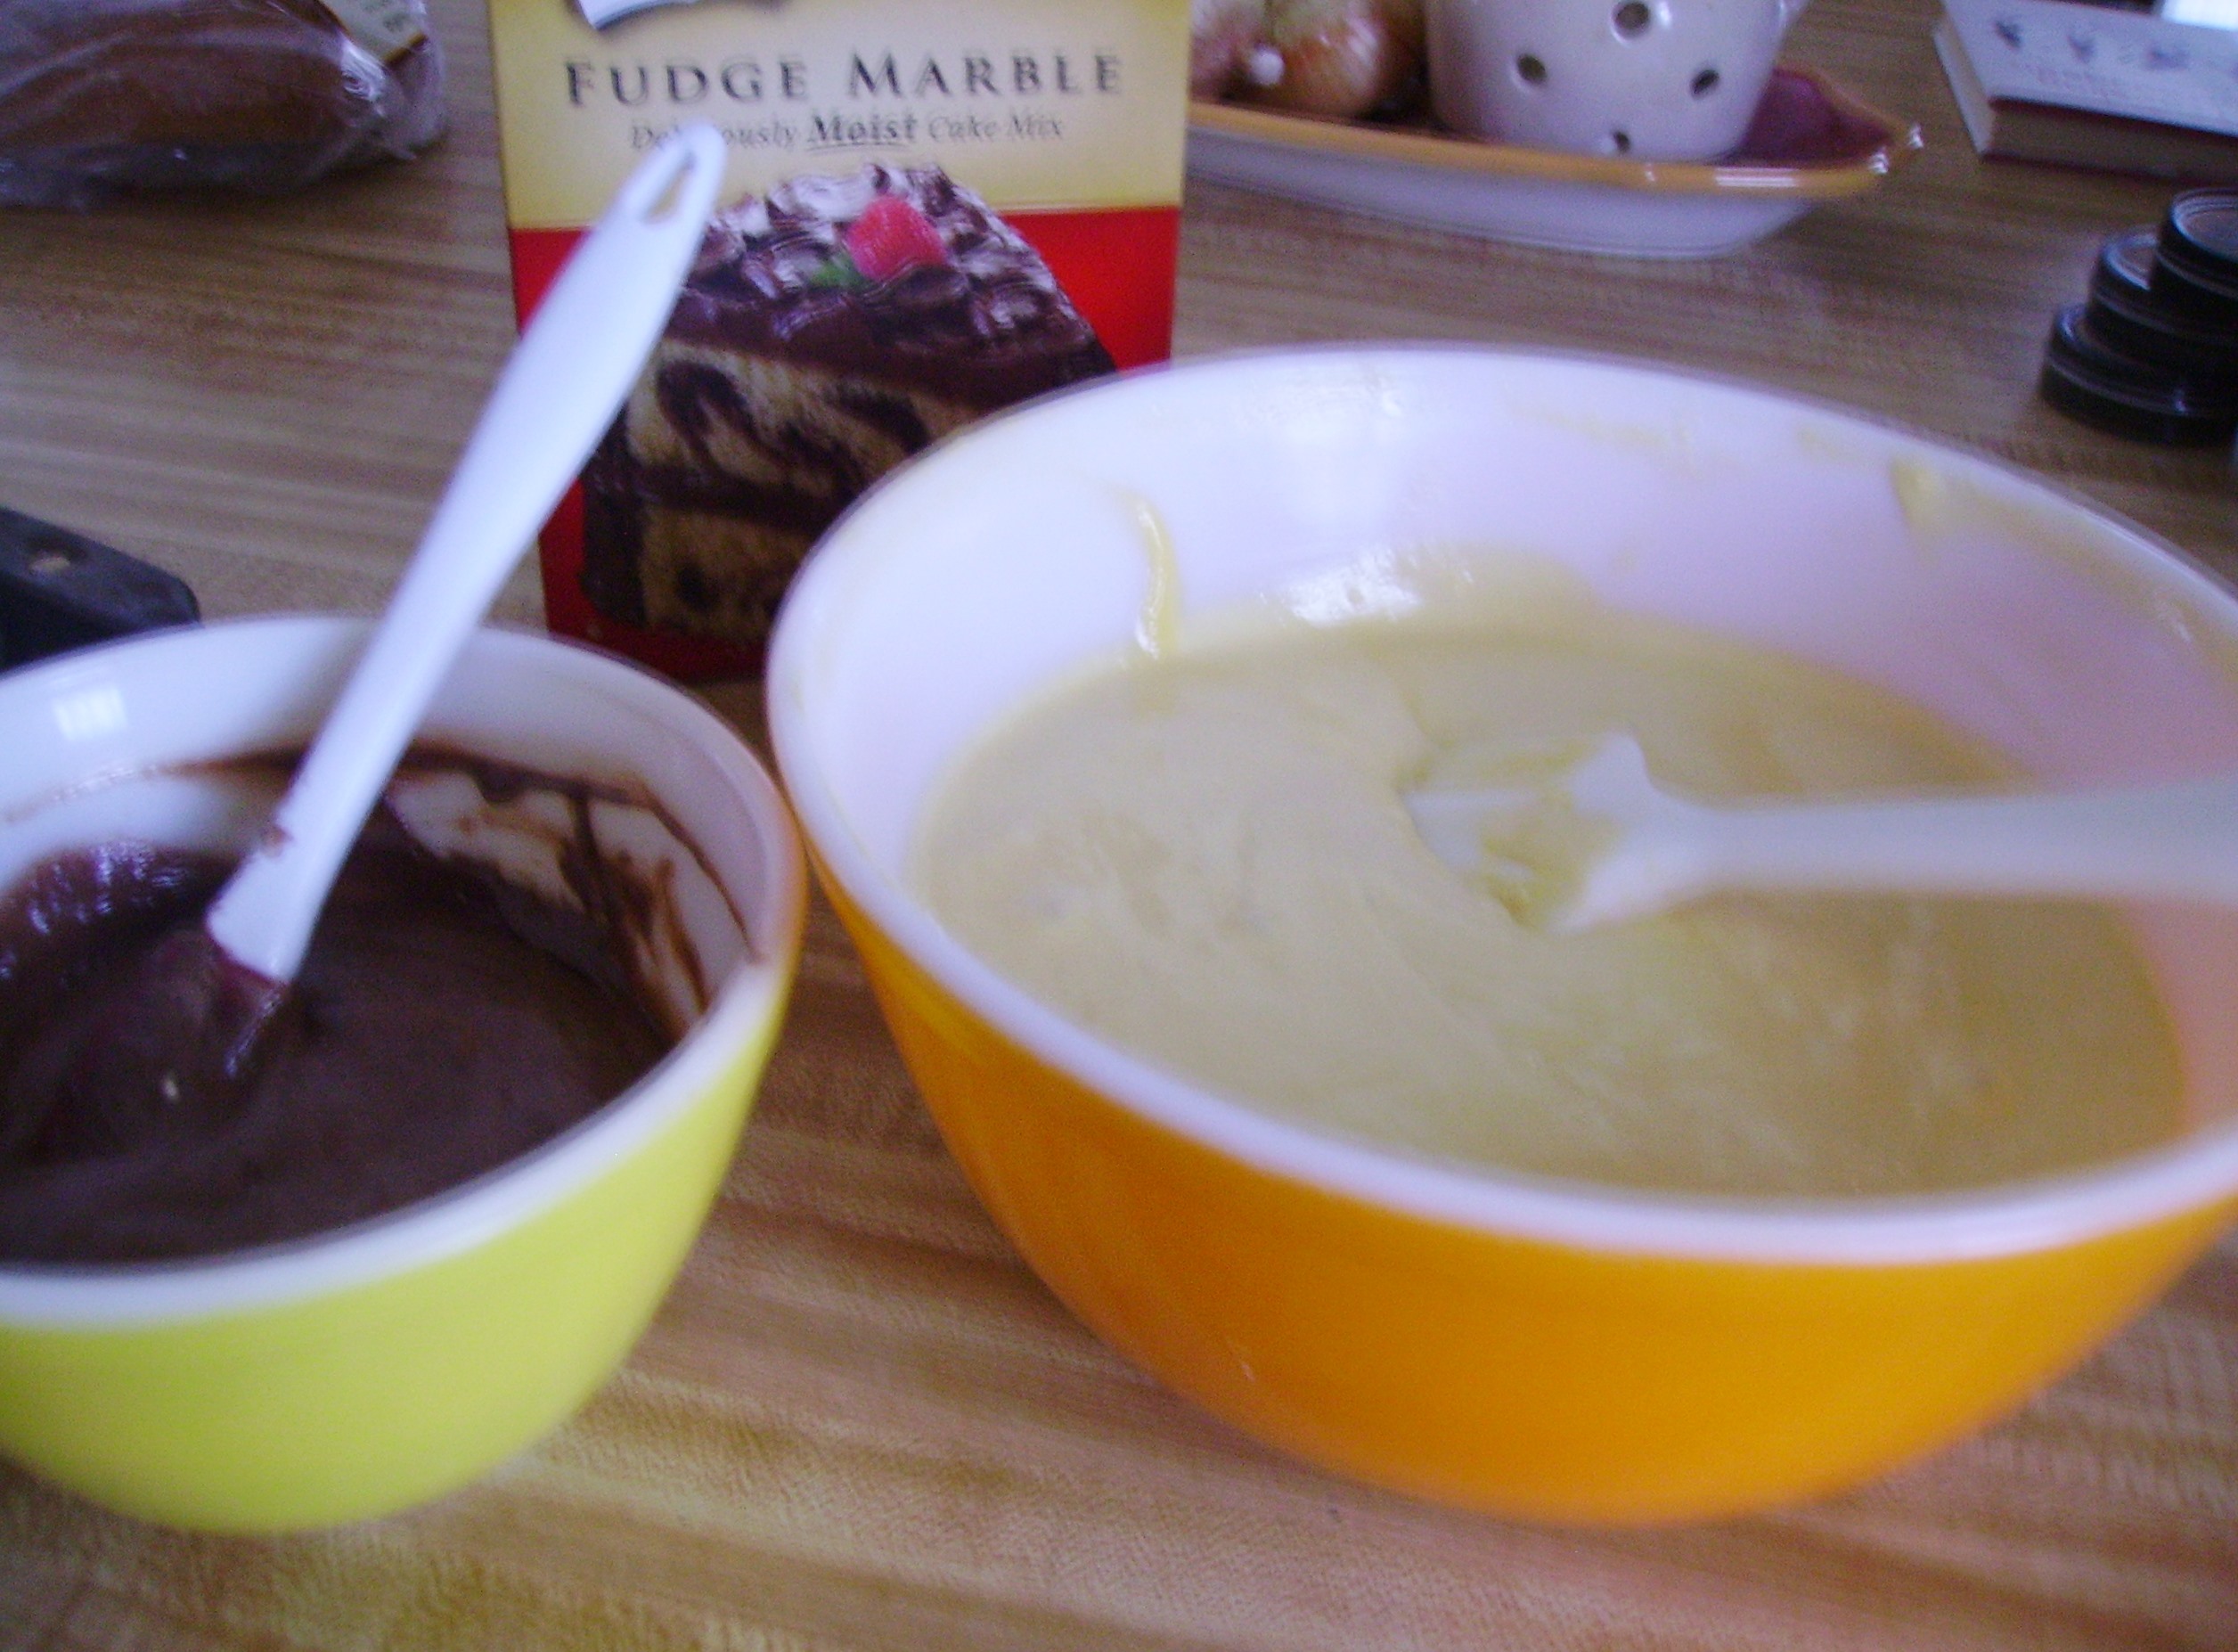
The batter is divided between the two prepared loaf pans and swirled to create the marble effect. Then it’s off to the oven to bake for about 45 minutes.DIGITAL CAMERA
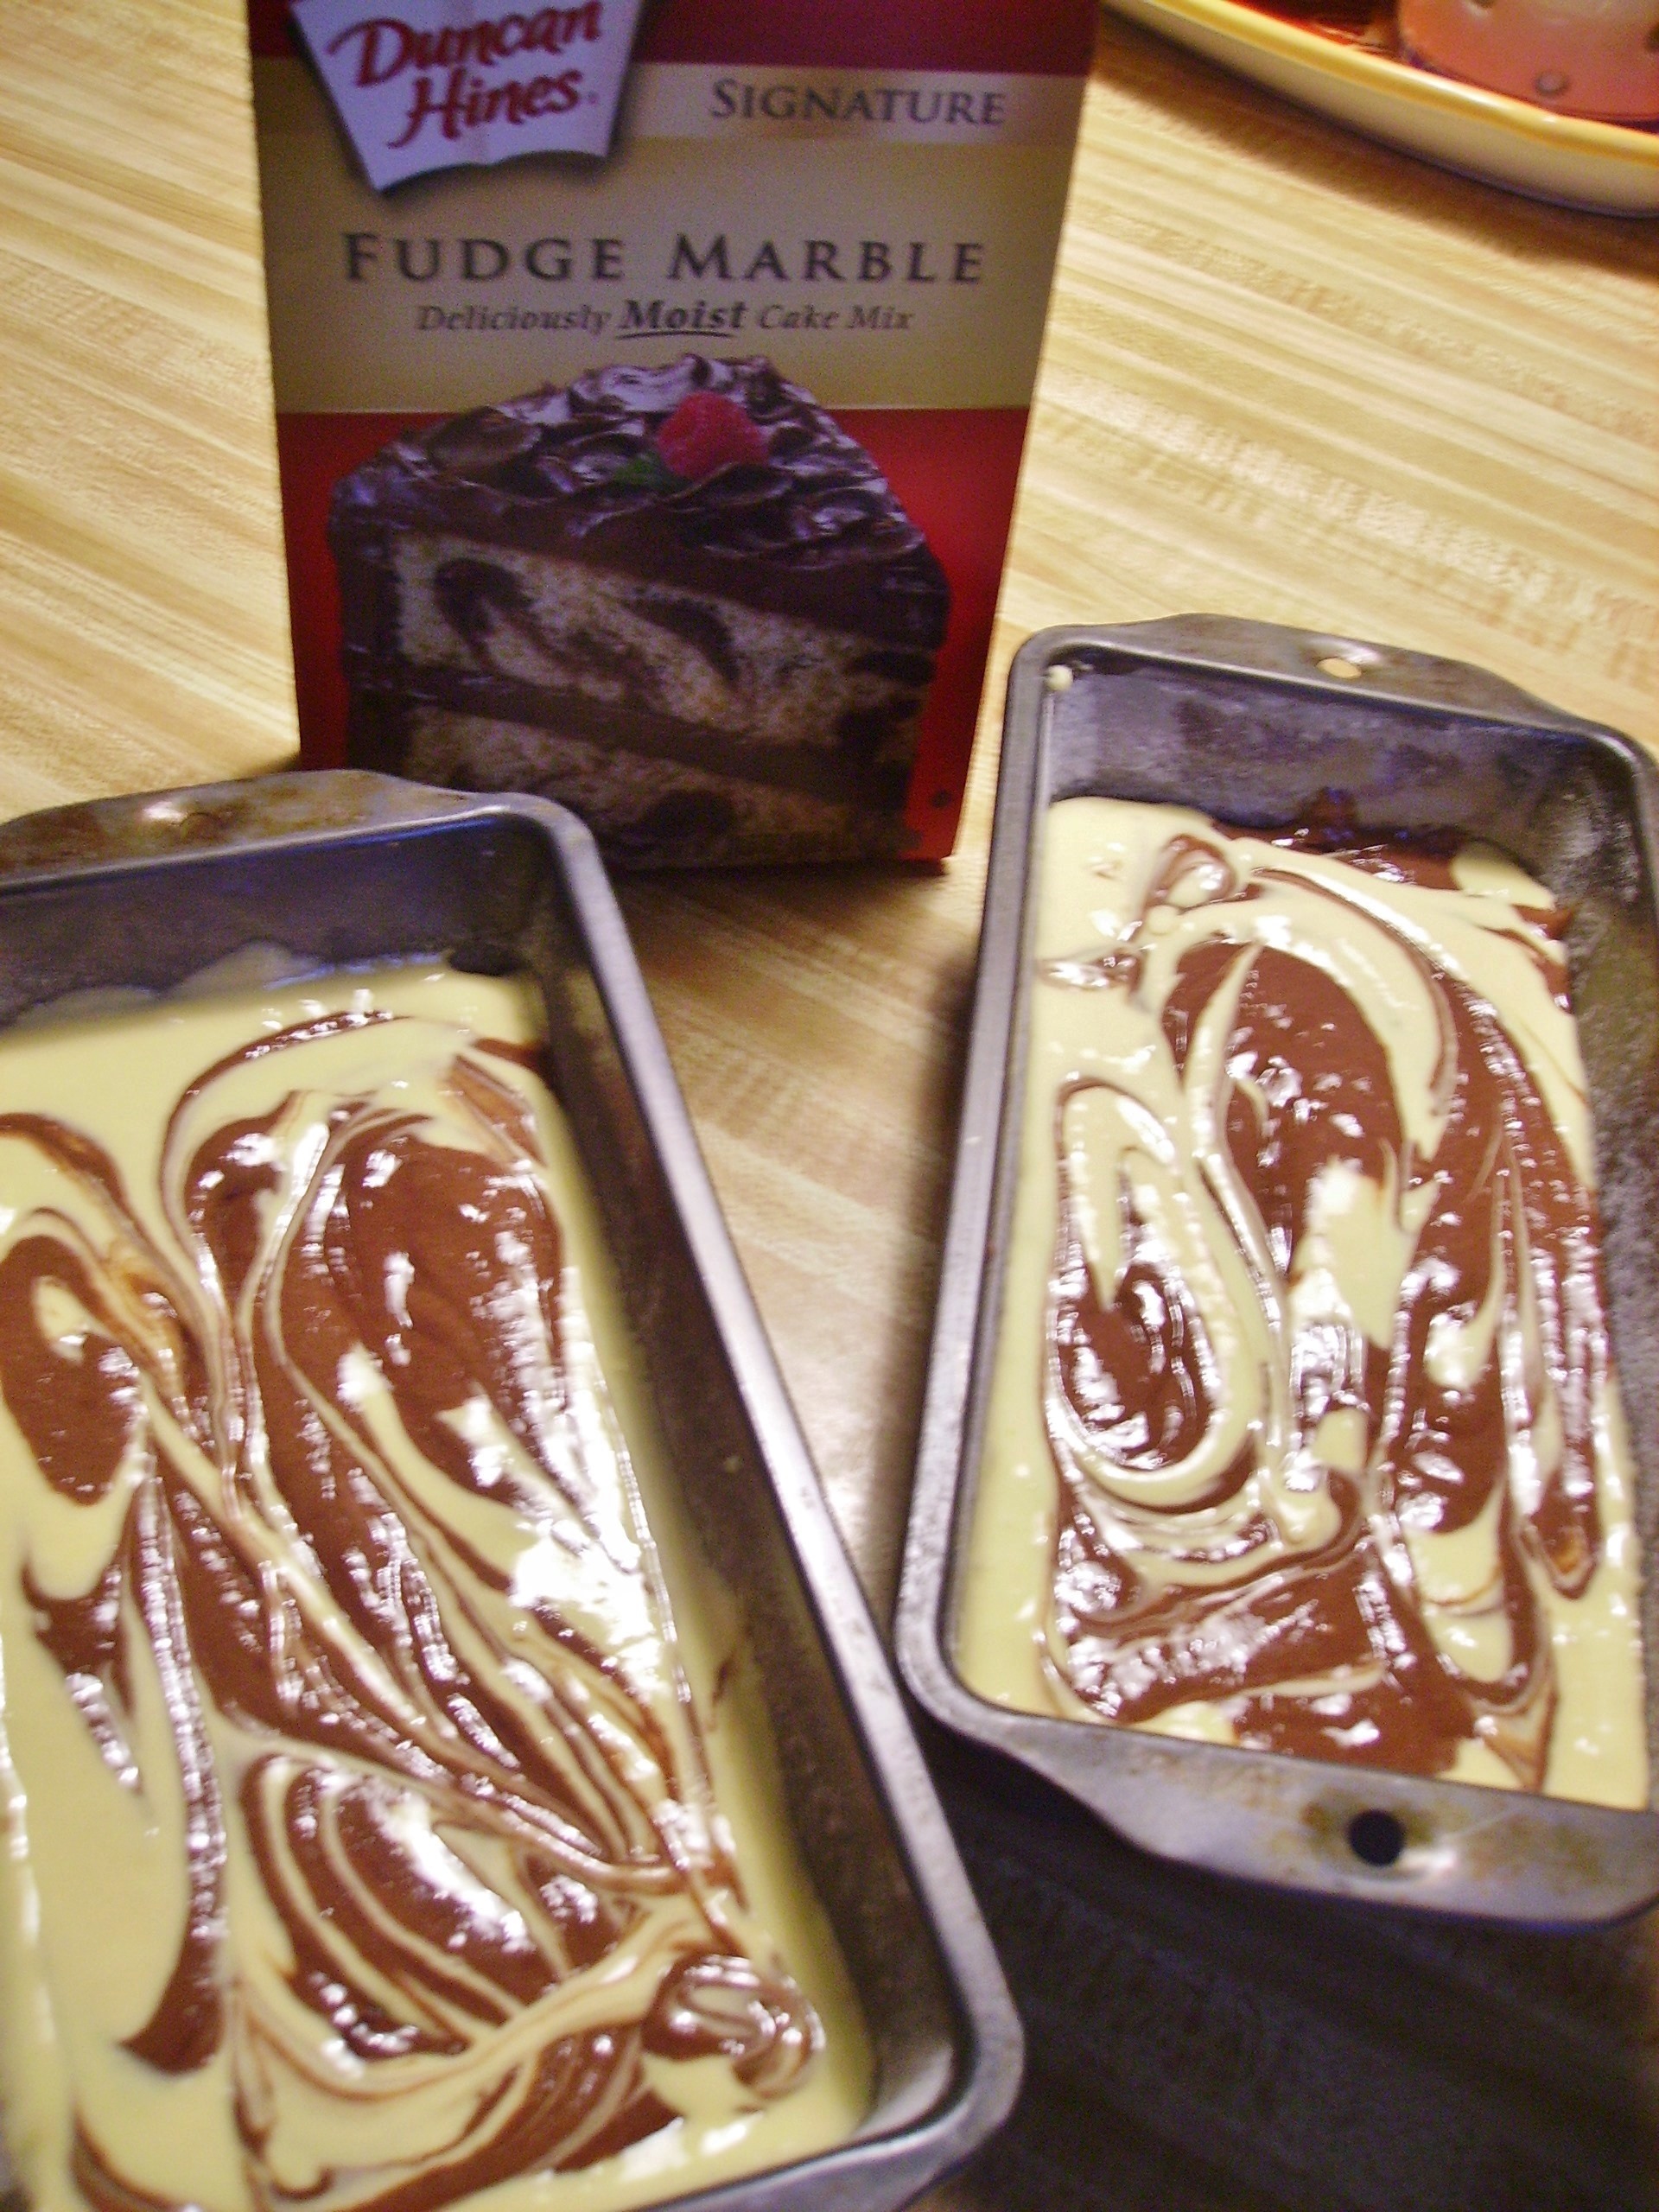
Once baked and cooled they are ready to glaze. Taking a page from my mother’s minimalist tendencies, I chose to leave them “au natural”. This cake is however, wonderful with a chocolate glaze that sensuously drips down the sides of the cake and impresses one and all when it is in the classic bundt shape.DIGITAL CAMERA


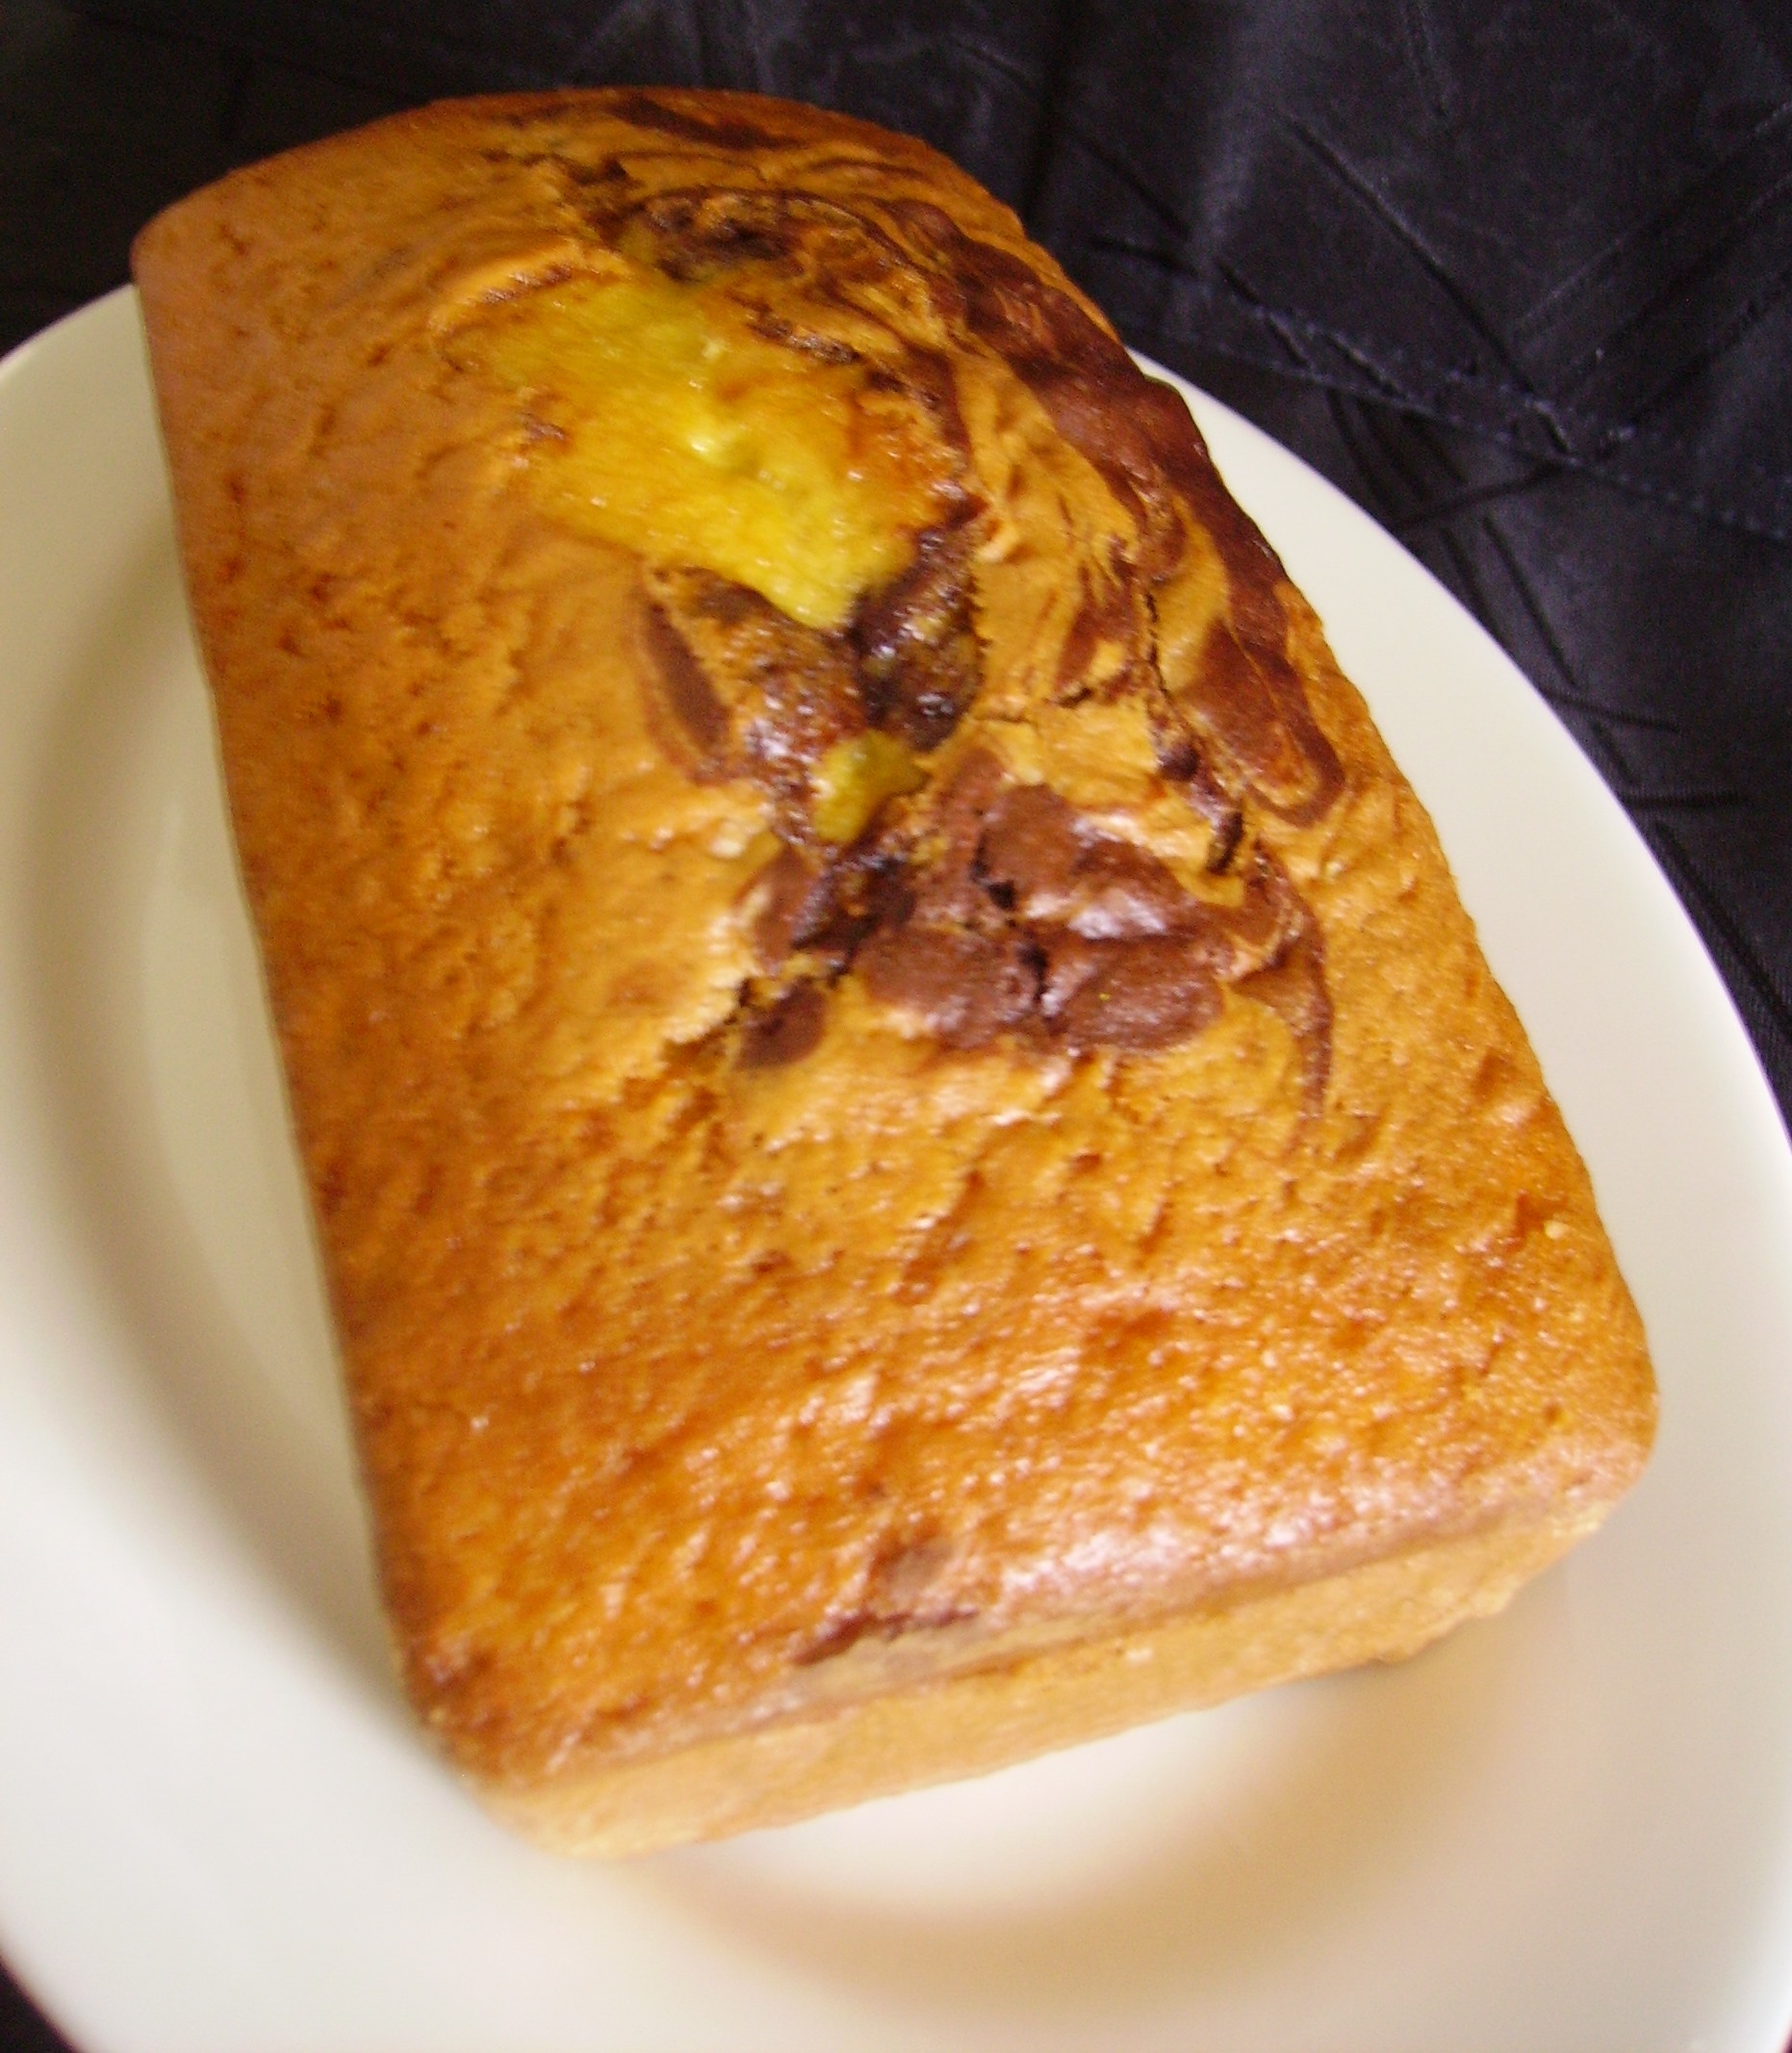
This recipe is fancy enough for company and easy and inexpensive enough for no occasion in particular. It is also open to infinite variations by changing the cake mix or the pudding mix or if you feeling exceptionally randy, adding nuts or chips or …

Marble Pound Cake
Print Recipe
A classic recipe for "bundt cake". Easy to make and adapt for limitless variations. oh, and it's really tasty.
Servings
12 Servings
Servings
12 Servings
Marble Pound Cake
Print Recipe
A classic recipe for "bundt cake". Easy to make and adapt for limitless variations. oh, and it's really tasty.
Servings
12 Servings
Servings
12 Servings
Ingredients
Servings: Servings
Instructions
  1. Pre-heat oven to 350 degrees. Combine the mixes, oil, water, and eggs in a large mixing bowl. Reserve the chocolate cake mix packet for later.
  2. Using a hand mixer, combine the ingredients at low speed until just blended.
  3. With mixer on medium high, blend for 2 - 3 minutes until the mixture is light and fluffy and all the lumps are gone.
  4. Remove one cup of the batter and put in a small bowl. Add the contents of the chocolate packet and stir to completely incorporate.
  5. Prepare pan(s). Spray evenly with cooking spray. Sprinkle approximately 1 tablespoon of flour into each pan and tilt and shake to lightly cover the bottom and sides. Tap out any excess.
  6. Divide the vanilla batter between the two pans. If using the bundt pan pour all of the vanilla batter into the pan and shake and tap to distribute evenly.
  7. Spoon the chocolate batter on top of the vanilla batter. Divide the batter if using two loaf pans or use all of it in the bundt pan.
  8. Using a butter knife, swirl the two batters together, Using vertical and horizontal movements and reaching to the bottom of the pan(s).
  9. Bake for 45 - 50 minutes for loaf pans or 50- 60 minutes for bundt pan. Cake is done when a toothpick inserted in the center comes out clean.
  10. Remove from oven and cool in pans on wire rack for 5 minutes. Remove from pans and cool completed on rack.
Share this Recipe
Powered byWP Ultimate Recipe

 Happy Baking, Mama D

Summer Memories in Winter’s Chill and Balsamic Marinated Chicken

DIGITAL CAMERAWinter…Mother Nature’s sick joke. As most Midwesterners and from what ! hear on the news, 75 – 80 percent of the rest of the country know, Mother Nature has some kind of crazy bug up her bustle. Insane low temperatures, more snow than anyone knows what to do with, and winds that blow that snow around like a demonic snow globe, creating wind chill factors in the negative 30 degree range (Is that a real number?)

Do you remember Summer? You know that time of year when it took 20 seconds to get ready to go outside; basically shorts, a tee-shirt and flip-flops. Once outside you were treated to flowers in brilliant Technicolor bloom, green grass soft and fragrant and sunshine that actually meant something. Summer is more than 125  days away. Winter seems to have hunkered down and shows no signs of going anywhere.DIGITAL CAMERA

I for one am settling in with warm weather memories, especially the Herbs of Summer. I remember those days when I would stroll out on the deck and snip glorious handfuls of basil, chives, rosemary and thyme. Their heady aroma released as they were plucked from a plants that seemed to have an endless supply.DIGITAL CAMERA

The basil and chives are gone now. They never make it past Indian Summer. The thyme and the rosemary are made of hardier stuff. Last year they held on to a bit of green all winter long and showed up in lots of dishes. This year winter hasn’t been as kind to these plants (or anything else for that matter). but I’ve kept them in their pots because they often come back in the Spring. Today I wanted to use some of these herbs in the Balsamic Marinade for my Baked Chicken.

I pulled on my boots, put on my coat, grabbed some gloves and a hat (it took 5 minutes at least) and ventured out to the deck. My rosemary and thyme were dry and brown, but when I gently brushed them there was still the essence of their glorious aroma as the leaves fell off. So I snipped some sprigs, gathered up the fallen leaves and brought them in the house. Washed and dried they gave off a subtle memory of their Summer glory that was still more intense than their dried brothers. They became a part of the marinade.DIGITAL CAMERA

I used a Fig and Orange Balsamic in this recipe but I think that any fruit balsamic would work well. The other main ingredients beside my thyme and rosemary were garlic, olive oil, and McCormick Italian Herb Grinder.DIGITAL CAMERA A few words about this product. It is a blend of many traditional Italian herbs including rosemary, red pepper flakes, peppercorns, garlic, onion, parsley, and sea salt. The salt by the way is subtle. The grinder can be adjusted for fine, coarse or in between dispensing. It packs more punch than regular Italian Seasoning, adding a nice touch to everything from eggs to pasta sauce.DIGITAL CAMERA

This is a Baked Chicken recipe, but when Summer is here or when you feel like braving the elements and firing up the grill, it would be delicious cooked outside.  The chicken can marinate for a few hours or even overnight. I divided the marinade in half. One part for the chicken and the other half for the glaze that would enhance the finished product. DIGITAL CAMERA

It baked at 375 degrees for about 25 minutes. The glaze was the reserved marinade, carmelized shallots, some chicken stock, and a touch of honey. Served with Roasted Fingerling Potatoes and Green Beans with Bacon and Onion, it was a wonderful dinner that I got to share with my husband for a change (gotta love a snow day).

Balsamic Baked Chicken
Print Recipe
Quick and easy recipe for chicken that can be cooked in the oven or on the grill
Servings
2
Servings
2
Balsamic Baked Chicken
Print Recipe
Quick and easy recipe for chicken that can be cooked in the oven or on the grill
Servings
2
Servings
2
Ingredients
Servings:
Instructions
  1. Mix the vinegar, one tablespoon of olive oil, garlic, Italian herb blend, and dried herbs in a small bowl. Put the chicken breasts in a zip top bag and add half of the marinade. Seal the bag and refrigerate for 4 hours or overnight. Reserve the rest of the marinade for the glaze.
  2. When you are ready to cook the chicken. Heat the oven to 375 degrees. Place the breasts in a cooking sprayed shallow pan. Bake until cooked through 25 - 30 miutes.
  3. If you are grilling the chicken. Heat the grill and spray lightly with cooking spray. Add the chicken and grill over medium heat turning once until cooked through 20- 25 minutes.
  4. While the chicken is cooking, prepare the glaze. Heat the remaining olive oil in a small pan. Add the shallots and cook until golden brown, 10 minutes or so. Add the reserved marinade, chicken stock and honey. Heat to boiling. Reduce heat to medium and simmer until mixture is thick and reduced by about 1/3.
  5. Transfer the cooked chicken to the plates and drizzle with some of the glaze. Extra glaze can go in a bowl to be passed at the table.
Share this Recipe
Powered byWP Ultimate Recipe


Ale and Cheddar Cheese Soup with a Noble Cause

I love making soup. It is my go to winter dinner. Since we’ve had more than our fair share of winter this year, I’ve been making a lot of soup. It somehow never gets old, and there is such a wealth of soups to be made and re-imagined.

DIGITAL CAMERAI also love helping my husband make beer. He’s been a home brewer for over twenty years015 and we often have a batch of beer at some point in the brewing process in the basement. I bring this up because I enjoy cooking with beer from time to time.  The beers my husband makes are wonderfully big and hoppy. Great to drink but hard to cook with (not that there’s anything wrong with that).  So most of my beer cooking adventures involve “store bought” brew.

DIGITAL CAMERASoup and beer make for a great pairing. Many a brewpub has an Ale and Cheddar Cheese soup on their menu. Now, Mama D’s Kitchen has one, too. There’s a story that goes with this soup that has to do with the beer. The beer I used to make this is called Blonde Bomber. It is an American Blonde Ale made by Veteran Beer Company. (Check out their website.)


This is a small company currently based in Chicago. The back story however is amazing. The company was started by disabled veterans on July 4, 2012. The executive team lead by Paul Jenkins all had impressive military careers as well as various experiences in the private sector prior to establishing Veteran Beer Company.

First production run 257 (1)They started this company to help eliminate some of the high unemployment rate for veterans by creating meaningful careers for them post service. Another goal of the company is to address many of the other issues that vets face. To this end Veteran employs only veterans and donates 10% of everything to veteran’s causes. Cool, huh? The company is small now, but they plan to employ up to 3500 veterans in the next five years. They run their business adhering to the ideals of the military; integrity, courage, and loyalty.First production run 282

First production run 285The beer is currently produced in Minnesota, but Veteran hopes to eventually have their own facility. They had their first production run in November producing two First production run 249beers: the lovely Blonde Bomber mentioned earlier and The Veteran, an Amber Lager that is also very food friendly. The beer travels from Minnesota and is distributed throughout Illinois and Indiana. Veteran plans to expand to several more Midwestern states in the near future. There are more beers on the horizon as well. Rumor has it that a Black Ale and an IPA will join the ranks. The beers are currently available at most Binny’s Liquor Marts and at many Jewel Osco Stores in Illinois and Indiana.1551563_349202748554842_1586154619_n

It’s a fine product working towards a noble goal. Give it a try. As Veteran Beer Company says, it’s “America’s  Most Important Beer”.

DIGITAL CAMERAI’m still writing a food blog so it’s time to talk about the soup. This rich and hearty soup starts with bacon that browns in a large soup pot. When it comes out, the chicken thigh bits go in and brown in the “bacony” goodness. They come out  along with most of the drippings (which are discarded) before the onion and garlic go in.

The flavors in this soup pack a savory punch that could be DIGITAL CAMERAkicked up if you roll that way. I usually do, but to showcase the beer’s flavor I kept things on the subtle side. Smoked Paprika, Worcestershire Sauce, and Chipotle Tabasco Sauce are the main players. A seasoned salt of your choice ( I used Abilene Depot Steak Seasoning from Caboose Spice & Company) and pepper round out the flavors.

Soup isn’t soup until you add the liquid and to make it thick as well as creamy, a roux. Beer and Chicken Stock go in first and  are followed by half & half (you could also use heavy cream, milk or mixture of them). The final step is to add the cheese. I opted for a medium cheddar, again in order to let the beer take center stage.

DIGITAL CAMERAA bowl of this rich and creamy soup topped with a few pretzel pieces, (after all,  what’s beer without pretzels) makes a great winter supper. All you need to add is a salad and maybe a slice of crusty bread. Needless to say, a glass of beer would be the perfect libation. While we are thinking about beer, many types of beer would work in and with this soup. Use any beer you’d like except light beer which shouldn’t even be classified as beer. Sorry, that’s just an opinion….

Since the Super Bowl is just around the corner, think about serving this at your party. For a fun individual presentation, serve it in mini pretzel rolls. Cheers.DIGITAL CAMERA

Cheddar Cheese and Ale Soup
Print Recipe
Rich and creamy with the bold flavor of craft brewed ale.
Servings
6
Servings
6
Cheddar Cheese and Ale Soup
Print Recipe
Rich and creamy with the bold flavor of craft brewed ale.
Servings
6
Servings
6
Ingredients
Servings:
Instructions
  1. Heat a large soup pot over medium heat. Add the bacon and cook until lightly crisp. Remove from the pan and drain on paper towels.
  2. Add the chicken to the pot and cook, stirring occasionally until cooked through, 7 -10 minutes. Remove from pot and drain on paper towels. Remove all drippings except a scant tablespoon.
  3. Add the onions and garlic and cook stirring frequently until the onion is softened and the garlic is fragrant but not brown. Add a small amount of the chicken stock to the pan to de-glaze it, scraping up any brown bits.
  4. Add the butter to the pot and allow it to melt. Add paprika, salt, pepper, chipotle and Worcestershire sauces. Stir to combine. Add the flour a little at a time. Stirring to combine after each addition. Once the flour is all incorporated, Allow to cook over low heat for a minute or two, stirring frequently.
  5. Add the chicken stock stirring to prevent lumps. Add the beer stirring as with the stock. Bring mixture just to a boil, Reduce the heat and simmer stirring occasionally until mixture thickens, 5-8 minutes.
  6. Add the bacon and chicken back into the pot. Simmer for a few minutes. Add the half & half and continue to cook over low heat until everything is hot and happy. Add the cheese a little at a time stirring until each addition melts.
  7. Ladle into bowls and serve.
Share this Recipe
Powered byWP Ultimate Recipe


Memories of the Wine Country and a Quick Pasta Dish

Note: This is a post from 9 years ago. I brought it up because I made the recipe this week and as it is almost Mothers Day, this dish reminds me of my sons. As the pictures show they were young, They are grown up now with homes and sons of their own ( about the ages they were in these pictures). When I made this I felt that I had to share it with them, photographically speaking. So as any good mother would I sent them a picture. They remembered it all, the trips, the good times, and the dish. A perfect Mother’s Day gift, in my opinion.

Another Note: I must give credit for this recipe to one of my favorite cookbooks, The Frugal Gourmet by Jeff Smith. His recipes featured on the television show of the same name were always tasty, easy, and yes, frugal.

Finally: Happy Mother’s Day to all the women who proudly share the title and job description of Mother. Hope you enjoy this post and your special day.

We were fortunate to live in Northern California for almost 20 years. We took advantage of all the things that the area offered, Trips into San Francisco, camping in the Redwoods, exploring tide pools and of course the Wine Country. All of this, and there was no snow to shovel…Why we came back to the Midwest is complicated. Suffice to say we had our reasons and we have not regretted it.

My sons were born and raised in California. We had no family around so our adventures were always immediate family affairs and that included trips to the Wine Country. Scan_Pic0013Sonoma County was about an hour and a half away. It was a great day trip destination. Back in the 80’s Sonoma was pretty rural. There were a few big wineries and lots of small ones. The small wineries were more like family run farms with the crop being grapes. That actually makes them vineyards, and Sonoma still has some of the best.Scan_Pic0017

Every few months we would take a day trip up to Wine Country. We always did this on the cheap. Back then tastings were free and a bottle of wine was under $10.00 (if we splurged and bought one).  We would visit 3 or 4 wineries and have a picnic lunch overlooking the vineyards.  Lunch was often salami, cheese and crackers; some fruit and cookies for dessert (parent and child friendly and easy to carry in a cooler).

Our sons always found something to do on these trips. They were very adaptable and quickly learned to make their own adventures. Sometimes we even joined in their fun. The time we rented a canoe and paddled the Russian River was memorable for all of usScan_Pic0012

Left to their own devices they always seemed to find something to do. Being treated toScan_Pic0011 some fresh grape juice, skipping stones, playing with the wine maker’s children or playing with the requisite “Vineyard Dog” that seemed to hold court at every winery. Looking back, they mostly remember the adventures and not the waiting for Mom and Dad to finish their wine. At least that’s the way I prefer to remember it; they may have a slightly different take.

The trip home was quiet. The boys would sleep and I would most likely doze off, Jeff, ever the good husband and father got us back across the bridge in one piece (He also took these amazing pictures of the Wine Country). Once home everyone was hungry and getting supper on the table was job number one. That’s how Salami and Zucchini Pasta came to be. It was quick, hearty and everyone liked it. The salami was left over from lunch and the zucchini was usually in the fridge. Pasta, olive oil and garlic…I’m Italian, of course it was in the house.

The most recent time that I made this dish we had been out running “errands” that included picking up our wine at Cooper’s Hawk Winery, so the wine tasting component was there. I used salami that I received in a gift basket from my son. It was made with Chianti so it seemed to fit right in with my the wine tasting memories. Still being Italian, the rest of the ingredients were, once again, already in the house.

DIGITAL CAMERA

The salami and zucchini get cut into match sticks, the garlic gets minced and it all goes into the pan with the olive oil.DIGITAL CAMERA

While the pasta is cooking the cream gets added to the pan, simmering to velvety thickness. DIGITAL CAMERAThis coats the pasta, salami and veggies, resulting in a rich and tasty supper. A little freshly ground pepper and some Romano cheese are all that it needs. We may be far from the Wine Country, but this pasta dish always brings back memories. It also is still a favorite and fast way to create a delicious ending to any busy day. 


Linguine with Salami and Zucchini
Print Recipe
A quick and easy pasta dish that you can whip up after a day in the (Wine) country or a long day of work.
Servings
4
Servings
4
Linguine with Salami and Zucchini
Print Recipe
A quick and easy pasta dish that you can whip up after a day in the (Wine) country or a long day of work.
Servings
4
Servings
4
Ingredients
Servings:
Instructions
  1. Cook linguine in salted boiling water until Al Dente. While the pasta is cooking, heat a large frying pan and add the salami, zucchini, and garlic. Cook, stirring frequently until the zucchini is soft and the salami is slightly frizzled. 7 minutes or so
  2. Add the cream and capers and bring to a hard simmer, stirring frequently. This will prevent scorching. Continue to simmer and stir until slightly reduced. 5 - 8 minutes.
  3. Reserve 1-2 ladles of the pasta water then drain the pasta. Add the drained pasta to the fry pan. Toss to combine the pasta and sauce. Cook for about 3 minutes until the sauce comes together. Add in some of the reserved pasta water if the sauce seems tight.
  4. Add pepper to taste and serve topped with the grated cheese.
Share this Recipe
Powered byWP Ultimate Recipe

The past holds so much for us. It got us to where we are now and in some small way it colors where we will go next. Reflecting on the memories leads to rediscovering good things, like pictures of happy times and pasta that still tastes like love. Mama D


Baked Ham with a Glaze of Love A New Years Tradition

For as long as I can remember, ham has been the dinner of choice on New Years Day. From my childhood when the ham often came out of a can(!!?!!), to my first adventures with a bone in ham, the thing that I remember the most is the glaze. I find it kind of odd because I don’t have much of a sweet tooth and I prefer sweet things as dessert not main dishes. but a sweet and sticky glaze thickly coating the fat layer of a ham is pure pleasure to me.

Back in the 50’s, canned hams were the modern thing. They carved easily into perfect pink file6291252090276rectangles. They opened with a “key” that rolled around the edge of the can making a ribbon of metal that could slice off a finger it you weren’t paying attention. Once you removed the gelatin slime it was ready to be covered with glaze. This was a necessity because naked it was frighteningly unappetizing.

My mothers glazing process was simple. First she would score the surface in a diamond pattern. Then a clove was placed in each cut intersection. She then made a paste of dark brown sugar and yellow mustard and slathered it all over the ham until it dripped down the sides and created a sticky brown oval/rectangular mass. Occasionally there would be cherries or pineapple slices added before it went into the oven to heat for several hours. The ham emerged from the oven looking much like it did when it in, except it smelled sweet and smoky, and the glaze had melted into a shiny brown cloak.

file0001795692878 (1)I loved it. I didn’t know anything else existed. I honestly didn’t know there was anything different until I got married. My mother-in-law made a bone in smoked ham the first time I went to her house for Christmas. The cloves, sugar and mustard were there, but so was a tremendous amount of flavor. It had a different texture, color and to my delight, a thick succulent layer of fat that melted into the glaze to form “ham candy”.

Let’s zoom ahead to the present. Ham’s have come a long way. The varieties available are DIGITAL CAMERAendless. There’s even something called turkey ham that has no resemblance to either turkey or ham.  The bone in ham with only it’s natural juices and the convenience of spiral slicing is my favorite. These are available everywhere from every producer, but I’ve taken a shine to Aldi’s Hickory Smoked Spiral Sliced Ham. It is juicy and tender with a mild sweetness and saltiness. It virtually slices itself and it’s very inexpensive. It comes with a packet of glazing ingredients that I have occasionally used, but I prefer to start from scratch.

DIGITAL CAMERAA glaze needs to be thick enough to well, glaze the ham. It is by nature sweet so it should have a generous amount of brown sugar. Because nothing goes with sweet better on ham than something sharp there should always be mustard of one kind or another. Liquor just makes it better and the flavorings are up to you. You can go spicy, sweet or smoky, even crank up the heat with a chili powder. This recipe is all approximate. Whatever you use, do simmer it for a bit. This allows the flavors to blend, the mixture to thicken and the booze to settle down. Make sure the ham is in the pan cut side down, if not for the whole heating, at least for the glazing.

Ham Glaze (A Formula of Sorts)
Print Recipe
Every ham needs a coat of glaze to bring out it's flavors. This recipe is just a guideline. Glaze is after all a very personal thing. Brown sugar and simmering are the only rules.
Ham Glaze (A Formula of Sorts)
Print Recipe
Every ham needs a coat of glaze to bring out it's flavors. This recipe is just a guideline. Glaze is after all a very personal thing. Brown sugar and simmering are the only rules.
Ingredients
Servings:
Instructions
  1. Put the ingredients you have chosen for your glaze in a small heavy bottom pan. Stir the ingredients together and heat to just boiling over medium heat, stirring frequently.
  2. Reduce the heat to low simmer and cook for 10 minutes or however long it takes for the glaze to reduce and slightly thicken
  3. When your ham is about 20 minutes from being completely heated, remove it from the ovenand raise the heat to 375 degrees. Make sure it is in the pan cut side down and pour about 1/3 of the glaze over the ham. Return to the oven for 5 minutes or so.
  4. Repeat the process of poring on the glaze and returning to the oven two more times. Remove the ham from the oven and let sit for 10 minutes before moving it to a cutting board. Slice the ham and drizzle with some of the pan drippings and serve.
Share this Recipe
Powered byWP Ultimate Recipe

Love, Mama D