Moving Beyond Meatless Monday and a Mediterranean Farro Bowl

Let me start by saying, I am proud to be a carnivore. As this site attests, meat, in all of its forms is my friend, however, there is more than enough room in that  circle of friends for non-meat members. This site can attest to that as well. I’ve often shared recipes that don’t feature beef, pork or poultry in a starring role. Beans, grains, eggs, and dairy are well represented in the Recipe Archive.  Lately I find myself drawn to more recipes that do not feature meat at all. I have completely embraced “Meatless Monday” and I’m working towards Meatless Wednesday or Thursday on occasion.

Speaking of Meatless Monday…how did we come to call it that? We have to look back to both World Wars when rationing food was the law of the land and Meatless Mondays happened in every home. Entering into the new millennium, the concept was revised to improve people’s eating habits. The story goes that Monday being the first weekday was a time to get back on track after a weekend of indulgence. Think of all those diets we’ve started on Monday morning…it kind of makes sense.

Personally, I’m probably in that camp. I tend to eat more on the weekend and often look upon Monday as a clean slate, but that’s not the only reason. Meatless meals tend to be less expensive and some are downright cheap. Especially when there are beans involved. Mama D does have a “thing ” for beans. Soups and chilies of course, but she’s dipped her toe into the pond that is the veggie burger, just look at the Black Bean and Cannellini Burgers from some time back. Besides being low in fat, high in fiber and full of protein, beans are versatile and dare I say (again) cheap.

So, today’s entry into the Meatless Monday category is a Farro Bowl that has a distinctly Mediterranean flair. Farro of course, comes from Italy and many of the other ingredients originate from not too far away in Greece. It has the bright vegetable colors that are featured in both cuisines and then there are those Chick Peas,  Garbanzos, or Ceci, whatever you choose to call them.IMG_1195

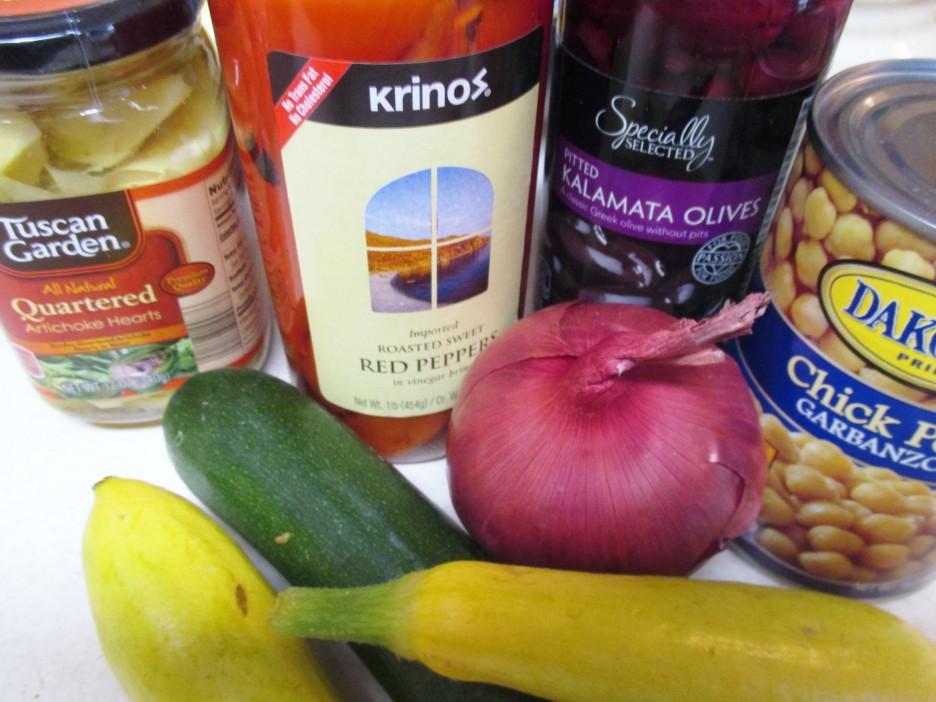
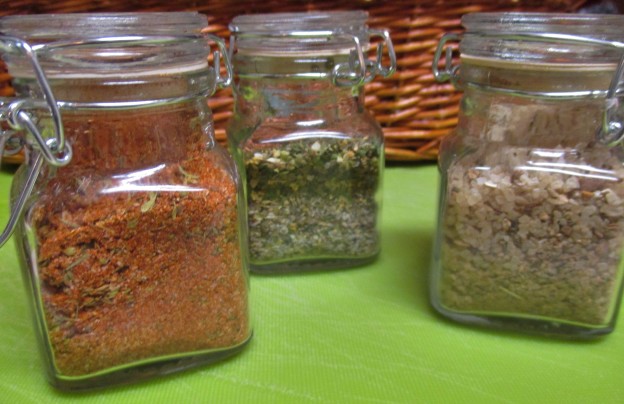
It’s quite an easy dish to prepare. While the farro is cooking, the topping comes together in a skillet. The onions and the squash went in first, followed shortly thereafter by  a little garlic (yes, a little… I know) and the beans. I think that garbanzos taste wonderful when they are cooked to a light golden brown. It gives them a nutty, creamy taste that doesn’t happen with most other beans.IMG_1200As the picture indicates, a good many ingredients came out of jars…not that there’s anything wrong with that. Coarsely chopped, they waited on the sidelines until the time was right.IMG_1202Once the garbanzos and squash were what I considered the perfect color, the rest of the veggies went into the pan.IMG_1205
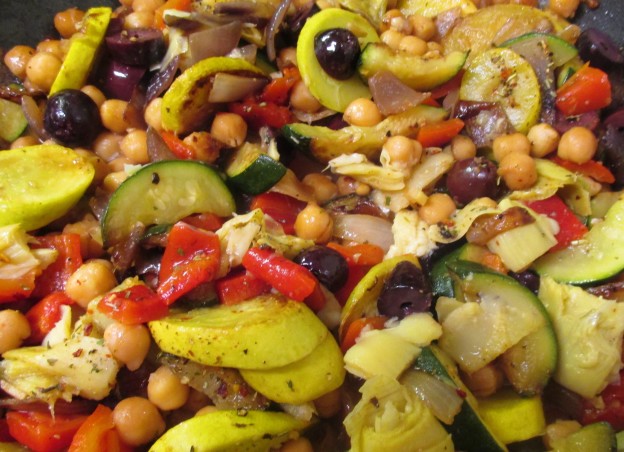
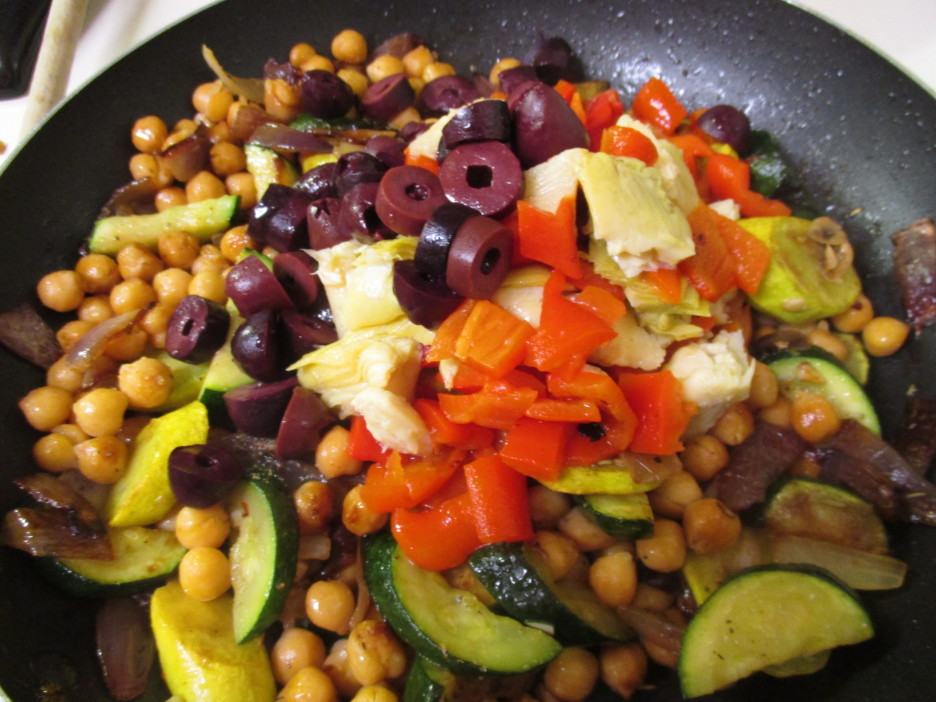
All that was needed now was a little lemon juice, a bit more olive oil, some Italian herb blend and fresh rosemary. The farro created a rich brown bed of grainy goodness (absolutely love this stuff) that cradled the vegetables nobly. Some crumbled feta  sat on top in blinding white splendor. This was truly a meal for the gods…Greek or otherwise.IMG_1213
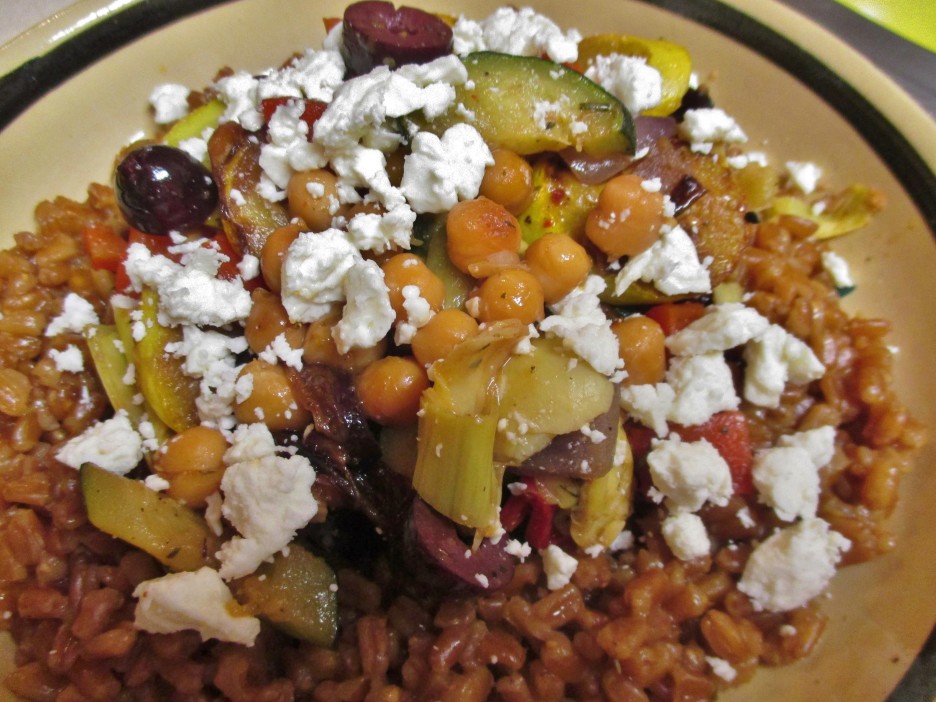
The beauty of this recipe is that is the entry-level to so many other creations. Try it with your favorite veggies and grains; go for a different ethnic flavor; or just give my recipe your own personal spin.

Mediterranean Farro Bowl
Print Recipe
Servings
2
Servings
2
Mediterranean Farro Bowl
Print Recipe
Servings
2
Servings
2
Ingredients
Servings:
Instructions
  1. Rinse farro and drain. In a medium pan, combine the farro with 1-1/2 cups stock and bring to a boil. Reduce the heat and cook until the liquid is absorbed and the farro is as tender as you like. This will take 20 - 30 minutes. While the farro cooks, prepare the vegetables.
  2. Heat a large skillet over medium-high heat. Add the olive oil and swirl to coat the pan. Add the onions and cook for 2 minutes. Add the squashes and the garlic and cook another 2-3 minutes until everything begins to soften and become fragrant.
  3. Add the garbanzos and continue to cook until the beans are beginning to brown. This should take around 5-7 minutes. Make sure you stir often so that they brown evenly.
  4. Add a little of the reserved stock to keep things moving. Add the olives, peppers, and artichokes to the skillet, tossing to combine. Continue to cook for another 4-5 minutes, adding more stock if necessary.
  5. Add the lemon juice, herb blend, and rosemary to the skillet and toss one more time and heat another coupe of minutes.
  6. Divide the farro between 2 bowls creating a little well in the middle. Top each bowl with half of the vegetable mixture. Sprinkle 1 ounce of the feta on each bowl and serve.
Share this Recipe
Powered byWP Ultimate Recipe

The best part of this is you don’t have to wait for Monday to make it. You can go Meatless any day of the week…Can you say Meatless Sunday Supper?

A Spatchcock Turkey Adventure

I know, the holidays are over.  Turkey Day is but a memory and holiday feasts are past. For many the thought of turkey has been put to rest for another year, but not in Mama D’s Kitchen. I was once again given a turkey at work and as the holidays played out I, didn’t have an opportunity to cook it, so the little fella sat in the freezer waiting for the time to be right to bring joy to the table.

That time came last weekend when a cold spell kept us indoors and something from the oven just seemed right. I’ve been intrigued by the idea of “spatchcocking” a turkey. It is somewhat of a trend these days and though it is not my style, I thought I’d take a brief ride on the bandwagon. Little did I know….

Spatchcocking is the act/art of removing the backbone from a fowl, breaking the breastbone and creating if not a poultry pancake, a relatively flat bird. This flat bird has the ability to brown on all skin surfaces and cook in record time. That is, once you have the backbone out. Poultry shears are the tool of choice to accomplish this. Alas, my poultry shears have disappeared. They were my mother’s, and as mothers will do, she created such fear that I might cut off a finger that I put them in a drawer or box somewhere to protect my digits from certain peril and thus lost track of them.

Not to fear (I thought), I had brand new kitchen shears and Papa D (complete with latex-free gloves) to take on the task. This would be quick and easy…not so much. Turkey bones are tough and the process feels a little like surgery gone terribly wrong. After a 30 minute wrestling match the backbone was out and off to the stock pot. Papa D cracked the breastbone with his gloved hands while standing on  a step stool for leverage (I’m  glad the online directions suggested that, and that I didn’t scoff at the suggestion). At last, the bird was laid out to meet its ultimate date with destiny.IMG_1080
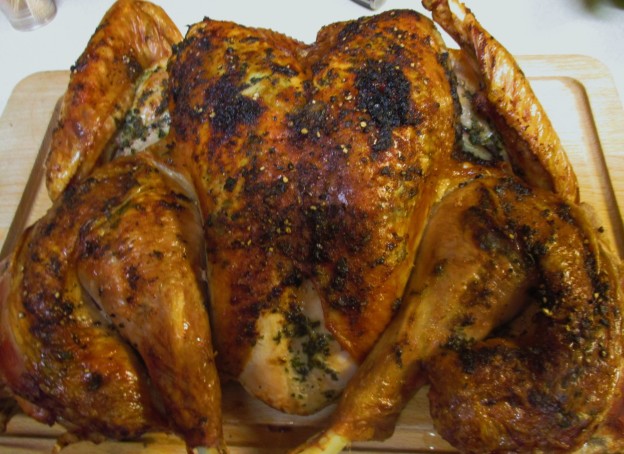
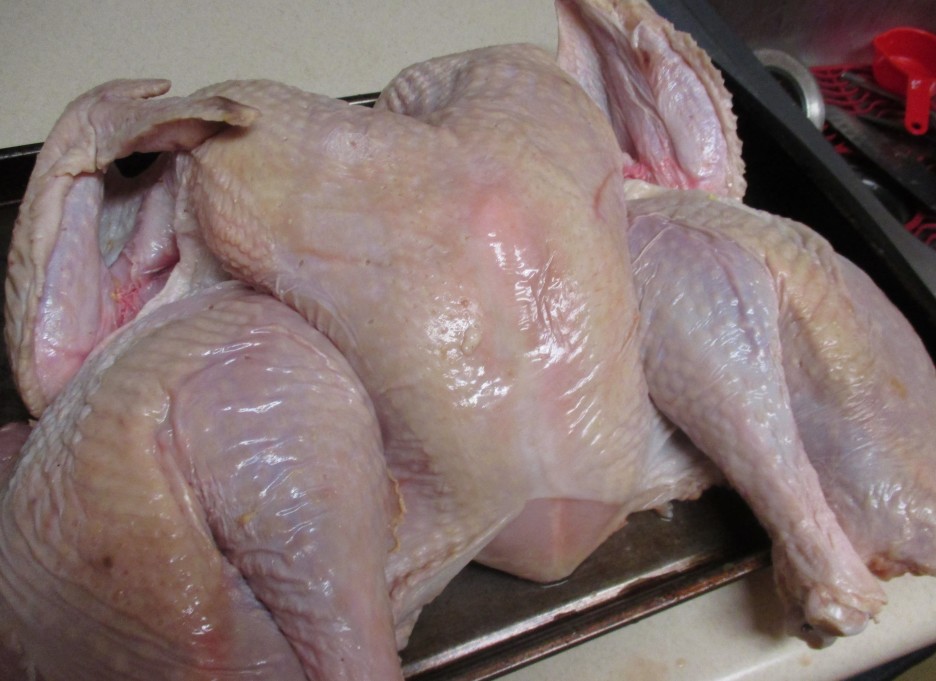
To make sure he would retain his innate moistness, I coated him with herb laced butter and olive oil, making sure that he was well lubed under the skin as well. Finally he was ready for the oven.IMG_1083
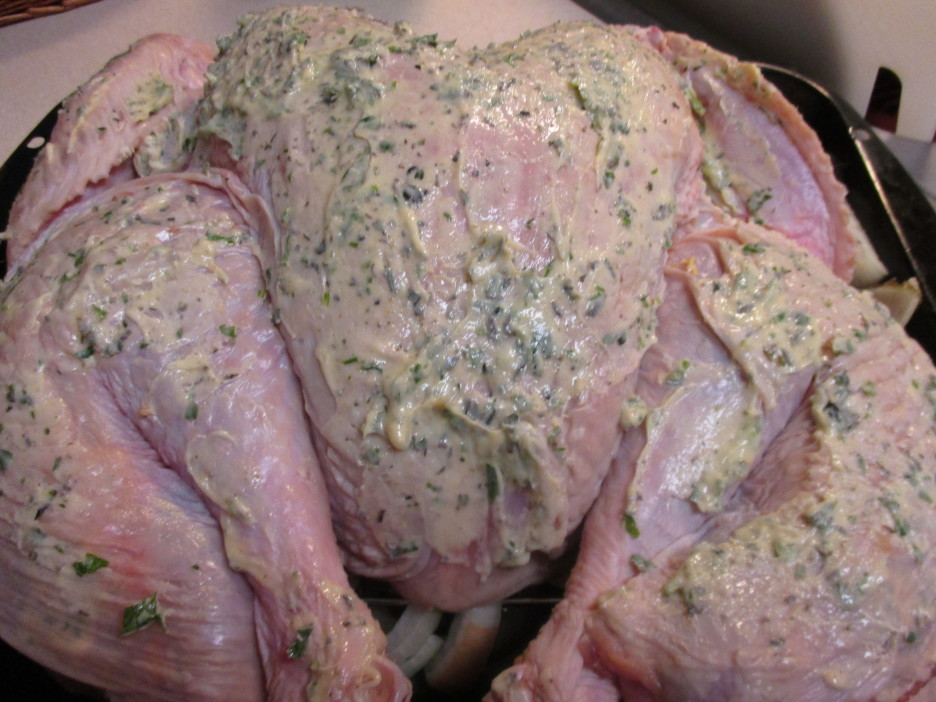
An hour later he was beautifully golden and at the correct internal temperature. After a bit of a rest the bird was carved with the greatest of ease and became the star attraction of a wonderful meal. Will I do this again? Absolutely. Will I invest in poultry shears? Damn skippy.IMG_1100
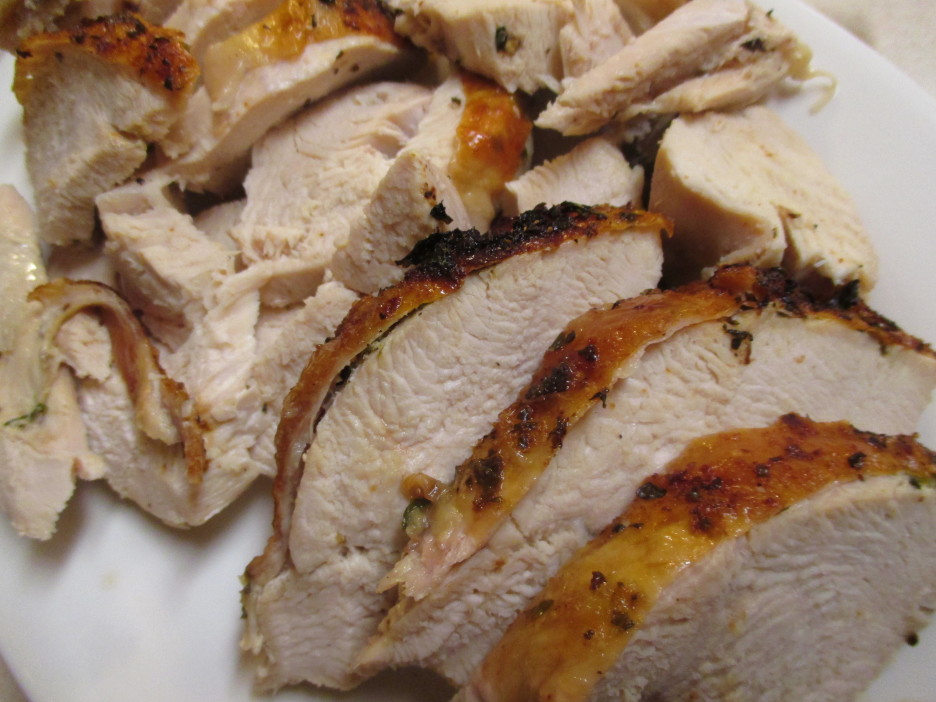
As with every turkey ever served there was an abundance of leftovers. There were sandwiches and salads and care packages to the children, and I still had enough left to create a casserole. I decided to make my version of Chicken Divan. This casserole from the 50’s features broccoli, and chicken in a creamy cheese laced sauce. I elaborated on the idea by switching the protein to turkey and adding mushrooms, garlic, and shallots to the sauce.IMG_1114
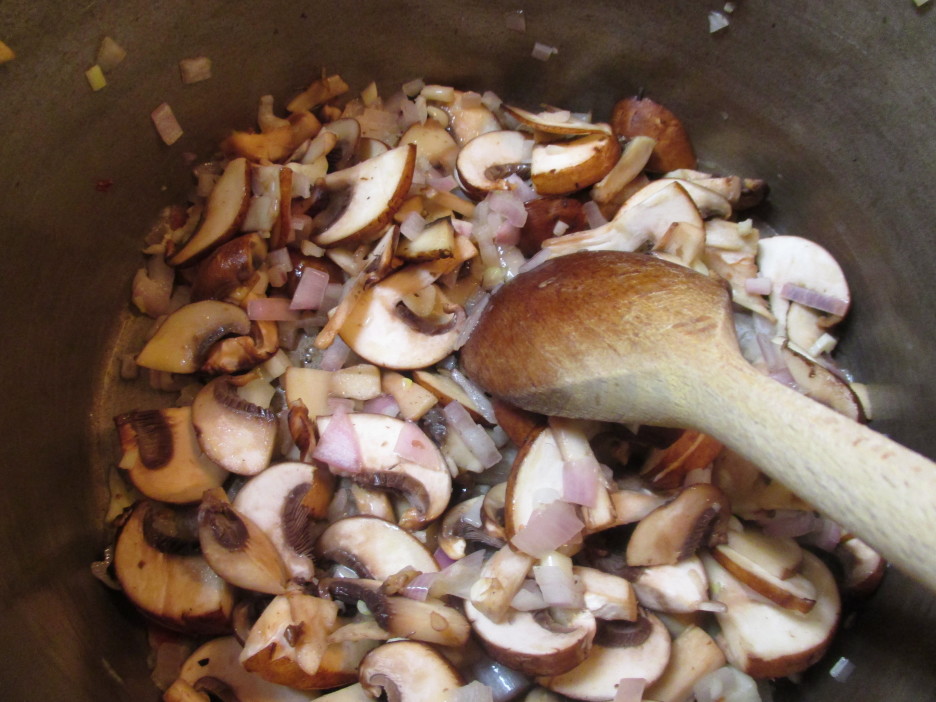
Milk, turkey stock, and a touch of sherry were the liquid base of the sauce. Herbs de Provence and Dijon mustard bumped up the flavor and created a sauce that beautifully coated the broccoli and turkey.IMG_1121

A cheese laced panko crumb topping ensured that it would emerge from the oven golden and delicious. And it did.IMG_1126
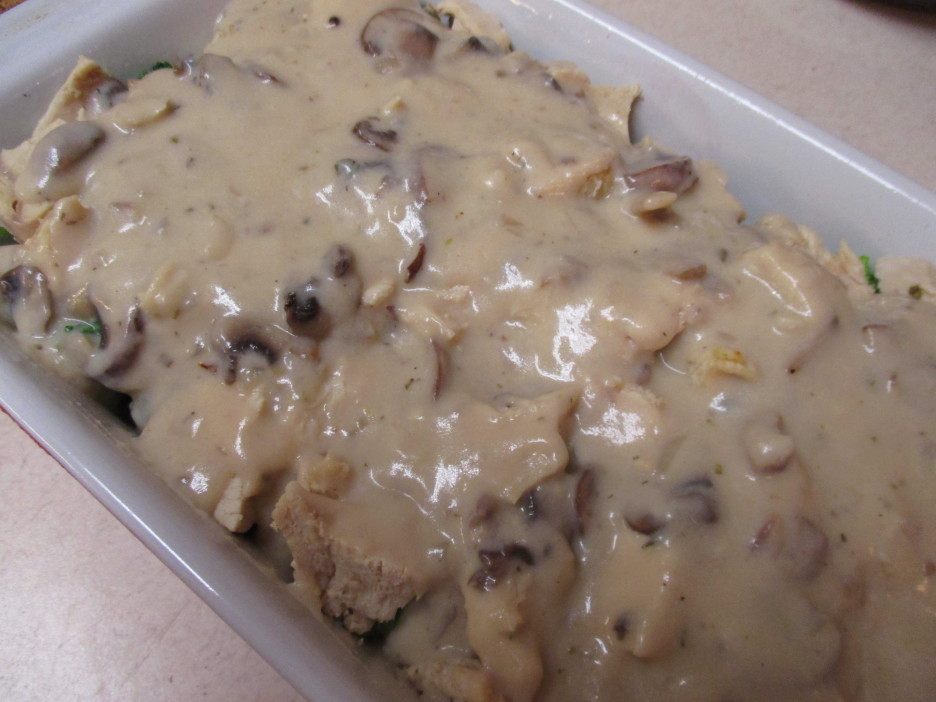
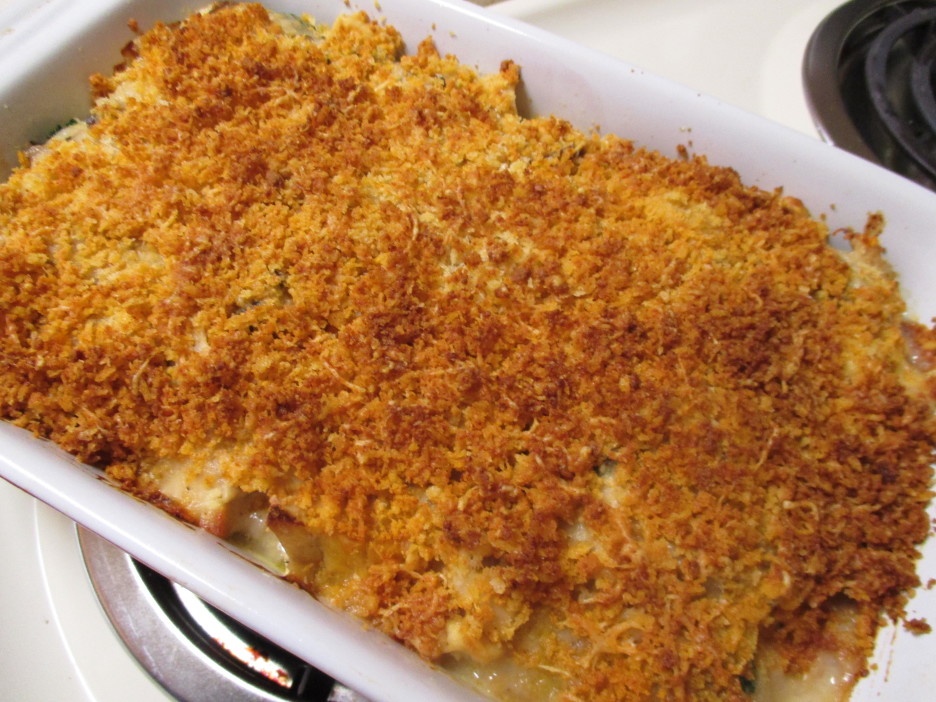
I made a casserole that served three generously. An odd number, I know, but it makes a lovely dinner for two and some lucky person gets a fabulous lunch the next day. If you have more mouths to feed, you can easily double this recipe.IMG_1129

Turkey Divan
Print Recipe
This is a rich and hearty casserole that works just as well with chicken.
Servings
3
Servings
3
Turkey Divan
Print Recipe
This is a rich and hearty casserole that works just as well with chicken.
Servings
3
Servings
3
Ingredients
Servings:
Instructions
  1. Blanch and shock the broccoli: Cook the florets in boiling salted water for about 1 minute. Remove to a bowl of ice water to stop the cooking. Drain well, pat dry, and place in a single layer in a baking dish that has been lightly coated with cooking spray.
  2. Layer the turkey on top of the broccoli.
  3. In a medium saucepan, melt the butter and olive oil together. Add the mushrooms. shallot, and garlic and cook stirring frequently until everything is soft and fragrant. This should take 5 - 7 minutes.
  4. Add the sherry to the pan and sprinkle the flour in as well. Whisk constantly to keep things smooth and allow to cook for 2 minutes. You will have a thick ball of stuff.
  5. Add the stock and milk a little at a time as you continue to whisk. The goal is to get all the liquid incorporated without creating lumps. Bring to a boil.
  6. Reduce the heat slightly and continue to cook and stir until the mixture thickens, about 4 - 5 minutes. Stir in the mustard and herbs. Remove the pan from the heat.
  7. Add about half of the grated Swiss cheese and stir until it melts Taste and add salt and pepper as needed. Pour the sauce over the broccoli and turkey.
  8. Combine the remaining Swiss Cheese with the Parmesan and panko crumbs. You can add a drizzle of olive oil if it seems too dry.
  9. Sprinkle the crumb mixture evenly over the casserole. Spray lightly with cooking spray and bake at 350 degrees for 30 -35 minutes. The crust should be golden and everything else should be bubbly.
  10. Allow to rest for 5 minutes or so before serving.
Share this Recipe
Powered byWP Ultimate Recipe

The original Chicken Divan would make an equally delicious dish, and unless you have a whole turkey lying around just waiting to be given the ” spatchcock treatment”, it might be a more practical choice. (I bet it’s a whole lot easier, too.)

A New Year…A New Project…A New Pasta

We are already a week into the new year. I’ve decided that I want to challenge myself to be more mindful of the food I create this year. I know that every dish that I make doesn’t need to have its own moment as the star of a post, but I thought that I would try to catalog each dish that I create with a picture and a brief description. I will admit that this is partly to help me keep track of what I make, my memory, after all, isn’t getting any younger. You need have no fear of being overwhelmed with posts because I will only be sharing some of them in detail.  Bear with me this first week, I’ll share several of the plates that graced our table and yes, there will be a recipe (just one) at the end.

We started the year off with what I think was a wonderful NYE dinner. Yes it was technically 2015, but I wanted to set the tone for the coming year and no it does not mean that we will eat like this on a regular basis. We had Surf, and Turf, and Turf.IMG_0998

A small lobster tail, a bacon wrapped filet, and a lamb chop all were grilled to perfection by Papa D. Proscuitto wrapped asparagus and sautéed grape tomatoes completed the plate. We said goodbye to the old year with full and happy stomachs….

With the meat feast behind us we entered into the new year. Continuing on the theme of healthy vegetable forward meals, I turned 8 ounces of pork into  colorful kabobs that  were as tasty as they were healthy. Peppers, onions, yellow squash, and potatoes were marinated and grilled before they came to rest on a bed of sautéed spinach.IMG_1012

I plan to keep “Meatless Mondays” on the menu. I may even throw in a Meatless Wednesday or IMG_1033
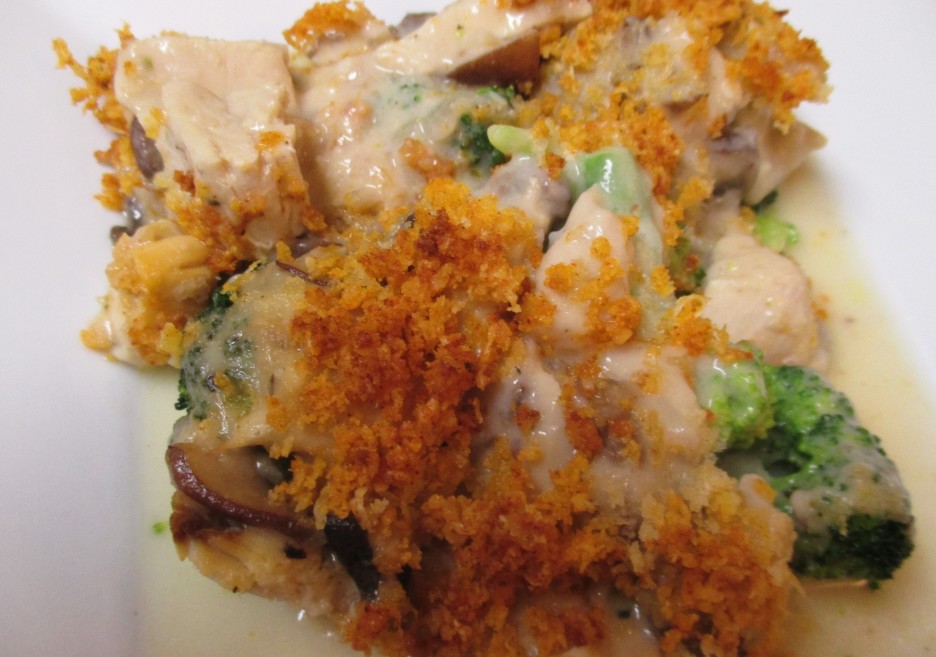
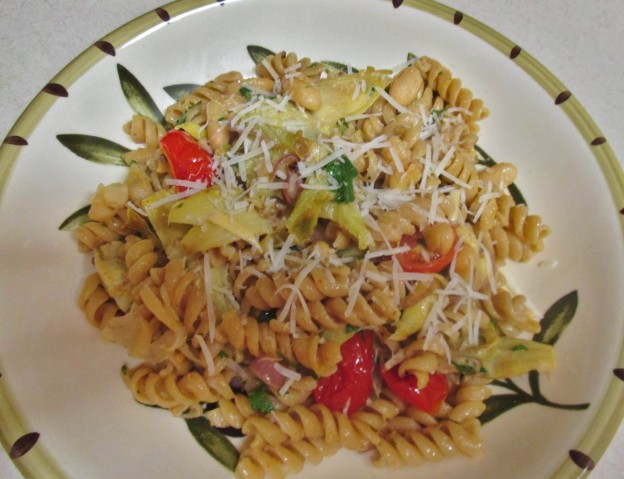
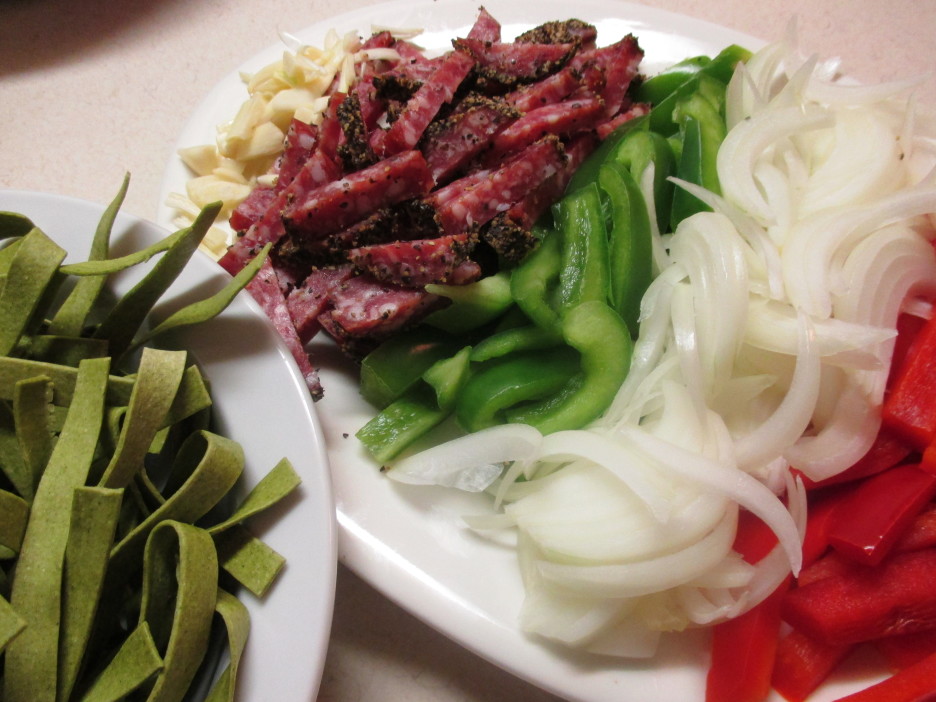
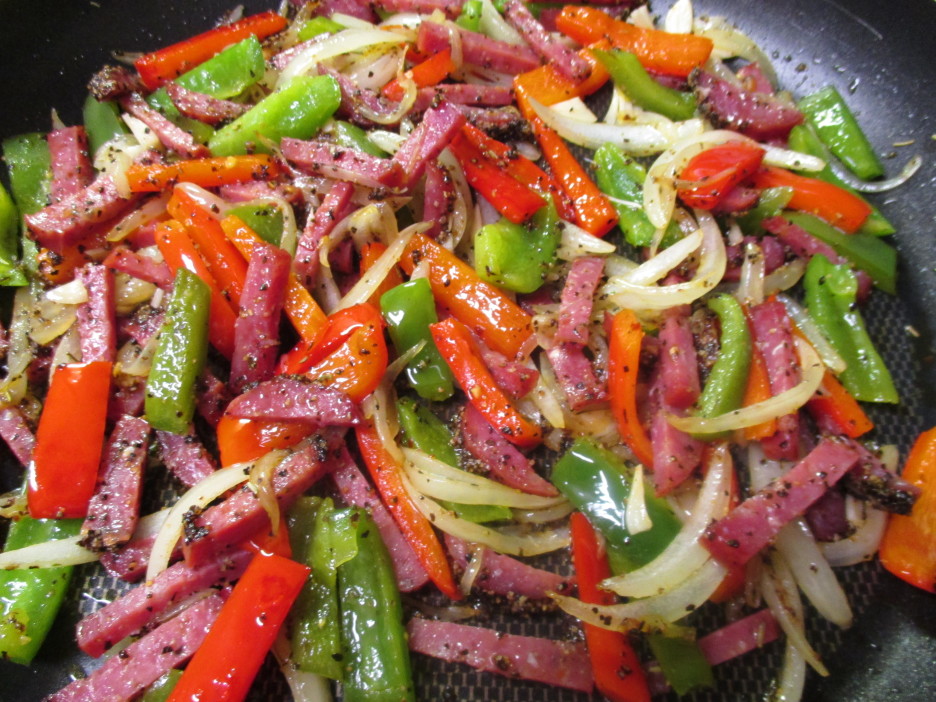
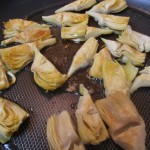
Thursday from time to time. Our first Monday Minus Meat was a pasta dish that featured Artichokes and Cannellini Beans with Whole Wheat Rotini. I started with a can of whole artichoke hearts. I prefer these because they hold together better than the quartered variety and you can cut them to the size that works for you. In this case, I quartered them (ironic, huh?) before I browned them in a skillet with olive oil. Frozen hearts are another good option, but unless you are near a Trader Joe’s, you may not find them. Of course, if you can find fresh baby artichokes that would be wonderful…I didn’t have any luck with that, either, but I did have the can of hearts in the pantry.

Mama D’s Trinity went into the pan. This time the onions were red and the garlic was sliced. I cut all the grape tomatoes that I had in half and added them to the pan along with the drained and rinsed beans. I added a generous splash of vegetable stock to keep everything lubricated. The sauce would later be bulked up with a cup of the pasta water. I added some red pepper flakes and fresh parsley to seal the deal. Then I let it rain Pecorino Romano Cheese.IMG_1043

This dish will feed two lavishly with enough left over  for someone to have a nice lunch the next day.IMG_1045

Pasta with Artichokes and Cannellini Beans
Print Recipe
Servings
3
Servings
3
Pasta with Artichokes and Cannellini Beans
Print Recipe
Servings
3
Servings
3
Ingredients
Servings:
Instructions
  1. Cook the pasta according to the package directions minus a minute or 2. While the pasta is cooking, make the sauce.
  2. Add 1 tablespoon of the olive oil to a hot skillet. Place the artichoke hearts in a single layer in the pan. Cook until lightly brown, turning as needed, 4-5 minutes. Remove from the pan and set aside.
  3. Add the remaining olive oil to the pan and add the onions and garlic. Cook a few minutes until they soften and smell wonderful.
  4. Add the beans and tomatoes and toss to combine. Add the vegetable stock and cook for 4 minutes or so. If the mixture seems dry, add a little more stock.
  5. Return the Artichokes to the skillet. When the pasta is cooked, reserve one cup of the pasta water. Drain the pasta and add to the skillet.
  6. Add the pasta water, parsley and pepper flakes to the skillet along with the cheese. Toss everything to combine and allow to cook for another few minutes until the cheese has melted.
  7. Serve with more cheese to add at the table.
Recipe Notes

Share this Recipe
Powered byWP Ultimate Recipe

The new year will hold many new adventures and many of them will happen in the kitchen. There will hopefully be a little travel, a lot of family time, and of course, lots of love.

One More Post ….Spinach Fettuccine with Peppers and Salami

This year has flown by. So much has happened that it’s hard to believe that it has only been a year. It’s been a year filled with many good things. The bad things weren’t really bad, just things that happened for the best, as my mother always said. We buried two cars, but got two very nice sensible ones to replace them. We continued at our part-time, semi-retired, jobs and were able to drive to Florida for a long overdue visit with family. We now know that we really like apartment living and have only replaced a few things that we got rid of too hastily. Oh, and the kitchen has been full of love and the recipes I’ve shared have been stellar examples of that. Here’s one more ….

We had lots of leftovers from Christmas Eve and the time had come to use them or loose them. A few carefully chosen items went into this pasta dish. It was simple, easy, and oh so tasty. It was also a riff on another quick pasta dish that I shared long ago…I think I might like this new version even better. Red and green bell pepper strips joined some peppered salami to become a decadent sauce for some spinach fettuccine.IMG_0958

The rest of the ingredients were standard fixtures in the Kitchen of Love…Mama D’s Trinity joined in and  got the party started.IMG_0966
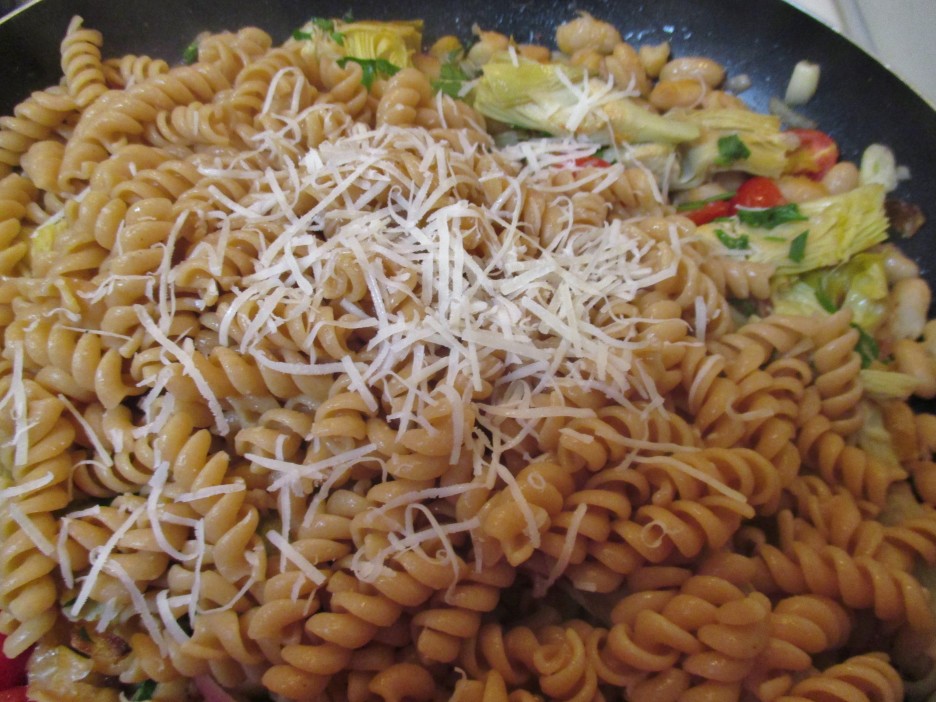
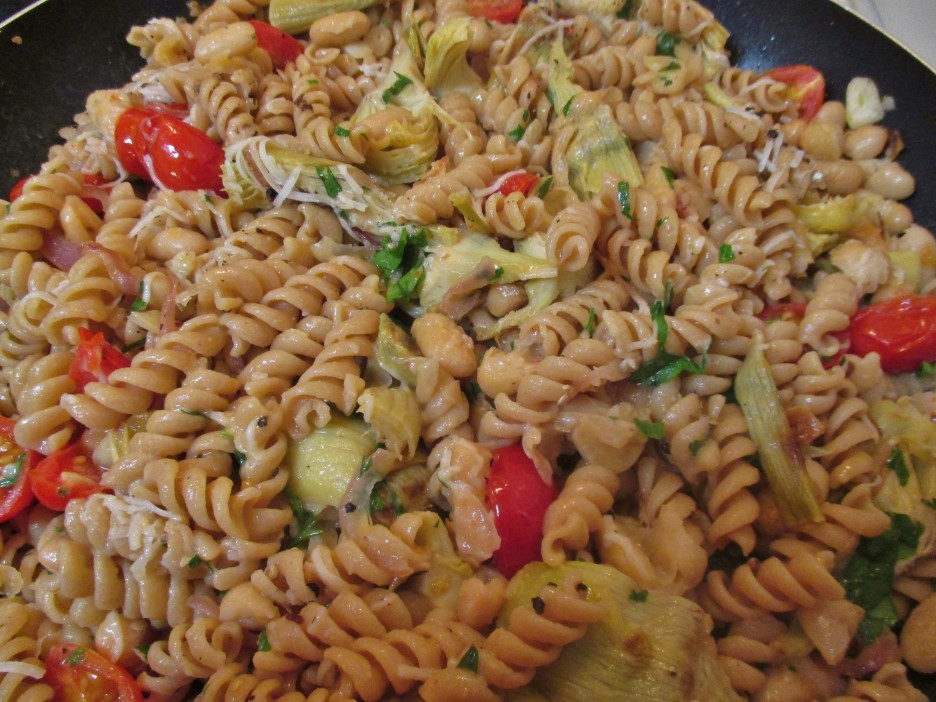
A touch of heavy cream and some milk created a sauce that enveloped the dish luxuriously.IMG_0979
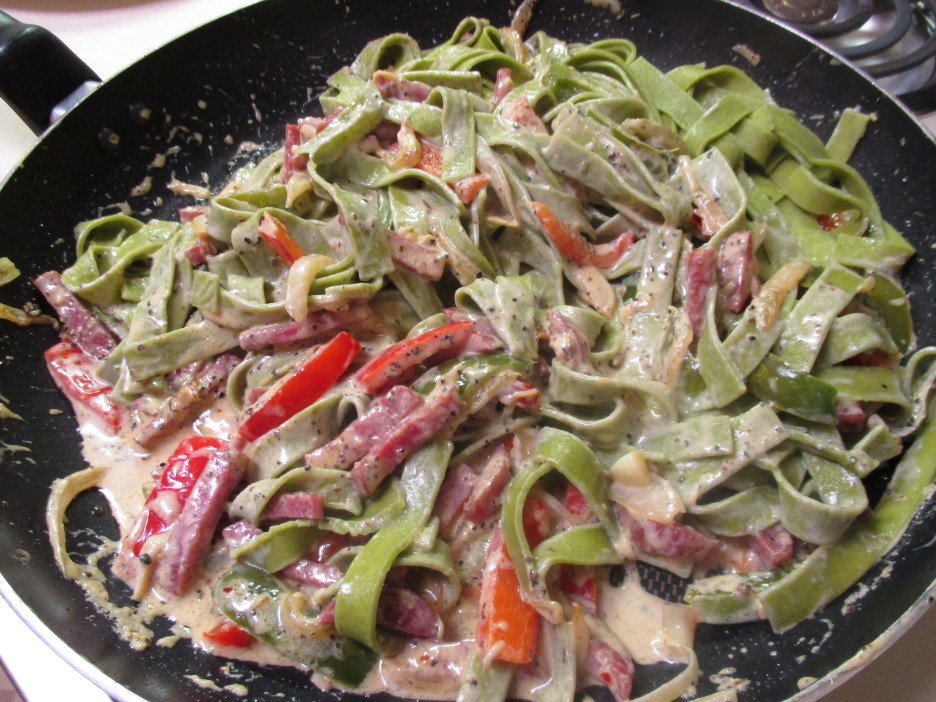
A generous sprinkle of Pecorino Romano and it was ready to eat.IMG_0982
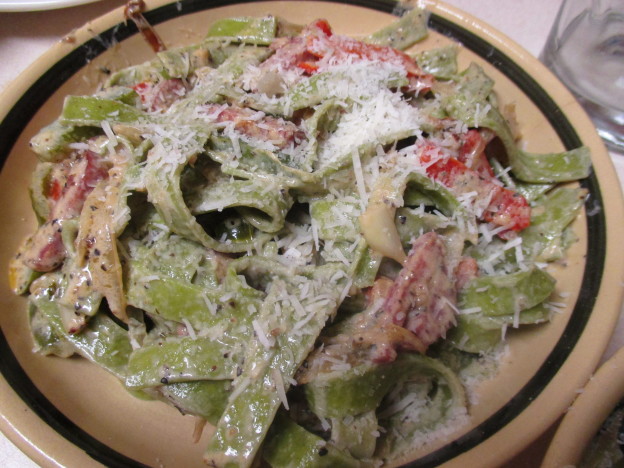
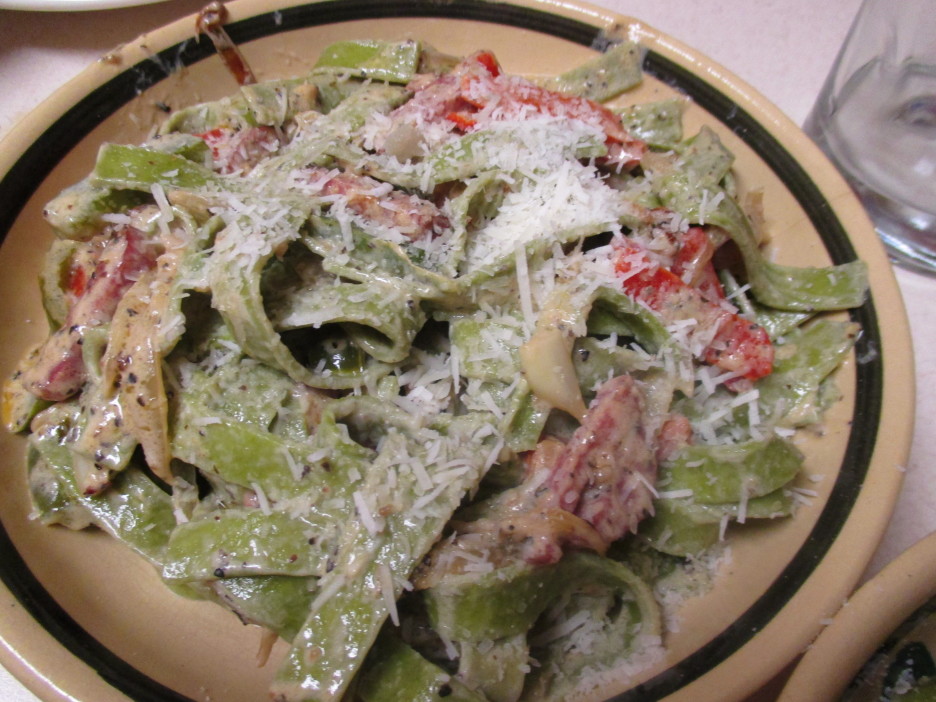
And eat it we did, Papa D and I. We ate it all…the New Year will be here soon and we’ll focus on the healthier side of the kitchen again. Right now, this was the perfect dish to warm a Winter’s Night that finally felt like a Winter’s Night.

This recipe was literally made with what was on hand. Quantities could go in any direction that works for you. I used a combination of milk and cream because I only had a little cream. More cream would be delightful, if you dare. I aimed to keep the peppers onions and salami in similar size pieces mostly because it’s easier to eat that way. So, without further ado, here’s a simple way to say goodbye to the year.

Spinach Fettuccine With Salami and Peppers
Print Recipe
Servings
2
Servings
2
Spinach Fettuccine With Salami and Peppers
Print Recipe
Servings
2
Servings
2
Ingredients
Servings:
Instructions
  1. Cook the pasta in salted boiling water 1 minute less than package directions. While the pasta cooks, prepare the sauce.
  2. Heat the olive oil in a large skillet over medium heat. Add the onions and peppers and cook for 7 - 8 minutes, until the onions are golden and the peppers are soft.
  3. Add the salami and the garlic and cook another 3 - 4 minutes.
  4. Pour in the milk and cream and simmer for 5 minutes or so until the sauce thickens slightly. Stir in 2 tablespoons of the cheese and continue to cook until the cheese melts.
  5. Drain the pasta and add it to the skillet. Toss to coat and cook for a minute or two more.
  6. Divide the goodness into two pasta bowls. Sprinkle one tablespoon of the cheese on each bowl and serve.
Share this Recipe
Powered byWP Ultimate Recipe

The coming year will hold many wonderful things, including the arrival of our third grandson. I know there will be new adventures in the kitchen and in the world. I’ll be sharing the best of everything with you. That’s part of my resolution…to be grateful for the best year yet, and to share my gratitude with my friends… Happy New Year!

                                                              Love, Mama D


Savory Seasoning Trio

“Omne trium perfectum.” Latin scholars know that this means that three makes a perfect set.  That may or may not always be the case, but in Mama D’s Kitchen a set of three makes a very nice gift.

I love to bake and cook at the holidays…giving homemade gifts is something that I have done for years. It never gets old, though the variety and quantity changes from year to year. As I planned out what to make this year, things kept coming up in groups of three. Cookies, chocolate bark, and savory snack mixes all came out in threes. I hope to share many of these “perfect sets” with you and I’m starting with a trio of seasoning blends.

I love lemon. It is bright in taste, its acidity brings out the best in many dishes, and it just looks pretty. This Lemon and Herb blend uses dried fresh lemon zest at center stage. IMG_0899
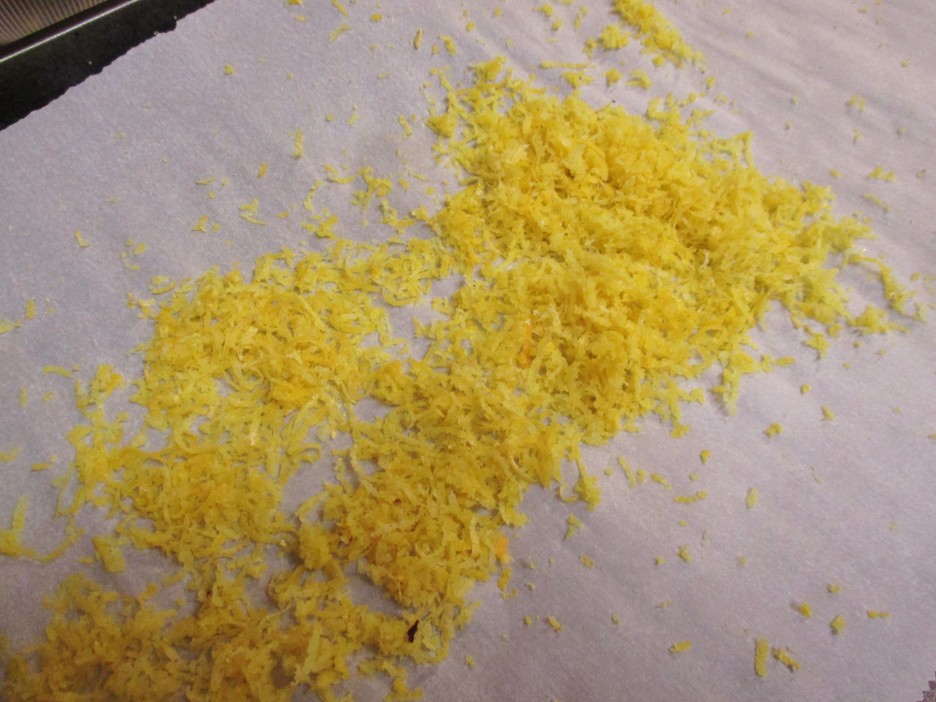
Six large lemon gave up their vivid yellow dresses to make enough zest for the recipe. The naked lemons then were squeezed to yield a hefty cup of juice that thanks to the freezer will be flavoring many a dish to come. Once the lemon peel was dry, it joined a fragrant array of herbs to become a wonderful seasoning.

Lemon Herb Seasoning
Print Recipe
Servings
4 Ounces
Servings
4 Ounces
Lemon Herb Seasoning
Print Recipe
Servings
4 Ounces
Servings
4 Ounces
Ingredients
Servings: Ounces
Instructions
  1. To dry the Lemon Zest: Spread the zest of 5-6 lemons on a baking sheet lined with parchment paper and allow to air dry for 24 hours.
  2. Combine the dried lemon zest with the rest of the ingredients. Spoon into spice jars and cover tightly.
Share this Recipe
Powered byWP Ultimate Recipe

Cajun flavors are always a spicy boost to many dishes whether they come from New Orleans or not. I like a Cajun blend that features plenty of the pepper trio; white, black, and red (a.k.a. cayenne) and lots of dried thyme. This delivers on both of those fronts with more than a token dose of onion and garlic. You know that you can always play with the amounts here to suit your own taste. Try it on fish or chicken to bring a bold taste to a simple protein.

Last, but not least, Porcini Rosemary Salt is making a return appearance. It’s divine on steak, but is wonderful in soups and pasta sauces as well.DIGITAL CAMERA

Porcini and Rosemary Salt
Print Recipe
This is a perfect seasoning for steak, but it is wonderful on eggs, in soups, or anywhere you want a subtle mushroom flavor. This is a lovely Hostess gift, but save some for yourself.
Porcini and Rosemary Salt
Print Recipe
This is a perfect seasoning for steak, but it is wonderful on eggs, in soups, or anywhere you want a subtle mushroom flavor. This is a lovely Hostess gift, but save some for yourself.
Ingredients
Servings: Cups
Instructions
  1. Put all ingredients in the bowl of a processor. Pulse until everything is ground. This will take a bit of time. The porcini will not completely grind so the end product will have small bits of mushroom, which makes it even more delicious. Store in airtight containers.
Share this Recipe
Powered byWP Ultimate Recipe

These three seasoning blends make a wonderful gift for anyone who spends time in the kitchen, and don’t forget to save a jar of each for yourself.